|
Subject |
This document covers all the phases of the SafeKit implementation: architecture, installation, tests, administration & troubleshooting, support, and command line interface. |
|
|
Intended |
Architectures |
|
|
Installation |
||
|
Console |
||
|
Advanced configuration |
Cluster.xml for the SafeKit cluster configuration Userconfig.xml for a module configuration |
|
|
Administration |
||
|
Support |
||
|
Other |
||
|
Release |
SafeKit 8.2 |
|
|
Supported OS |
Windows and Linux; for a detailed list of supported OS, see here |
|
|
Web Sites |
Evidian marketing site: http://www.evidian.com/safekit Evidian support site: https://support.evidian.com/safekit |
|
|
Ref |
39 A2 38MC 04 |
|
|
If you have any comments or questions related to this documentation, please contact us at https://www.evidian.com/company/contact-evidian/ |
||
The trademarks mentioned in this document are the propriety of their respective owners.
No part of this publication may be reproduced, stored in a retrieval system or transmitted in any form or by any means, electronic, mechanical or otherwise without the prior written permission of the publisher.
Evidian disclaims the implied warranties of merchantability and fitness for a particular purpose and makes no express warranties except as may be stated in its written agreement with and for its customer. In no event is Evidian liable to anyone for any indirect, special, or consequential damages.
The information and specifications in this document are subject to change without notice. Consult your Evidian Marketing Representative for product or service availability.
1.1..... Generalities, solutions, architectures
1.1.4 SafeKit cluster definition
1.1.5 SafeKit module definition
1.2..... The SafeKit mirror cluster
1.2.1 Real time file replication and application failover
1.2.2 Step 1. Normal operation
1.2.4 Step 3. Failback and automatic resynchronization
1.2.5 Step 4. Return to normal operation
1.2.6 Synchronous replication versus asynchronous replication
1.2.7 Behavior in case of network isolation
1.2.9 SafeKit on a single node to protect against software failures
1.3..... The SafeKit farm cluster
1.3.1 Network load balancing and application failover
1.3.2 Principle of a virtual IP address with network load balancing
1.3.3 Load balancing for stateful or stateless web services
1.3.4 Chain high availability solution in a farm
1.4..... Clusters running several modules
1.4.1 The SafeKit farm+mirror cluster
1.4.2 The SafeKit active/active cluster with replication
1.5..... The SafeKit Hyper-V or KVM cluster
1.5.1 Load balancing, replication, failover of entire virtual machines
1.6..... SafeKit clusters in the cloud
1.6.1 Mirror cluster in Azure, AWS and GCP
1.6.2 Farm cluster in Azure, AWS and GCP
2.1.2 Installation directories and disk space provisioning
2.1.3 SafeKit install procedure
2.1.4 Use the SafeKit web console or command line interface
2.1.6 System specific procedures and characteristics
2.2..... Mirror installation recommendation
2.2.3 Application prerequisites
2.2.4 File replication prerequisites
2.3..... Farm installation recommendation
2.3.3 Application prerequisites
2.4.3 Reinstall and postinstall procedure
2.5..... SafeKit full uninstall
2.5.1 Uninstall on Windows as administrator
2.5.2 Uninstall on Linux as root
2.6..... SafeKit documentation
3.1..... Start the web console
3.1.2 Connect to a SafeKit server
3.2..... Configure the cluster
3.2.1 Cluster configuration wizard
3.2.2 Cluster configuration home page
3.3.1 Select the new module to configure
3.3.2 Module configuration wizard
3.3.3 Modules configuration home page
3.3.4 Edit the module configuration locally and then apply it
3.5..... Snapshots or logs of module for debug and support
3.6..... Secure access to the web console
4.1..... Installation and tests after boot
4.1.1 Test package installation
4.1.2 Test license and version
4.1.3 Test SafeKit services and modules after boot
4.1.4 Test start of SafeKit web console
4.2..... Tests of a mirror module
4.2.1 Test first start of a mirror module on 2 servers ![]() STOP (NotReady)
STOP (NotReady)
4.2.2 Test start of a mirror module on 2 servers ![]() STOP (NotReady)
STOP (NotReady)
4.2.3 Test stop of a mirror module on the server ![]() PRIM (Ready)
PRIM (Ready)
4.2.4 Test start of a mirror module on the server ![]() STOP (NotReady)
STOP (NotReady)
4.2.5 Test restart of a mirror module on the server ![]() PRIM (Ready)
PRIM (Ready)
4.2.6 Test virtual IP address of a mirror module
4.2.7 Test file replication of a mirror module
4.2.8 Test shutdown of the server ![]() PRIM (Ready)
PRIM (Ready)
4.2.9 Test power-off of the server ![]() PRIM (Ready)
PRIM (Ready)
4.2.10 Test split-brain with a mirror module
4.2.11 Continue your mirror module tests with checkers
4.3..... Tests of a farm module
4.3.1 Test start of a farm module on all servers ![]() STOP (NotReady)
STOP (NotReady)
4.3.2 Test stop of a farm module on one server ![]() UP (Ready)
UP (Ready)
4.3.3 Test restart of a farm module on one server ![]() UP(Ready)
UP(Ready)
4.3.4 Test virtual IP address of a farm module
4.3.5 Test TCP load balancing on a virtual IP address
4.3.6 Test split-brain with a farm module
4.3.7 Test compatibility of the network with invisible MAC address (vmac_invisible)
4.3.8 Test shutdown of a server ![]() UP (Ready)
UP (Ready)
4.3.9 Test power-off of a server ![]() UP (Ready)
UP (Ready)
4.3.10 Continue your farm module tests with checkers
4.4..... Tests of checkers common to mirror and farm
4.4.1 Test <errd> checker with action restart or stopstart
4.4.2 Test <tcp> checker with action restart or stopstart
4.4.3 Test <tcp> checker with action wait
4.4.4 Test <interface check="on"> with action wait
4.4.5 Test <ping> checker with action wait
4.4.6 Test <module> checker with action wait
4.4.7 Test <custom> checker with action wait
4.4.8 Test <custom> checker with action restart or stopstart
5.... Mirror module administration
5.1..... Operating mode of a mirror module
5.3..... First start-up of a mirror module (safekit prim command)
5.4..... Different reintegration cases (use of bitmaps)
5.5..... Start-up of a mirror module with the up-to-date data ![]() STOP (NotReady) -
STOP (NotReady) - ![]() WAIT (NotReady)
WAIT (NotReady)
5.6..... Degraded replication mode (![]() ALONE (Ready) degraded)
ALONE (Ready) degraded)
5.7..... Automatic or manual failover
5.8..... Default primary server (automatic swap after reintegration)
5.9..... Prim command fails: why? (safekit primforce command)
6.... Farm module administration
6.1..... Operating mode of a farm module
6.2..... State automaton of a farm module (STOP, WAIT, UP - NotReady, Transient, Ready)
6.3..... Start-up of a farm module
7.1..... Connection issues with the web console
7.2..... Connection issues with the HTTPS web console
7.2.1 Check server certificates
7.2.2 Check certificates installed in SafeKit
7.2.3 Revert to HTTP configuration
7.3..... How to read logs and resources of the module?
7.4..... How to read the commands log of the server?
7.5..... Stable module ![]() (Ready) and
(Ready) and ![]() (Ready)
(Ready)
7.6..... Degraded module ![]() (Ready)and
(Ready)and
![]() /
/![]() (NotReady)
(NotReady)
7.7..... Out of service module ![]() /
/![]() (NotReady) and
(NotReady) and ![]() /
/![]() (NotReady)
(NotReady)
7.8..... Module ![]() STOP (NotReady):
start the module
STOP (NotReady):
start the module
7.9..... Module ![]() WAIT (NotReady): repair the
resource="down"
WAIT (NotReady): repair the
resource="down"
7.10... Module oscillating from ![]() (Ready) to
(Ready) to
![]() (Transient)
(Transient)
7.11... Message on stop after maxloop
7.12... Module ![]() (Ready) but
non-operational application
(Ready) but
non-operational application
7.13... Mirror module ![]() ALONE (Ready) -
ALONE (Ready) - ![]() WAIT/
WAIT/![]() STOP
(NotReady)
STOP
(NotReady)
7.14... Farm module ![]() UP(Ready)but problem
of load balancing in a farm
UP(Ready)but problem
of load balancing in a farm
7.14.1 Reported network load share are not coherent
7.14.2 virtual IP address does not respond properly
7.16... Analysis from snapshots of the module
7.16.1 Module configuration files
7.17... Problem with the size of SafeKit databases
7.18... Problem for retrieving the certification authority certificate from an external PKI
7.18.1 Export CA certificate(s) from public certificates
8.... Access to Evidian support
8.1..... Home page of support site
8.2..... Permanent license keys
8.4..... Access to your account
8.5..... Call desk to open a trouble ticket
8.5.4 Answers to a call and exchange with support
8.6..... Download and upload area
8.6.1 Two areas of download and upload
9.1..... Commands to control SafeKit services
9.2..... Command lines to configure and monitor the cluster
9.3..... Command lines to control modules
9.4..... Command lines to monitor modules
9.5..... Command lines to configure modules
9.6..... Command lines for support
9.7..... Command lines distributed across multiple SafeKit servers
9.8.1 Local and distributed command
9.8.2 Cluster configuration with command line
9.8.3 Module configuration with command line
9.8.4 Module snapshot with command line
10.1... SafeKit environment variables and directories
10.2... SafeKit services and daemons
10.2.2 SafeKit daemons per module
10.3.1 Firewall settings in Linux
10.3.2 Firewall settings in Windows
10.4... Boot and shutdown setup in Windows
10.6... Securing module internal communications
10.6.1 Configuration with the SafeKit Web console
10.6.2 Configuration with the Command Line Interface
10.7... SafeKit web service configuration
10.7.2 Connection ports configuration
10.7.3 HTTP/HTTPS and user authentication configuration
10.9.1 SNMP monitoring in Windows
10.9.2 SNMP monitoring in Linux
10.10. Commands log of the SafeKit server
10.11. SafeKit log messages in system journal
11.. Securing the SafeKit web service
11.2.2 Unsecure setup based on identical role for all
11.3.1 HTTPS setup using the SafeKit PKI
11.3.2 HTTPS setup using an external PKI
11.4... User authentication setup
11.4.1 File-based authentication setup
11.4.2 LDAP/AD authentication setup
11.4.3 OpenID authentication setup
12.. Cluster.xml for the SafeKit cluster configuration
12.1.3 <lans>, <lan>, <node> attributes
12.2... SafeKit cluster Configuration
12.2.1 Configuration with the SafeKit web console
12.2.2 Configuration with command line
13.. Userconfig.xml for a module configuration
13.1... Macro definition - <macro>
13.2... Farm or mirror module - <service>
13.3... Heartbeats - <heart>, <heartbeat >
13.3.3 <heart>, <heartbeat > attributes
13.4... Farm topology - <farm>, <lan>
13.4.3 <farm>, <lan> attributes
13.5... Virtual IP address - <vip>
13.5.1 <vip> example in a mirror module
13.5.2 <vip> example in a farm module
13.5.3 Alternative to <vip> for servers in different networks
13.5.6 <loadbalancing_list>, <group>, <cluster>, <host> attributes
13.5.7 <vip> Load balancing description
13.6... File replication - <rfs>, <replicated>
13.6.3 <rfs>, <replicated> attributes
13.7... Enable module scripts - <user>, <var>
13.7.3 <user>, <var> attributes
13.8... Virtual hostname - <vhost>, <virtualhostname>
13.8.3 <vhost>, <virtualhostname> attributes
13.9... Process or service monitoring - <errd>, <proc>
13.9.3 <errd>, <proc> attributes
13.13. Interface checker - <intf>
13.15. Custom checker - <custom>
13.16. Module checker - <module>
13.17. Splitbrain checker - <splitbrain>
13.17.3 <splitbrain> attributes
13.18. Failover machine - <failover>
13.18.4 <failover> description
14.. Scripts for a module configuration
14.2... Variables and arguments passed to scripts
14.4... Scripts execution automaton
14.5... SafeKit special commands for scripts
14.5.3 Commands for Windows and Linux
15.. Examples of module configurations
15.1... Mirror module example with mirror.safe
15.1.1 Cluster configuration with two networks
15.1.2 Mirror module configurations
15.2... Farm module example with farm.safe
15.2.1 Cluster configuration with three nodes
15.2.2 Farm module configurations
15.3... Macro and script variables example with hyperv.safe
15.3.1 Module configuration with macros and var
15.3.2 Module scripts with var
15.4... Process monitoring example with softerrd.safe
15.4.1 Module configuration with process monitoring
15.4.2 Advanced configuration of module scripts
15.7... Custom checker example with customchecker.safe
15.7.1 Module configuration with custom checker
15.7.2 Advanced configuration of module checker script
15.8... Split-brain checker example
15.9... Module checker examples
15.9.1 Example of a farm module depending on a mirror module
15.9.2 Example with leader.safe and follower.safe
15.10. Interface checker example
15.12. Mail notification example with notification.safe
15.12.1 Notification on the start of the module
15.12.2 Notification on the stop of the module
15.12.3 Notification on module state changes
15.13. Virtual hostname example with vhost.safe
15.13.1 Module configuration with a virtual hostname
15.13.2 Module scripts with a virtual hostname
16.. SafeKit cluster in the cloud
16.1... SafeKit cluster in Amazon AWS
16.2... SafeKit cluster in Microsoft Azure
16.2.1 Mirror cluster in Azure
1. Technical overview
![]() Section 1.1 “Generalities, solutions, architectures”
Section 1.1 “Generalities, solutions, architectures”
![]() Section 1.2 “The SafeKit mirror cluster”
Section 1.2 “The SafeKit mirror cluster”
![]() Section 1.3 “The SafeKit farm cluster”
Section 1.3 “The SafeKit farm cluster”
![]() Section 1.4 “Clusters running several modules”
Section 1.4 “Clusters running several modules”
![]() Section 1.5 “The SafeKit Hyper-V or KVM cluster”
Section 1.5 “The SafeKit Hyper-V or KVM cluster”
![]() Section 1.6 “SafeKit clusters in the cloud”
Section 1.6 “SafeKit clusters in the cloud”
1.1 Generalities, solutions, architectures
1.1.1 Introduction to SafeKit
SafeKit, developed by Evidian, is a high availability software solution designed to ensure 24/7 uptime for business-critical applications. It supports both Windows and Linux platforms and eliminates the need for shared disks, enterprise editions of databases, or advanced technical skills, making it a cost-effective alternative to traditional clustering solutions.
Key Features:
· Real-Time Synchronous Replication: Continuous data replication across nodes to prevent data loss.
· Automatic Failover and Failback: Seamless switch to a secondary system during failures and reversion once the original system is operational.
· Load Balancing: Optimizes resource use by distributing workloads across multiple servers.
· Platform Agnostic: Compatible with physical machines, virtual machines, and public cloud infrastructures.
Key Advantages:
· Zero Specific Skills: No specialized IT skills required for deployment.
· Zero Hardware Overhead: No need for specific hardware like shared disks or load balancers.
· Zero Software Overhead: Works with standard editions of Windows and Linux.
Key Solutions:
· Application Level: High availability with restart scripts per application.
· Hypervisor Level: High availability without restart scripts per application.
· Container or Pod Level: High availability without restart scripts per application.
SafeKit is ideal for software publishers, resellers, and distributors looking to enhance their products with high availability features. It also offers an OEM opportunity for partners to integrate SafeKit into their own applications.
1.1.2 SafeKit solutions
See here for a list of SafeKit solutions.
|
Application-level HA In this type of solution, only application data is replicated. And only the application is restarted in case of a failure.
Integration tasks must be implemented: write restart scripts for the application, define folders for replication, configure software checkers, define a virtual IP address. This solution is platform-independent and works with applications inside physical machines, virtual machines, in the cloud. Any hypervisor is supported (e.g., VMware, Hyper-V, etc.). |
Virtual machine-level HA In this type of solution, the entire virtual machine (VM) is replicated, including the application and OS. The complete virtual machine is restarted in case of a failure.
The advantage is that there are no restart scripts to write per application, and no virtual IP address to set. If you don’t know how an application works, this is the simplest solution. This solution works with Windows/Hyper-V and Linux/KVM but not with VMware. This is an active/active solution with multiple virtual machines replicated and restarted between the two nodes. |


Note: Applications running in containers or pods also do not require dedicated restart scripts. SafeKit provides generic restarts and real-time replication of persistent data for these environments (see the list of SafeKit solutions).
1.1.3 SafeKit architectures
SafeKit offers two basic high availability clusters for Windows and Linux:
· the mirror cluster, with real-time file replication and failover, built by deploying a mirror module on 2 servers,
· the farm cluster, with network load balancing and failover, built by deploying a farm module on 2 servers or more.
Several modules can be deployed on the same cluster. Thus, advanced clustering architectures can be implemented:
· the farm+mirror cluster built by deploying a farm module and a mirror module on the same cluster,
· the active/active cluster built by deploying several mirror modules on 2 servers,
· the N-1 cluster built by deploying N mirror module on N+1 servers.
Specific clusters are also interesting to consider with SafeKit:
· the Hyper-V or KVM cluster with real-time replication and failover of entire virtual machines between 2 active hypervisors,
· mirror or farm clusters in the Cloud.
1.1.4 SafeKit cluster definition
A SafeKit cluster is a set of servers where SafeKit is installed and running.
All servers within a given SafeKit cluster share the same cluster configuration, which includes the list of servers and networks used. These servers communicate with each other to maintain a global view of the configurations of the SafeKit modules. A server cannot belong to multiple SafeKit clusters simultaneously.
Configuring the cluster is a prerequisite before the installation and configuration of SafeKit modules. This can be done using the SafeKit web console or through online commands.
1.1.5 SafeKit module definition
A module is a customization of SafeKit for a specific application or hypervisor. See here for a list of modules and their quick installation guides.
Types of Modules
· Generic farm and mirror modules for new applications,
· Preconfigured application modules for databases, web servers…,
· Hypervisors modules (hyperv.safe, kvm.safe) for real-time replication and restart of entire virtual machines.
Module Contents
In practice, a module is a “.safe” file (zip type) that includes:
· The configuration file userconfig.xml, which contains:
o The virtual IP address (not necessary for a hypervisor module),
o File directories to replicate in real time (for a mirror module),
o Network load balancing criteria (for a farm module),
o Configuration of software and hardware failures detectors,
· The scripts to start and stop an application or a virtual machine.
Deployment Steps
Once a module is configured and tested, deployment requires no specific IT skills:
· Install the application or the hypervisor on 2 standard servers,
· Install the SafeKit software on both servers,
· Install the module on both servers.
Configuring, deploying, and monitoring modules can be done using the SafeKit web console or through online commands.
1.1.6 SafeKit limitations
|
Typical usage with SafeKit |
|||
|
Replication of a few Tera-bytes |
Replication < 1 million files |
Replication <= 32 virtual machines |
1 or 10 G/s LAN or extended LAN |
|
Limitation |
|||
|
Resynchronization after a failure takes too long. On a 1 Gb/s network, 3 Hours for 1 Tera-bytes. On a 10 Gb/s network, 1 hour or less for 1 Tera-bytes (depends on write disk IO performances). |
Resynchronization after a failure takes too long. Time to check each file between both nodes. |
In full virtual machine replication mode, and with one virtual machine in a mirror module, the limit is 32 modules per cluster. |
Failover of the virtual IP address is built-in when in the same subnet. A LAN provides adequate bandwidth for resynchronization. A LAN provides adequate latency (typically a round-trip of less than 2ms) for synchronous replication. |
|
Alternative |
|||
|
Use shared storage. |
Put files in a virtual hard disk replicated by SafeKit. |
Use another HA solution with shared storage. |
Use backup solutions with asynchronous replication. |
1.2 The SafeKit mirror cluster
1.2.1 Real time file replication and application failover
The mirror cluster is an active-passive high-availability solution, built by deploying a mirror module within a two-node cluster. The application runs on a primary server and is restarted automatically on a secondary server if the primary server fails.
With its real-time file replication function, this architecture is particularly suited to providing high availability for back-end applications with critical data to protect against failure.
Microsoft SQL Server, PostgreSQL, MariaDB, Oracle, Milestone, Nedap, Docker, Podman, Hyper-V, and KVM solutions are examples of mirror modules. You can create your own mirror module for your application based on the generic mirror.safe module. See here for a list of modules.
Note that Hyper-V and KVM mirror modules replicate entire virtual machines, including applications and operating systems. They do not require a virtual IP, as the VM restart handles the failover of the VM physical IP address.
The mirror cluster works as follows.
1.2.2 Step 1. Normal operation

Server 1 (PRIM) runs the application.
SafeKit replicates files opened by the application. Only changes made by the application in the files are replicated in real time across the network, thus limiting traffic.
For replication, only names of file directories to replicate are configured in SafeKit. There are no pre-requisites on disk organization for the two servers. Directories to replicate may be located in the system disk.
1.2.3 Step 2. Failover

When Server 1 fails, Server 2 takes over. SafeKit switches the virtual IP address and restarts the application automatically on Server 2. The application finds the files replicated by SafeKit up-to-date on Server 2, thanks to the synchronous replication between Server 1 and Server 2. The application continues to run on Server 2 by locally modifying its files that are no longer replicated to Server 1.
The switch-over time is equal to the fault-detection time (set to 30 seconds by default) plus the application start-up time. Unlike disk replication solutions, there is no delay for remounting file systems and running recovery procedures.
1.2.4 Step 3. Failback and automatic resynchronization

Failback involves restarting Server 1 after fixing the problem that caused it to fail. SafeKit automatically resynchronizes the files, updating only the files modified on Server 2 while Server 1 was halted.
This automatic reintegration takes place without stopping the application, which can continue running on Server 2. This is a major feature that differentiates SafeKit from other solutions, which require manual operations to reintegrate Server 1 in the cluster.
1.2.5 Step 4. Return to normal operation

After reintegration, the files are once again in mirror mode, as in step 1. The system is back in high-availability mode, with the application running on Server 2 and SafeKit replicating file updates to Server 1.
If administrators want the application to run on Server 1, they can execute a ‘Stop/Start’ command on the PRIM server either through the console at the appropriate time or automatically by configuring a default primary server.
1.2.6 Synchronous replication versus asynchronous replication
There is a significant difference between synchronous replication, as offered by the SafeKit mirror solution, and asynchronous replication traditionally offered by other file replication solutions.
With synchronous replication, when a disk IO is performed by the application on the primary server inside a replicated file, SafeKit waits for the IO acknowledgement from the local disk and from the secondary server, before sending the IO acknowledgement to the application. This mechanism is essential for recovery of transactional applications.
The latency of a LAN (typically a round-trip of less than 2ms) between the servers is required to implement synchronous data replication, possibly with an extended LAN in two geographically remote computer rooms.
With asynchronous replication implemented by other solutions, the IOs are placed in a log on the primary server but the primary server does not wait for the IO acknowledgments of the secondary server. Thus, all data that has not been copied over the network to the second server is lost in the event of a failure of the first server.
In particular, a transactional application may lose committed data in the event of a failure. Asynchronous replication can be used for data replication over a low-speed WAN to back up data remotely, but it is not suitable for high availability with automatic failover.
SafeKit provides a semi-synchronous solution, implementing the asynchrony not on the primary server but on the secondary one. In this solution, SafeKit always waits for the acknowledgement of the two servers before sending the acknowledgement to the application. But on the secondary, there are 2 options asynchronous or synchronous. In the asynchronous case, the secondary sends the acknowledgement to the primary upon receipt of the IO and writes to disk after. In the synchronous case, the secondary writes the IO to disk and then sends the acknowledgement to the primary. The synchronous mode is required if we consider a simultaneous double power outage of two servers, with inability to restart the former primary server and requirement to re-start on the secondary.
1.2.7 Behavior in case of network isolation
A heartbeat is a mechanism for synchronizing two servers and detecting failures by exchanging data over a shared network. If one server loses all heartbeats, it assumes the other is down and runs the application ALONE.
SafeKit supports multiple heartbeats across shared networks. A dedicated network with a second heartbeat can prevent network isolation and also be used as the replication network.
Network Isolation:
· Upon losing all heartbeats, both servers transition to the ALONE state, running the application independently.
· After the isolation, one server stops and resynchronizes data from the other server.
· The cluster returns to PRIM-SECOND state.
Splitbrain Checker:
· Uses a witness IP (usually a router) to avoid double execution during isolation.
· Only the server with witness access goes ALONE, the other waits.
· After isolation, the WAIT server resynchronizes and becomes SECOND.
1.2.8 3-node replication
SafeKit only supports replication between two nodes. However, it is possible to implement 3-node replication by combining SafeKit with a backup solution.
An application is made highly available between 2 nodes thanks to SafeKit with its synchronous real-time replication (no data loss) and automatic failover. Additionally, a backup solution is implemented for asynchronous replication to a third node in a disaster recovery site. Since there is data loss with an asynchronous backup solution, the failover to the third node is manual and decided by an administrator.
Note that the real-time replication of SafeKit does not eliminate the need for a backup solution. For example, a ransomware attack encrypting replicated data on the primary server will also encrypt data on the secondary server in real-time with SafeKit. Only a backup solution with a retention policy can resolve a ransomware attack. The administrator must restore the backup from before the ransomware attack.
1.2.9 SafeKit on a single node to protect against software failures
You can configure a module in "light" mode, which corresponds to a module running on a single node without synchronizing with other nodes (unlike mirror or farm modules). A light module includes the start and stop of an application, as well as SafeKit checkers that detect software errors and perform automatic restarts on a single node.
The light module interfaces with the SafeKit console, allowing an administrator to view the status of the application module and manually trigger application restarts using a button-click interface.
There is no need to define a virtual IP address or replicated directories in a light module. Note that this can also serve as a first step before transitioning to a mirror module or a farm module.
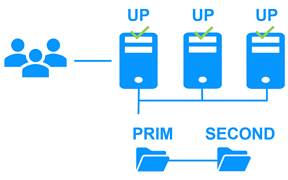
1.3 The SafeKit farm cluster
1.3.1 Network load balancing and application failover

The farm cluster is an active-active high-availability solution, built by deploying a farm module within a cluster of two or more nodes. The farm cluster provides both network load balancing, through transparent distribution of network traffic, and software and hardware failover. This architecture offers a simple solution to support the increase in system load.
The same application runs on each server, and the load is balanced by the distribution of network activity on the different servers of the farm.
Farm clusters are suited to front-end applications like web services.
Apache, Microsoft IIS, NGINX solutions are examples of farm modules. You can write your own farm module for your application, based on the generic farm.safe module. See here for a list of modules.
1.3.2 Principle of a virtual IP address with network load balancing
The virtual IP address is configured locally on each server in the farm. Input traffic for this address is distributed among all servers by a filter within each server’s kernel.
The load balancing algorithm inside the filter is based on the identity of the client packets (client IP address, client TCP port). Depending on the identity of the client packet, only one filter on a server accepts the packet. Once a packet is accepted by the filter on a server, only the CPU and memory of that server are used by the application responding to the client’s request. The output messages are sent directly from the application server to the client.
If a server fails, the SafeKit heartbeat protocol in a farm reconfigures the filters to re-balance the traffic among the remaining available servers.
1.3.3 Load balancing for stateful or stateless web services
With a stateful server, session affinity is required. The same client must connect to the same server across multiple TCP sessions to retrieve its context. In this scenario, the SafeKit load balancing rule is configured on the client IP address. This ensures that the same client always connects to the same server for multiple TCP sessions, while different clients are distributed across various servers in the farm. This configuration is used when session affinity is required.
With a stateless server, there is no session affinity. The same client can connect to different servers in the farm across multiple TCP sessions, as no context is stored locally on a server from one session to another. In this case, the SafeKit load balancing rule is configured on the TCP client session identity. This configuration is optimal for distributing sessions between servers but requires a TCP service without session affinity.
1.3.4 Chain high availability solution in a farm
What is a chain HA solution (also known as a cascading HA solution)?
· Multiple servers are linked in a sequence: If one server fails, the next one in the chain takes over.
· Priority-based management: A single server, the one with the highest priority in the chain and which is available, manages all requests from clients.
· Failover process: If the server with the highest priority fails, the next available server with the highest priority takes over.
· Reintegration: When a server comes back online and has the highest priority, it resumes handling all client requests.
· Quick recovery time: This solution has a quick recovery time, as the application is pre-started on all servers. The recovery time is essentially the time needed to reconfigure the priorities among the servers in the farm (a few seconds).
· Replication limitations: This solution does not support real-time replication, which is limited to mirror architecture. However, a combined farm+mirror architecture is available.
To implement a chain high availability solution, SafeKit offers a "power" variable in the load balancing rules, which is set at the level of each server in the cluster. The power variable allows you to allocate more or less traffic to a server. When the power variable is set as a multiple of 64 between servers (e.g., 1, 64, 64*64, 64*64*64, ...), the chain high availability solution is implemented.
1.4 Clusters running several modules
1.4.1 The SafeKit farm+mirror cluster
Network load balancing, file replication and application failover
You can mix farm and mirror modules on the same cluster.
This option allows you to implement a multi-tier application architecture, such as apache_farm.safe (farm architecture with load balancing and failover) and postgresql.safe (mirror architecture with file replication and failover) on the same servers.
As a result, load balancing, file replication and failover are managed coherently on the same servers.
1.4.2 The SafeKit active/active cluster with replication
Crossed replication and mutual failover
In an active / active cluster with replication, there are two servers and two mirror modules in mutual failover (appli1.safe and appli2.safe). Each application server is backup of the other server.
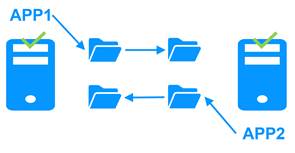
If one application server fails, both applications will run on the same physical server. Once the failed server is restarted, its application will return to its default primary server.
A mutual failover cluster is more cost-effective than two separate mirror clusters, as it eliminates the need for backup servers that remain idle most of the time, waiting for a primary server to fail. However, in the event of a server failure, the remaining server must be capable of handling the combined workload of both applications.
Note that:
· Both applications, Appli1 and Appli2, must be installed on each server to enable application failover.
· This architecture is not limited to just two applications; N application modules can be deployed across two servers.
· Each mirror module will have its own virtual IP address, its own replicated file directories, and its own restart scripts.
1.4.3 The SafeKit N-1 cluster
Replication and application failover from N servers to 1
In an N-1 cluster, N mirror application modules are deployed across N primary servers and a single backup server.
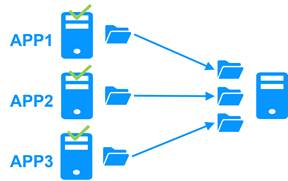
In the event of a failure, unlike in an active/active cluster, the backup server does not need to manage a double workload when a primary server fails. This assumes only one failure occurs at a time. While the solution can support multiple primary server failures simultaneously, in such cases, the single backup server will need to handle the combined workload of all the failed servers. In a N-1 cluster, there are N mirror application modules installed between N primary servers and one backup server.
Note that:
· All applications (Appli1, Appli2, Appli3) must be installed on the single backup server to enable application failover.
· Each mirror module will have its own virtual IP address, its own replicated file directories, and its own restart scripts.
1.5 The SafeKit Hyper-V or KVM cluster
1.5.1 Load balancing, replication, failover of entire virtual machines
The Hyper-V or KVM cluster is an example of an active-active cluster. Multiple applications can be hosted in various virtual machines, which are replicated and restarted by SafeKit. Each virtual machine is managed by SafeKit within its own mirror module.
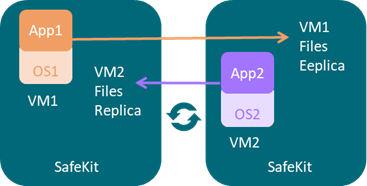
The solution has the following features:
· Real-time synchronous replication of entire virtual machines with failover capabilities.
· A centralized, user-friendly SafeKit console for managing all VMs, including the ability to migrate VMs between servers to optimize load distribution.
· A checker for each VM to detect if it has locked up, crashed, or ceased to function, and to restart the VM if necessary.
· An attractive solution that requires no application integration.
· A robust architecture suitable for high-availability solutions that cannot be integrated at the application level.
A free trial of the Hyper-V cluster with SafeKit is available here.
A free trial of the KVM cluster with SafeKit is available here.
1.6 SafeKit clusters in the cloud
For a full description, refer to section 16.
1.6.1 Mirror cluster in Azure, AWS and GCP
SafeKit delivers high-availability clusters with real-time replication and failover in Azure, AWS, and GCP through the deployment of a mirror module.
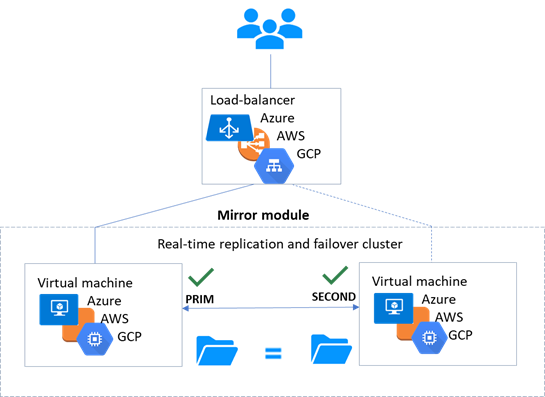
The mirror solution in the cloud is similar to the on-premise one, except that the virtual IP address must be configured at the load balancer level:
· Virtual machines are placed in different availability zones, which are in different subnets.
· The critical application runs on the primary server.
· Users connect to a primary/secondary virtual IP address managed by the cloud load balancer.
· SafeKit provides a health check configured in the load balancer. On the primary server, the health check returns OK to the load balancer, while it returns nothing on the secondary server. Thus, all requests to the virtual IP address are routed to the primary server.
· If the primary server fails or is stopped, the secondary server automatically becomes the primary one and returns OK to the health check. Thus, all requests to the virtual IP address are rerouted to the new primary server.
· SafeKit monitors the critical application on the primary server using SafeKit checkers.
· SafeKit automatically restarts the critical application in the event of software or hardware failure, thanks to restart scripts.
· SafeKit performs synchronous real-time replication of files containing critical data.
For more information, refer to mirror cluster in Azure, mirror cluster in AWS or mirror cluster in GCP.
1.6.2 Farm cluster in Azure, AWS and GCP
SafeKit delivers high-availability clusters with network load balancing and failover in Azure, AWS, and GCP through the deployment of a farm module.
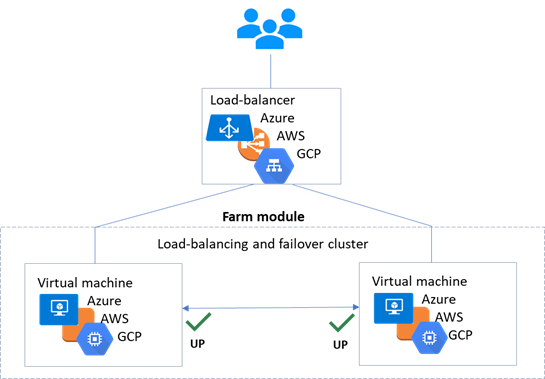
The farm solution in the cloud is similar to the on-premise one, except that the virtual IP address must be configured at the load balancer level:
· Virtual machines are placed in different availability zones, which are in different subnets.
· The critical application runs on all servers.
· Users are connected to a virtual IP address managed by the cloud load balancer.
· SafeKit provides a health check configured in the load balancer. The health check returns OK on all servers running the application.
· SafeKit monitors the critical application on all servers using SafeKit checkers.
· SafeKit automatically restarts the critical application on a server when there is a software failure, thanks to restart scripts.
For more information, refer to farm cluster in Azure, farm cluster in AWS or farm cluster in GCP.
2. Installation
![]() Section 2.1 “SafeKit install”
Section 2.1 “SafeKit install”
![]() Section 2.2 “Mirror installation recommendation”
Section 2.2 “Mirror installation recommendation”
![]() Section 2.3 “Farm installation recommendation”
Section 2.3 “Farm installation recommendation”
![]() Section 2.4 “SafeKit upgrade”
Section 2.4 “SafeKit upgrade”
![]() Section 2.5 “SafeKit full uninstall”
Section 2.5 “SafeKit full uninstall”
![]() Section 2.6 “SafeKit documentation”
Section 2.6 “SafeKit documentation”
2.1 SafeKit install
2.1.1 Download the package
1. Connect to https://support.evidian.com/safekit
2. Go to <Version 8.2>/Platforms/<Your platform>/Current versions
3.
Download the package
In Windows, two packages are available:
· A Windows Installer package (safekit_windows_x86_64_8_2_x_y.msi). It depends on the VS2022 C runtime which must be previously installed
· A standalone executable bundle (safekit_windows_x86_64_8_2_x_y.exe), which includes the SafeKit installation and the VS2022 C runtime
Choose one or the other package depending on whether the VS2022 C runtime is installed or not.
2.1.2 Installation directories and disk space provisioning
SafeKit is installed in:
|
· in Windows SAFE=C:\safekit · in Linux SAFE=/opt/safekit |
Minimum free disk space: 97MB
|
|
|
SAFEVAR |
· in Windows SAFEVAR= C:\safekit\var if %SYSTEMDRIVE%=C: · in Linux SAFEVAR=/var/safekit |
Minimum free disk space: 20MB + at least 20MB (up to 3 GB) per module for dumps
|
2.1.3 SafeKit install procedure
2.1.3.1 Install on Windows as administrator
2.1.3.1.1 SafeKit package install
1. Log-in as administrator on Windows server
2. Locate the downloaded file safekit_windows_x86_64_8_2_x_y.msi (or safekit_windows_x86_64_8_2_x_y.exe)
3. Install in interactive mode by double-clicking it and go through the installer wizard
Before SafeKit 8.2.3, after installation, you need to run the firewall configuration scripts (see section 10.3) and initialize the SafeKit web service (see section 11.2.1.2).
Since SafeKit 8.2.3, at the end of the SafeKit Setup, you will be asked to check or uncheck " Set console credentials and firewall rules now ".
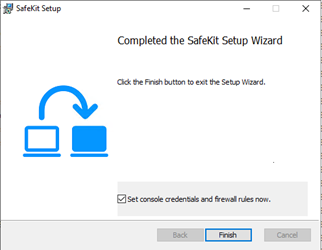
If the box is checked, when clicking the “Finish” button:
o it configures Microsoft Windows Firewall for SafeKit. For details or other firewalls, see section 10.3.
o it opens a window to enter the password for the admin user of the SafeKit web console.

This step is mandatory to initialize the default configuration of the web service that requires authentication. It is initialized with the admin user and the given password pwd, for instance. It then allows to access to all the web console's features, by logging in with admin/pwd, and run distributed commands. For details, see section 11.2.1.
|
|
The password must be identical on all nodes that belong to the same SafeKit cluster. Otherwise, web console and distributed commands will fail with authentication errors. |
or
3. Install in non-interactive mode, by executing:
msiexec /qn /i safekitwindows_8_2_x_y.msi
Then, the firewall setup and web service initialization must be done.
2.1.3.1.2 Firewall setup
No action required when firewall automatic configuration has been performed during the package install. Otherwise see section 10.3.
2.1.3.1.3 Web service initialization
This step is mandatory to initialize the default configuration of the web service, which is accessed by the web console and the global safekit command. The web service requires authentication to access the service. No action required when the web service initialization has been performed during the package install. Otherwise, see section 11.2.1.2.
2.1.3.1.4 Antivirus setup
This step is only necessary if the server's antivirus interferes with the operation of SafeKit. See section 10.5 for the list of legitimate SafeKit directories and processes that should not be affected by the antivirus.
2.1.3.2 Install on Linux as root
2.1.3.2.1 SafeKit package install
1. Open a Shell console as root on Linux server
2. Go to the directory that contains the downloaded file safekitlinux_x86_64_8_2_x_y.bin
auto extractible zip file
3. Run chmod +x safekitlinux_x86_64_8_2_x_y.bin
4. Run./safekitlinux_8_2_x86_64_x_y.bin
it extracts the package and the safekitinstall script
5. Install in interactive mode by executing ./safekitinstall
· reply to “Do you accept that SafeKit automatically configure the local firewall to open these ports (yes|no)?”
If you answer yes, it configures firewalld or iptable Linux firewall for SafeKit. For details or other firewalls, see section 10.3.
· reply to “Please enter a password or "no" if you want to set it later”
This step is mandatory to initialize the default configuration of the web service. The web service requires authentication to access the service.
It initializes it with the admin user and the given password pwd, for instance. It then allows to access to all the web console's features, by logging in with admin/pwd, and run distributed commands. For details, see section 11.2.1.
|
|
The password must be identical on all nodes that belong to the same SafeKit cluster. Otherwise, web console and distributed commands will fail with authentication errors. |
or
5. Install in non-interactive mode, by executing:
Use the option -nofirewall for disabling the firewall automatic setup.
Use the option -passwd pwd for initializing the web service authentication (where pwd is the password set for the admin user).
The install log is /tmp/safekitinstall_log.
2.1.3.2.2 Firewall setup
This step is mandatory to enable communication between the nodes of the SafeKit cluster and with the web console.
No action required when firewall automatic configuration has been performed during the package install. Otherwise see section 10.3.
2.1.3.2.3 Web service initialization
This step is mandatory to initialize the default configuration of the web service, which is accessed by the web console and the global safekit command. The web service requires authentication to access the service. No action required when the web service initialization has been performed during the package install. Otherwise, see section 11.2.1.2.
2.1.3.2.4 Antivirus setup
This step is only necessary if the server's antivirus interferes with the operation of SafeKit. See section 10.5 for the list of legitimate SafeKit directories and processes that should not be affected by the antivirus.
2.1.4 Use the SafeKit web console or command line interface
Once installed, the SafeKit cluster must be defined. Then modules can be installed, configured, and administered. All these actions can be done with the SafeKit console or the command line interface.
2.1.4.1 The SafeKit web console
1. Start a web browser (Microsoft Edge, Firefox, or Chrome)
2. Connect it to the URL http://host:9010 (where host is the name or IP address of one of the SafeKit nodes)
3. In the login page, enter admin as user’s name and the password you gave on initialization (e.g., pwd)
4. Once the console is loaded, the admin user can access
to ![]() Monitoring and
Monitoring and
![]() Configuration
in the navigation sidebar, as he has the default Admin role
Configuration
in the navigation sidebar, as he has the default Admin role
For details see section 3.
2.1.4.2 The SafeKit command line interface
It is based on the single safekit command located at the root of the SafeKit installation directory. Almost all safekit commands can be applied locally or on a list of nodes in the SafeKit cluster. This is called global or distributed command.
For details on the safekit command, see section 9.
To use the safekit command:
|
In Windows |
1. Open a PowerShell console as administrator 2. Go to the root of the SafeKit installation directory SAFE (by default SAFE=C:\safekit if %SYSTEMDRIVE%=C:) cd c:\safekit 3. Run .\safekit.exe <arguments> for the local command 4. Run .\safekit.exe -H "<hosts>" <arguments> for the command distributed across multiple nodes |
|
In Linux |
1. Open a Shell console as root 2. Go to the root of the SafeKit installation directory SAFE (by default SAFE=/opt/safekit) cd /opt/safekit 3. Run ./safekit <arguments> for the local command 4. Run ./safekit -H "<hosts>" <arguments> for the command distributed across multiple nodes |
For instance, to display the levels (SafeKit, OS…):
· for the local host
safekit level
· for all hosts configured in the SafeKit cluster
safekit -H "*" level
2.1.5 SafeKit license keys
License keys are
determined and verified based on the Operating System (Windows or Linux) and
the hostnames of machines (not the FQDN), as returned by the hostname
command in a Windows command prompt or a Linux shell. They are delivered in a
text file. Once the license key file is installed, there is no need for a
connection to a license server.
· If you do not install any license key file, the product will stop functioning every 3 days. However, it can be restarted for another 3 days.
· You can download a one-month trial key file from the following address: https://www.evidian.com/products/high-availability-software-for-application-clustering/high-availability-and-load-balancing-cluster-key/
· When a license key expires or is incorrect (e.g., wrong OS or hostname), the system falls into the 3-day behavior.
· After placing a purchase order, you obtain a permanent key file (see section 8.2). The permanent key file can be installed without reinstalling or stopping the product.
· The key file can contain keys for multiple hostnames. SafeKit will detect the appropriate license for the correct OS/hostname on each server.
·
Save the key file into the SAFE/conf/license.txt file (or any
other file in SAFE/conf) on each server.
·
If files in SAFE/conf contain more than one key file, the most favorable key will be
chosen.
·
Check the key conformance on each server with
the command SAFE/safekit level or with the SafeKit web console.
2.1.6 System specific procedures and characteristics
2.1.6.1 Windows
· Apply a special procedure to properly stop SafeKit modules at machine shutdown and to start safeadmin service at boot: see section 10.4.
· For network interfaces with teaming and with SafeKit load balancing, it is necessary to uncheck "Vip" on physical network interfaces of teaming and keep it checked only on teaming virtual interface.
2.1.6.2 Linux
· For an updated list of required packages, see the SafeKit Release Notes.
· The user safekit and a group safekit are created: all users belonging to the safekit group, and the user root can execute SafeKit commands
· In a farm module with load balancing on a virtual IP address, the vip kernel module is compiled when the module is configured. To compile successfully, Linux packages must be installed. See the SafeKit Release Notes for an up-to-date list of the packages.
· For a farm with SafeKit load balancing on a bonding interface, no ARP should be set in the bonding configuration. Otherwise, the association <virtual IP address, invisible virtual MAC address> is broken in client ARP caches with physical MAC address of the bonding interface.
2.2 Mirror installation recommendation
|
|
virtual ip = ip 1.10
mirror(app1)= app1
dir1 dir1 |
2.2.1 Hardware prerequisites
· 2 servers with the same Operating System
· Supported OS: https://support.evidian.com/supported_versions/#safekit
· Disk drive with write-back cache recommended for the performance of the IOs
2.2.2 Network prerequisites
· 1 physical IP address per server (ip 1.1 and ip 1.2)
· If you need to set a virtual IP address (ip 1.10), both servers must be in the same IP network with the standard SafeKit configuration (LAN or extended LAN between two remote computer rooms). For setting a virtual IP address with servers in different IP networks, see section 13.5.3.
2.2.3 Application prerequisites
· The application is installed and starts on both servers
· Application can be started and stopped using command lines
· On Linux, command lines like service "service" start|stop or su -user "appli-cmd"
· On Windows, command lines like net start|stop "service"
· If necessary, application with a procedure to recover after crash
· Remove automatic application start at boot and configure the boot start of the module instead
2.2.4 File replication prerequisites
· File directories that will be replicated are created on both servers
· They are located at the same place on both servers in the file tree
· It is better to synchronize clocks of both server for file replication (NTP protocol)
· On Linux, align uids/gids on both servers for owners of replicated directories/files
· See also system specific procedures and characteristics in section 2.1.6
2.3 Farm installation recommendation
|
|
virtual IP = ip 1.20 ip 1.20 ip 1.20
farm (app2) = app2 app2 app2 |
2.3.1 Hardware prerequisites
· At least 2 servers with the same Operating System
· Supported OS: https://support.evidian.com/supported_versions/#safekit
· Linux: kernel compilation tools installed for vip kernel module
2.3.2 Network prerequisites
· 1 physical IP address per server (ip 1.1, ip 1.2, ip 1.3)
· If you need to set a virtual IP address (ip 1.20), servers must be in the same IP network with the standard SafeKit configuration (same LAN or extended LAN between remote computer rooms). For setting a virtual IP address with servers in different IP networks, see section 13.5.3.
· See also system specific procedures and characteristics in section 2.1.6
2.3.3 Application prerequisites
The same prerequisites as for a mirror module described in section 2.2.3
2.4 SafeKit upgrade
If you encounter a problem with SafeKit, see the Software Release Bulletin containing the list of fixes on the product.
If you want to take advantage of some new features, see the SafeKit Release Notes. This document also tells you if you are in the case of a major upgrade (ex. 7.5 to 8.2) which requires a different procedure from the one presented here.
The upgrade procedure consists in uninstalling the old package and then installing the new package. All nodes in the same cluster must be upgraded.
2.4.1 Prepare the upgrade
1. Note the state "on" or "off" of SafeKit services and modules started automatically at boot safekit boot webstatus; safekit boot status -m AM (where AM is the name of the module) and in Windows: safekit boot snmpstatus;
|
|
The start at boot of the module can be defined in its configuration file. If so, the use of the safekit boot command becomes unnecessary. |
2. for a mirror module
note the server in the ALONE or PRIM status to know which server holds the up-to-date replicated files
3. optionally, take snapshots of modules
Uninstalling/reinstalling will reset logs and dumps of each module. If you want to keep this information (logs and last 3 dumps and configurations), run the command safekit snapshot -m AM /path/snapshot_xx.zip (replace AM by the module name)
2.4.2 Uninstall procedure
On Windows as administrator and on Linux as root:
1. stop all modules using the command safekit shutdown
For a mirror in the PRIM-SECOND status, stop first the SECOND server to avoid an unnecessary failover
2. close all editors, file explorers, shells, or terminal under SAFE and SAFEVAR (to avoid package uninstallation error)
3. uninstall SafeKit package
|
Use the Control Panel-Add/Remove Programs applet |
|
|
In Linux |
Use the command safekit uninstall |
4. undo all configurations that you have done manually for the firewall setup (see section 10.3)
Uninstalling SafeKit includes creating a backup of the installed modules in SAFE/Application_Modules/backup, then unconfiguring them.
2.4.3 Reinstall and postinstall procedure
1. Install the new package as described in section 2.1
2. Check with the command safekit level the installed SafeKit version and the validity of the license (which has not been uninstalled)
If you have a problem with the new package and the old key, take a temporary license: see section 2.1.5
3. If you use the web console, clear the browser cache and refresh pages in the web browser
4. Since SafeKit 8.2.1, previously configured modules are automatically reconfigured on upgrade.
However, you may still need to reconfigure module to apply any configuration changes coming with the new version (see the SafeKit Release Notes). Reconfigure the module either with:
o the web console by navigating to ![]() “Configuration/Modules
configuration/
“Configuration/Modules
configuration/
![]() Configure the module/”
Configure the module/”
o the web console by directly entering the URL http://host:9010/console/en/configuration/modules/AM/config/
o the command safekit config -m AM
where AM is the module name
5. If necessary, reconfigure the automatic start of modules at boot
The start at boot of the module can be defined in its configuration file. If so, skip this step. Otherwise, run the command safekit boot -m AM on (replace AM by the module name)
6. Restart the modules
|
The module must be started as primary on the node with the updated replicated files (former PRIM or ALONE) either with: ·
the web console by navigating to · the command safekit prim -m AM (replace AM by the module name)
Check that the application is working properly once the module is in ALONE state, before starting the other node. On the other node (former SECOND), the module must be started in secondary mode either with: ·
the web console by navigating to · the command safekit second -m AM (replace AM by the module name) Once this initial start has been performed by selecting the primary and secondary nodes, subsequent starts can be performed with: ·
the web console by navigating to · the command safekit start -m AM (replace AM by the module name) |
|
|
Farm module |
Start the module either with: ·
the web console by navigating to · the command safekit start -m AM (replace AM by the module name) |
Furthermore, in exceptional cases where you have modified the default setup of the SafeKit web service or SNMP monitoring :
1. the SafeKit web service safewebserver
· If its automatic start at boot had been disabled, disable it again with the command safekit boot weboff
· If you had modified configuration files and these have evolved in the new version, your modifications are saved into SAFE/web/conf before being overwritten by the new version. Carrying over your old configuration to the new version may require some adaptations. For details on the default setup and all predefined setups, see section 11.
· For HTTPS and login/password configurations, certificates, and user.conf / group.conf generated for the previous release should be compatible.
2. The SafeKit SNMP monitoring
· In Windows, if its automatic start at boot had been enabled, enable it again with the command safekit boot snmpon
· If you had modified configuration files and these have evolved in the new version, your modifications are saved into SAFE/snmp/conf before being overwritten by the new version. Carrying over your old configuration to the new version may require some adaptations. For details, see section 10.9.
2.5 SafeKit full uninstall
For completely removing the SafeKit package, follow the procedure described below.
2.5.1 Uninstall on Windows as administrator
1. Log-in as administrator on Windows server
2. stop all modules using the command safekit shutdown
3. close all editors, file explorers, shells, or cmd under SAFE and SAFEVAR (to avoid package uninstallation error)
(SAFE=C:\safekit if %SYSTEMDRIVE%=C: ; SAFEVAR=C:\safekit\var if %SYSTEMDRIVE%=C:)
4. uninstall SafeKit using the Control Panel-Add/Remove Programs applet
5. reboot the server
6. delete the folder SAFE that is the installation directory of the previous install of SafeKit
7. undo all configurations that you have done for SafeKit boot/shutdown (see section 10.4)
8. undo all configurations that you have done for firewalls rules setting (see section 10.3)
2.5.2 Uninstall on Linux as root
1. Open a Shell console as root on Linux server
2. stop all modules using the command safekit shutdown
3. close all editors, file explorers, shells, or terminal under SAFE and SAFEVAR (SAFE=/opt/safekit ; SAFEVAR=/var/safekit)
4. uninstall SafeKit using the safekit uninstall -all command and answer yes when prompted to delete all SafeKit folders
5. reboot the server
6. undo all configurations that you have done for firewalls rules setting
See section 10.3
7. delete the user/group created by the previous install (default is safekit/safekit) with the commands:
userdel safekit
groupdel safekit
2.6 SafeKit documentation
|
The SafeKit solution is fully described. |
|
|
Refer to this online training for a quick start in using SafeKit. |
|
|
It presents: · latest install instructions · major changes · restrictions and known problems · migration instructions |
|
|
Bulletin listing SafeKit 8.2 packages, with descriptions of changes and fixed issues. |
|
|
List of known SafeKit issues and restrictions. Other KBs are available on the Evidian support site, but are only accessible to registered users. For more details on the support site, see section 8. |
|
|
This is the guide. Please refer to
the guide corresponding to your SafeKit version number. It is delivered with
the SafeKit package and can be accessed via the web console under The link opposite takes you to the latest version of this guide. |
3. The SafeKit web console
![]() Section 3.1 “Start the web console”
Section 3.1 “Start the web console”
![]() Section 3.2 “Configure the cluster”
Section 3.2 “Configure the cluster”
![]() Section
3.3 “Configure a module”
Section
3.3 “Configure a module”
![]() Section 3.4 “Monitor a module”
Section 3.4 “Monitor a module”
![]() Section 3.5 “Snapshots or logs of module for debug and support”
Section 3.5 “Snapshots or logs of module for debug and support”
![]() Section 3.6 “Secure access to the web console”
Section 3.6 “Secure access to the web console”
The SafeKit 8 web console and API have evolved from earlier versions. As a result, the console delivered with SafeKit 8 can only administer SafeKit 8 servers, which cannot be administered with an older console.
3.1 Start the web console
The web console permits to administer one SafeKit cluster. A SafeKit cluster is a set of servers where SafeKit is installed and running. All servers belonging to a given SafeKit cluster share the same cluster configuration (list of servers and networks used) and communicate with each other’s to have a global view of SafeKit modules configurations. The same server can not belong to many SafeKit clusters.
3.1.1 Start a web browser
· The web browser runs on any allowed SafeKit nodes or workstation that can reach the SafeKit servers over the network.
· Network, firewall and proxy configuration must allow access to all the servers that are administered with the web console
· JavaScript must be available and enabled in the web browser
· Tested browsers are Microsoft Edge, Firefox, and Google Chrome
· To avoid security popups in Microsoft Edge, you may add the SafeKit servers addresses into the Intranet or Trusted zone
· The messages in the web console are displayed in French or English languages, according to the selected language into the console
· After SafeKit upgrade, you must clear the browser’s cache to get the new web console pages. A quick way to do this is a keyboard shortcut:
1. Open the browser to any web page and hold CTRL and SHIFT while tapping the DELETE key
2. A dialog box will open to clear the browser. Set it to clear everything and click Clear Now or Delete at the bottom
3. Close the browser, stop all background processes that may be still running and re-open it fresh to reload the web console
3.1.2 Connect to a SafeKit server
By default, access to the web console requires the user to authenticate himself with a name and password. On SafeKit install, you had to initialize it with the user admin and assign a password. This admin name and password are sufficient to access all the console's features. For more details on this configuration, see section 11.2.1.
1. Start a web browser (Microsoft Edge, Firefox, or Chrome)
2. Connect it to the URL http://host:9010 (where host is the name or IP address of one of the SafeKit servers). If HTTPS is configured, there is an automatic redirection to https://host:9453.
3. The SafeKit server to which the console is connected (host in the URL) is called the connection node. This node acts as a proxy to communicate on behalf of the console with all other SafeKit servers.
|
|
You can connect to any node of the cluster since the console offer global view and actions. On connection error with one node, connect to another node. |
4. In the login page, enter admin as user’s name and the password you gave on initialization (e.g., pwd).
5. The SafeKit web console is loaded
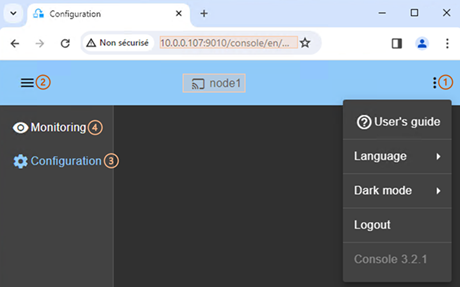
· When the console is connected to a SafeKit server on which the cluster is configured, the name of the node corresponding to the server (as defined in the cluster configuration) is displayed in the header. This is the connection node (node1 in the example). If the cluster is not yet configured, no name is displayed.
·
Click on ![]() to open the menu
to read the SafeKit User’s Guide, select the language, enable/disable the dark
mode and logout.
to open the menu
to read the SafeKit User’s Guide, select the language, enable/disable the dark
mode and logout.
·
Click on ![]() to collapse or
expand the navigation sidebar.
to collapse or
expand the navigation sidebar.
·
Click on ![]() “Configuration” to
configure the cluster and the modules. Configuration is only authorized to
users that have Admin role. By default, the admin user has the
Admin role.
“Configuration” to
configure the cluster and the modules. Configuration is only authorized to
users that have Admin role. By default, the admin user has the
Admin role.
·
(4) Click on ![]() “Monitoring” to
monitor and control the configured modules. Monitoring is authorized to users
that have Admin, Control and Monitor roles. With Monitor role, actions on
modules (start, stop…) are prohibited.
“Monitoring” to
monitor and control the configured modules. Monitoring is authorized to users
that have Admin, Control and Monitor roles. With Monitor role, actions on
modules (start, stop…) are prohibited.
|
|
The web console offers contextual help by
clicking on the |
3.2 Configure the cluster
The SafeKit cluster must be defined before installing, configuring, or starting a SafeKit module. A Safekit cluster is defined by a set of networks and the addresses, on these networks, of a group of SafeKit servers, named nodes. These nodes implement one or more modules. Each server is not necessarily connected to all the networks, but at least one.
The cluster configuration is saved on the servers’ side into the cluster.xml file (see section 12). For a correct behavior, it is required to apply the same cluster configuration on all the nodes.
|
|
You must fully define the cluster configuration before installing and configuring modules since the modification of the cluster can affect the configuration or the execution of installed modules. |
The cluster configuration home page is available :
· Directly via the URL http://host:9010/console/en/configuration/cluster
Or
·
By navigating the console via ![]() “Configuration/Cluster configuration”
“Configuration/Cluster configuration”
If the cluster is not yet configured, the cluster configuration wizard is automatically opened.
3.2.1 Cluster configuration wizard
Open the configuration wizard:
· Directly via the URL http://host:9010/console/en/configuration/cluster/config
Or
·
Navigate in the console via
![]() “Configuration/Cluster
configuration/
“Configuration/Cluster
configuration/
![]() Configure
the cluster/”
Configure
the cluster/”
The cluster configuration wizard is a step-by-step guided form:
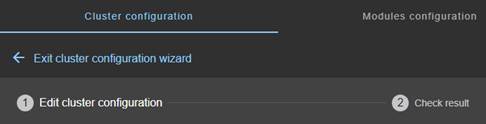
1. “Edit cluster configuration” described in section 3.2.1.1
2. “Check result” described in section 3.2.1.2
3. ![]() to “Exit
cluster configuration wizard”
to “Exit
cluster configuration wizard”
3.2.1.1 Edit cluster configuration
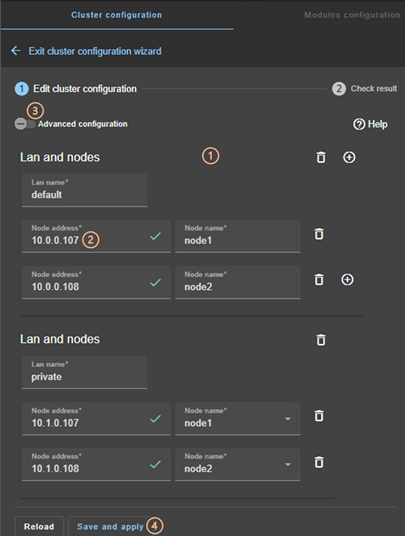
· (1) Fill in the form to first assign a user-friendly name for the network. This name is used for configuring heartbeat networks used by a module.
Click on ![]() to add another node/lan or on
to add another node/lan or on ![]() to remove the node/lan from the
cluster.
to remove the node/lan from the
cluster.
|
|
When a node/lan is removed from the cluster, all modules using it in its configuration may become unusable. |
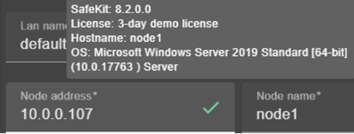
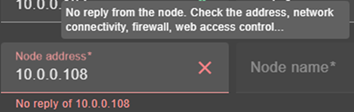
· (2) Fill in the IP address of the node and then press the Tab key to check the server connectivity and automatically insert the server hostname.
The icon next to the address reflects the reachability of the node.
|
|
|
|
· Change the node name if necessary. This name is the one that will be used by the SafeKit administration service for uniquely identifying a SafeKit node. It is also the one displayed into the SafeKit web console.
· (3) If you prefer, click on “Advanced configuration” to switch to XML cluster editing.
Click on ![]() to open the SafeKit User’s
Guide on the configuration description in the cluster.xml file.
to open the SafeKit User’s
Guide on the configuration description in the cluster.xml file.
· Click on “Reload” to discard your current modifications and reload the original configuration.
· (4) Once the edition is completed, click on “Save and Apply” to save and apply the edited configuration to all nodes in the cluster.
|
|
If required, you can reapply the configuration to all nodes without modifying it. |
|
|
For examples of cluster configurations with two networks refer to section 15.1.1; with three nodes refer to section 15.2.1. |
3.2.1.2 Check result
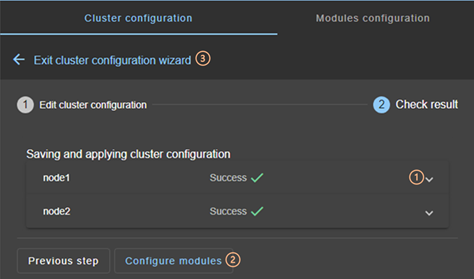
· (1) Read the result of the operation on each node:
o “Success”![]() means
the configuration was successful.
means
the configuration was successful.
o “Failure”![]() means
the configuration has failed. Click to read the output of commands executed on
the node and search for the error. You may need to modify the parameters
entered or connect to the node to correct the problem. Once the error has been
corrected, “Save and apply” again.
means
the configuration has failed. Click to read the output of commands executed on
the node and search for the error. You may need to modify the parameters
entered or connect to the node to correct the problem. Once the error has been
corrected, “Save and apply” again.
· (2) Click on “Configure modules” to exit the cluster configuration wizard and navigate to modules configuration.
Or
·
(3) Click on ![]() to “Exit the cluster
configuration wizard” and navigate to the cluster configuration home
page
to “Exit the cluster
configuration wizard” and navigate to the cluster configuration home
page
3.2.2 Cluster configuration home page
When the cluster is configured, the cluster configuration home page is available.
Open it:
· Directly via the URL http://host:9010/console/en/configuration/cluster
Or
·
By navigating the console via ![]() “Configuration/Cluster configuration”
“Configuration/Cluster configuration”
In this example, the console is loaded from 10.0.0.107, which corresponds to node1 in the existing cluster. This is the connection node.
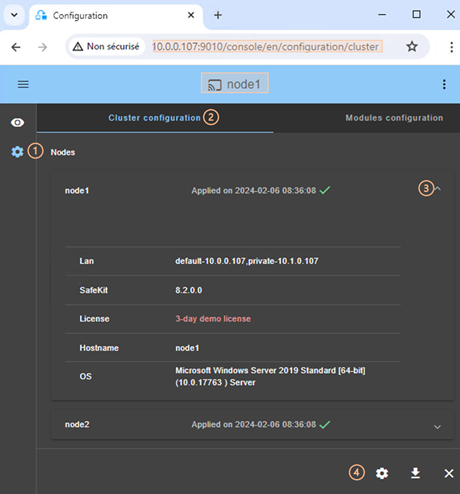
·
(1) Click on ![]() “Configuration” in the
navigation sidebar
“Configuration” in the
navigation sidebar
· (2) Click on “Cluster configuration” tab
Nodes configured in the cluster are listed with their configuration date.
·
(3) Click on ![]() to display
details about the node: networks name and addresses
defined in the cluster configuration, SafeKit version, license key, hostname,
OS.
to display
details about the node: networks name and addresses
defined in the cluster configuration, SafeKit version, license key, hostname,
OS.
· (4) Click on one of the buttons:
o ![]() to
modify the cluster configuration and/or re-apply it. This opens the cluster
configuration wizard and loads the cluster configuration from the connection
node.
to
modify the cluster configuration and/or re-apply it. This opens the cluster
configuration wizard and loads the cluster configuration from the connection
node.
o ![]() to
download the cluster configuration in XML format from the connection node.
to
download the cluster configuration in XML format from the connection node.
o ![]() to
unconfigure the cluster on one or more nodes
to
unconfigure the cluster on one or more nodes
3.3 Configure a module
Once the cluster has been set up, you can configure a new module on the cluster. The module configuration home page is accessible :
· Directly via the URL http://host:9010/console/en/configuration/modules
Or
·
By navigating the console via ![]() “Configuration/Modules configuration”
“Configuration/Modules configuration”
If no module has been configured, the console automatically presents the page for configuring a “New module”.
|
|
For module configuration examples refer to section 15. |
3.3.1 Select the new module to configure
In this example, the console is loaded from 10.0.0.107, which corresponds to node1 in the existing cluster. This is the connection node.
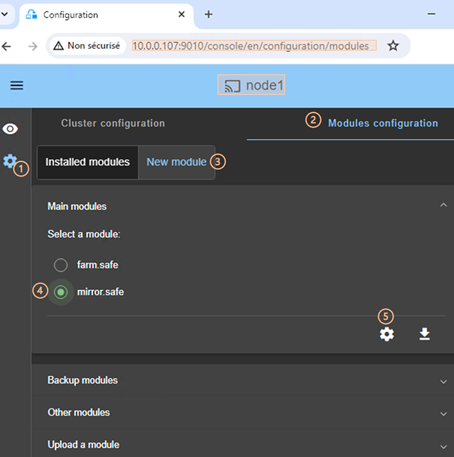
·
(1) Click on ![]() “Configuration” in the
navigation sidebar
“Configuration” in the
navigation sidebar
· (2) Click on “Modules configuration” tab
· (3) Click on “New Module”
The page
proposes to select a new module among several proposals visible by clicking on ![]() :
:
o the “Main modules”, including the generic mirror.safe (refer to section 15.1.2) and farm.safe (refer to section 15.2.2) modules for integrating a new application into a mirror or farm architecture.
Here are the modules stored on the connection node, node1, under SAFE/Application_Modules/generic, SAFE/Application_Modules/demo and SAFE/Application_Modules/published.
o “Backup modules” archived on the connection node, which are saved when a module is uninstalled on this node.
They are loaded from node1 under SAFE/Application_Modules/backup.
o “Other modules” which are examples of SafeKit features used in modules supplied for testing purposes only. Refer to section 15 for the description some of them.
They are loaded from node1 under SAFE/Application_Modules/other.
o A locally stored module accessible from “Upload module”.
This feature can be used to configure a module for a given application (e.g., Microsoft SQL Server, PostgreSQL…) downloaded from one of the SafeKit quick installation guides.
· (4) Select a module to configure from those listed above. In the example, mirror.safe.
·
(5) Click on the button ![]() Configure the new module.
Configure the new module.
· A dialog opens to give the new module name

· (6) Enter the name of the new module.
· (7) Click on “Confirm”
The module configuration wizard is opened. This is described below.
3.3.2 Module configuration wizard
The module configuration wizard is a step-by-step guided form.:

1. “Edit module configuration” described in section 3.3.2.1
2. “Edit module scripts (Optional)” described in section 3.3.2.2
3. “Enable communication encryption (Optional) ” described in section 3.3.2.3
4. “Save and apply” described in section 3.3.2.4
5. “Check result” described in section 3.3.2.5
6. ![]() to “Exit
module configuration wizard”
to “Exit
module configuration wizard”
Note that module reconfiguration can only be applied to nodes on which the module in question is not started. Therefore, stop the module before starting the configuration wizard.
|
|
If needed, you can reapply the module configuration on all nodes without modifying it. |
3.3.2.1 Edit module configuration
Below is an example of editing the mirror.safe module configuration.
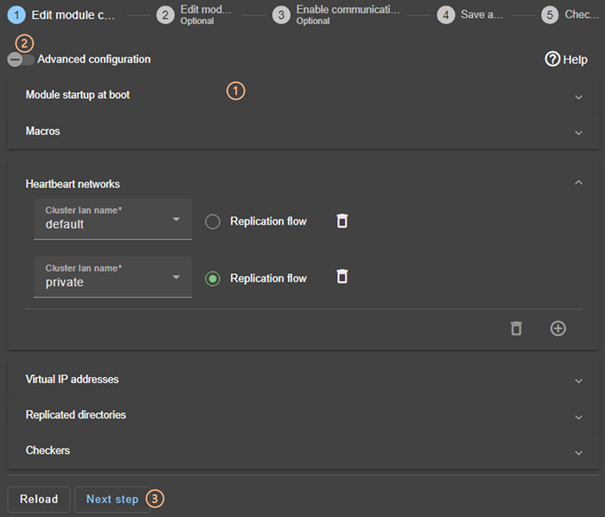
·
(1) Fill in the form to assign values to the
various components, add or remove them. Click on ![]() to
open the detailed panel for each component.
to
open the detailed panel for each component.
This form is used to enter only the main module configuration parameters.
|
|
The names of the “Heartbeat networks” proposed are the names of the lans entered during cluster configuration. |
· (2) For advanced module configuration, exhaustive compared to the form, click on “Advanced configuration”. This switches to editing the module configuration file in XML format, userconfig.xml.
Click on ![]() to open the SafeKit User’s
Guide describing the configuration of the various components in the userconfig.xml file.
to open the SafeKit User’s
Guide describing the configuration of the various components in the userconfig.xml file.
· If necessary, click on “Reload” to discard your modifications and reload the complete original configuration (including scripts if these were modified in the next step).
· (3) Once you have finished editing the module configuration, click on “Next step”.
|
|
For examples of mirror module configuration, refer to section 15.1.2 ; of farm module configuration, refer to section 15.2.2. |
3.3.2.2 Edit module scripts
Below is an example of editing the mirror.safe module scripts.
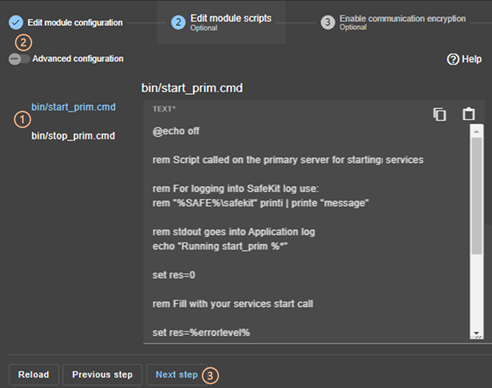
· (1) Click on “start_prim” or “stop_prim” to edit it and insert your application start/stop.
Click on ![]() to copy the content and edit it
with your favorite syntax editor. Once done, paste the modified content into
the input field with
to copy the content and edit it
with your favorite syntax editor. Once done, paste the modified content into
the input field with ![]() .
.
· (2) If necessary, click on “Advanced configuration” to list the other module’s scripts and edit them (prestart, poststop, scripts for checkers…).
·
Click on ![]() to open
the SafeKit User’s Guide describing the module scripts.
to open
the SafeKit User’s Guide describing the module scripts.
· If necessary, click on “Reload” to discard your modifications and reload the complete original configuration (including the module configuration if it was modified in the previous step).
· (3) Once you have finished editing the module scripts, click on “Next step”.
|
|
For examples of mirror module scripts, refer to section 15.1.3 ; of farm module scripts, refer to section 15.2.3. |
3.3.2.3 Enable communication encryption
Encryption of internal module communications between cluster nodes is enabled by default. For details, see section 10.6.
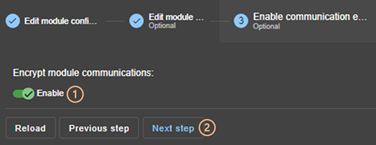
· (1) Click “Enable” to enable or disable encryption of module communications.
|
|
When the module's encryption key is not identical on all nodes, internal communication is impossible. The configuration must be reapplied to all nodes to propagate the same key. |
To generate new encryption keys, you need to:
1. disable encryption, then “Save and apply” configuration to all nodes
2. enable encryption, then “Save and apply” configuration to all nodes
· If necessary, click on “Reload” to discard your modifications and reload the complete original configuration (including the module configuration and scripts if these were modified in the previous steps).
· (2) Once this step is complete, click on “Next step”.
3.3.2.4 Save and apply
Step to select the nodes affected by the configuration.
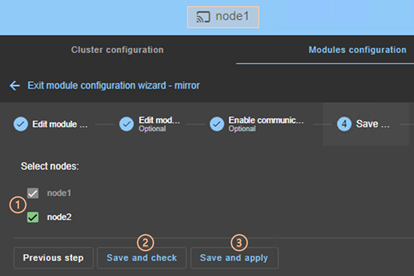
· (1) Check/uncheck to select/unselect nodes. Please note that the connection node (node1 in the example) is mandatory.
There are 2 cases where “Save and Apply” is disabled:
|
The module on the selected node is
started and, in a state, other than |
|
There was no reply from the node within the timeout delay. It may be a bad address, a network or host failure, a bad configuration of the web browser or the firewall, the stop of the SafeKit web service on the node. For solving the problem, refer to the section 7.1. |
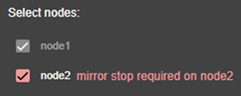

In both cases, uncheck the node or click on “Save and check” to apply it later, after stopping the module or solving the communication problem.
· (2) Click on “Save and check” to save the edited configuration on the connection node and check its consistency. It then proceeds to the next step to display the result of this operation.
Once this operation has been completed, any changes are saved on the connection node. The configuration wizard can be exited and relaunched later to apply the saved configuration. Until the saved configuration is applied, the last applied configuration of the module remains active.
· (3) Click on “Save and apply” to save and apply the edited configuration on selected nodes. It then proceeds to the next step to display the result of this operation.
If this operation is successful, the applied configuration becomes the active one for the module.
|
|
On the server side, the module configuration is saved under SAFE/modules/AM(where AM is the module name). When reconfiguring a module, this directory is deleted and overwritten with the changes made in the console. Thus, on the servers’ side, you must close all editors, file explorers, shells or cmd under SAFE/modules/AM before applying the configuration (otherwise there is a risk that the apply fails). |
3.3.2.5 Check result
The example below shows the result of the “Save and Apply” operation. The layout for “Save and Verify” is similar.
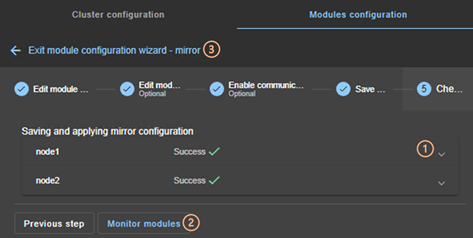
· (1) Read the result of the operation on each node:
o “Success”![]() means
the operation was successful.
means
the operation was successful.
o “Failure”![]() means
the operation has failed.
means
the operation has failed.
Click to read the output of commands executed on the node and search for the error. You may need to modify the parameters entered or connect to the node to correct the problem. Once the error has been corrected, repeat the operation from the previous step.
· (2) Click on “Monitor modules” to exit the module configuration wizard and navigate to modules monitoring.
Or
·
(3) Click on ![]() to “Exit the module
configuration wizard” and navigate to the modules configuration home page.
to “Exit the module
configuration wizard” and navigate to the modules configuration home page.
3.3.3 Modules configuration home page
Once the first module has been configured, the module configuration home page is available. It allows you to view the modules installed on the cluster and to access the configuration of a new module.
Open it:
· Directly via the URL http://host:9010/console/en/configuration/modules
Or
·
By navigating the console via ![]() “Configuration/Modules configuration”
“Configuration/Modules configuration”
|
|
Before each reconfiguration, deconfiguration and uninstallation, on each node, close all editors, file explorer, shells or cmd under SAFE/modules/AM (or risk the operation failing). |
In the following example, the console is loaded from 10.0.0.107, which corresponds to node1 in the existing cluster. This is the connection node.
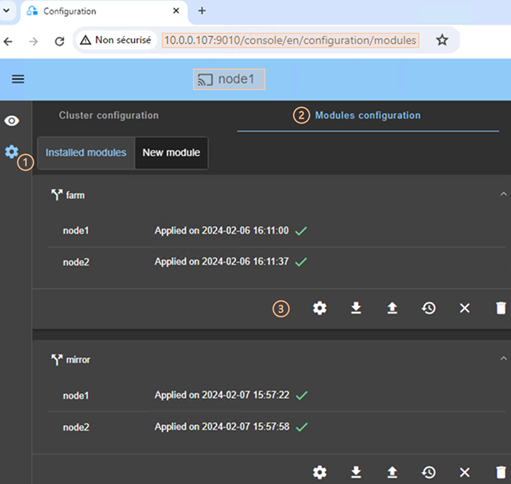
·
(1) Click on ![]() “Configuration” in the
navigation sidebar.
“Configuration” in the
navigation sidebar.
· (2) Click on “Modules configuration” tab.
· Modules installed on the cluster are listed with the date the configuration was applied and, if applicable, the date the configuration was saved but not yet applied.
· (3) Click on one of the buttons associated with the module:
o ![]() to
modify its configuration or reapply its current configuration. This opens the
module configuration wizard and loads its current configuration from the
connection node.
to
modify its configuration or reapply its current configuration. This opens the
module configuration wizard and loads its current configuration from the
connection node.
o ![]() to
download the .safe, consisting of all module files (userconfig.xml,
scripts) from the connection node.
to
download the .safe, consisting of all module files (userconfig.xml,
scripts) from the connection node.
o ![]() to
reconfigure the module from the contents of a locally stored .safe.
to
reconfigure the module from the contents of a locally stored .safe.
o ![]() to
restore a previous module configuration.
to
restore a previous module configuration.
o SafeKit keeps a copy of the last three successful configurations (stored under SAFE/modules/lastconfig on the server side). All module configuration files are packaged in a .safe file, whose name is of the type of AM_<date>_<time> (where AM is the module name).
o ![]() to remove
internal files for the module on one or more nodes, without uninstalling it. The
user configuration files are kept for later re-application.
to remove
internal files for the module on one or more nodes, without uninstalling it. The
user configuration files are kept for later re-application.
o ![]() to
completely uninstall the module on one or more nodes.
to
completely uninstall the module on one or more nodes.
All module configuration files are packaged in a .safe file, which is archived on the server side under SAFE/Application_Modules/backup.
· To configure a new module, click on “New module”
3.3.4 Edit the module configuration locally and then apply it
You may prefer to use your favorite editor to modify the module’s configuration file and scripts or may need to add module scripts, such as custom checkers.
Follow the procedure below to modifye the module's configuration on your workstation and then apply it.
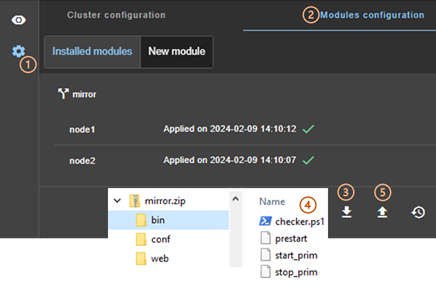
·
(1) Click on ![]() “Configuration” in the
navigation sidebar.
“Configuration” in the
navigation sidebar.
· (2) Click on “Modules configuration” tab.
·
(3) Click on ![]() to download the mirror.safe on your workstation.
to download the mirror.safe on your workstation.
· (4) Extract the content of mirror.safe, that is a zip file, to edit userconfig.xml, add/delete/edit module scripts into the bin directory (add a custom checker for instance).
·
(5) Compress the modified directory into xx.safe
(or xx.zip) then upload it with ![]() (.safe
and .zip extension are accepted).
(.safe
and .zip extension are accepted).
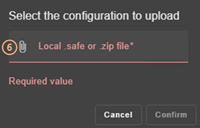
·
(6) Click on ![]() to select the
file to be uploaded then “Confirm”.
to select the
file to be uploaded then “Confirm”.
The module configuration wizard is launched with the contents of this file. The new contents are visible into the wizard. Got to step 4 to “Save and apply” this new configuration.
3.4 Monitor a module
Once a module is configured, you can monitor its state and run actions on it (start, stop…).
The modules monitoring home page is accessible :
· Directly via http://host:9010/console/en/monitoring
Or
·
By navigating the console via ![]() “Monitoring”
“Monitoring”
3.4.1 Monitoring home page
|
In this example, the console is loaded from 10.0.0.107, which corresponds to node1 in the existing cluster. This is the connection node. Two modules are configured: farm and mirror.
·
(1) Click on For each installed module, it displays: o the module name and nodes name on which it is installed o the module state on the node o a notification on state change if the user has allowed them, and the URL is https or http://localhost For a description, see section 3.4.2. ·
(2) Click on For a description, see section 3.4.3.1. ·
(3) Click on For a description, see section 3.4.3.2. ·
(4) Click
on the node panel (mirror>node1 in the example) to open details for the
module on this node (logs, resources…). Since SafeKit 8.2.2, Click instead on For a description, see section 3.4.4. ·
(5) Click on For a description, see section 3.4.5. |
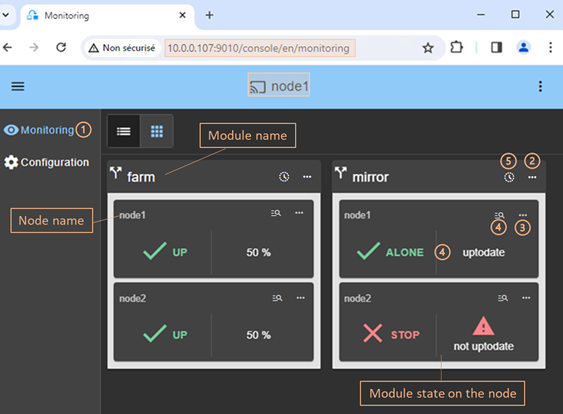
3.4.2 Module state
The module is represented real-time display of its synthetic and detailed states on the left and right panels.
3.4.2.1 Synthetic state
The console displays one of the following synthetic states for the module on the node:
|
|
|
|
|
|
|
|
|
|
|
|
|
|
|
|
|
|
|
|
|
|
|
NOT CONFIGURED (grey) Installed module but not configured |
|
This may be due to an incorrect address, a network or server failure, a misconfigured web browser or firewall, or the SafeKit web service being stopped on the node (see section 7.1). It may also be due to the temporary unavailability of the connection node. In this case, reload the console from another SafeKit node. |
For details on state changes of a mirror module, see section 5.2.
For details on state changes of a farm module, see section 6.2.
3.4.2.2 Detailed state
It is the state of the main resources or failover rules.
|
uptodate Replicated directories of the mirror module are uptodate |
|
not uptodate |
|
degraded |
|
50%, 100% The network load share of the farm module (e.g. 50% or 100% with 2 nodes) |
|
0% |
|
c_checkfile c_checkfile) which triggers the actions restart, stop, stopstart, or wait on the module due to a resource going down. View section 13.18.4.2 for details on failover rules. To analyze the issue, read the logs and resource statuses as described below. |
|
connection The node did not respond within the given time limit error |
3.4.3 Module control menus
3.4.3.1 Global menu
The actions of global menu apply to all nodes where the module is configured.
In the example below, actions apply to the module mirror on node1 and node2.
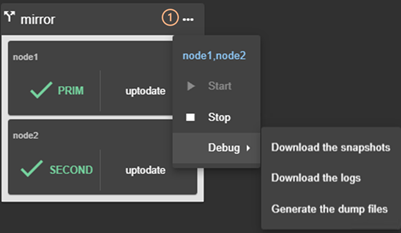
·
(1) Click on ![]() to open the
module's global actions menu.
to open the
module's global actions menu.
· Click on “Start” to start the module on all nodes.
For mirror module, the node with the up-to-date replicated data is started as primary.
· Click on “Stop” to stop the module on all nodes.
For mirror module, the node that is secondary is stopped first to avoid unnecessary failover.
· Click on “Debug” for debug and support as described in section 3.5.
3.4.3.2 Local menu
The actions of local menu apply only to the selected node.
3.4.3.2.1 Control a mirror module
In the example below, actions apply to the module mirror on node1.
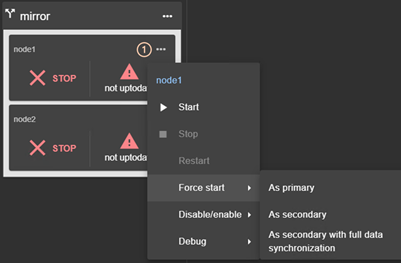
·
(1) Click on ![]() to open module's
local actions menu on the desired node (e.g. node1).
to open module's
local actions menu on the desired node (e.g. node1).
· Click on “Start” to start the module on the node.
For mirror module, the node is started as primary when replicated data are up-to-date. Otherwise, it is started as secondary. For details, see section 5.5.
· Click on “Stop” to stop the module on the node.
· Click on “Restart” to restart the module on the node.
It only executes only stop then start scripts to locally restart the application without leading to a failover.
· Use “Force start” submenu when you need to decide if the node should start primary or secondary:
o Select “Force start As Primary” to force the module to start as primary on this node.
For instance, on the 1st start of a mirror module as described in section 5.3, you must “Force start As primary” the node which has the up-to-date replicated folders.
o Select “Force Start As secondary” to force the module to start as secondary on this node.
Data synchronization can be optimized based on the module's last internal state.
o Select “Force Start As secondary with full data synchronization” to start the module on this node as a secondary and to force a complete copy of the replicated data.
· Click on “Disable/enable” to control error detection as described in section 3.4.3.2.3.
· Click on “Debug” to download module logs or snapshots from this node rather than from all nodes as described in section 3.5.
To understand and check the correct behavior of a mirror module, see section 5. To test it, see section 4.
3.4.3.2.2 Control farm module
In the example below, actions apply to the module farm on node2.
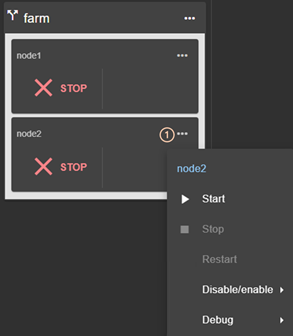
·
(1) Click on ![]() to open
module's local actions menu on the desired node (e.g. node2).
to open
module's local actions menu on the desired node (e.g. node2).
· Click on “Start” to start the module on the node.
· Click on “Stop” to stop the module on the node.
· Click on “Restart” to restart the module on the node.
It only executes only stop then start scripts to restart the application without leading to a failover.
· Click on “Disable/enable” to control error detection as described in section 3.4.3.2.3.
· Click on “Debug” to download module logs or snapshots from this node rather than from all nodes as described in section 3.5.
To understand and check the correct behavior of a farm module, see section 6. To continue the tests, see section 4.
3.4.3.2.3 Control checkers or processes/services monitoring
To avoid false error detection and automatic failover on application maintenance, you can disable configured checkers (TCP, ping, custom….) or processes/services monitoring. Once the maintenance is completed, they can be safely re-enabled. These actions can be applied while the module is started/stopped and are not reset when the module stops-starts.
In the example below, actions apply to the module mirror on node1.
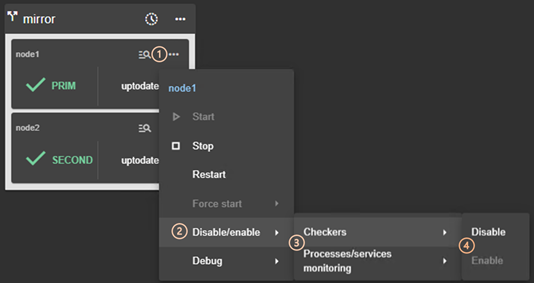
·
(1) Click on ![]() to open the
module's local actions menu on the desired node (e.g. node1).
to open the
module's local actions menu on the desired node (e.g. node1).
· (2) Click on “Disable/enable” to open the submenu.
· (3) Click on “Checkers” or “Processes/services monitoring” to open the submenu.
· (4) Click on “Disable” to disable the error detection
This disables all checkers (TCP, ping, custom….) or processes/services monitoring configured for the module.
· (4) Click on “Enable” to re-enable error detection by checkers or processes/services monitoring.
3.4.4 Module details
You can display details for a module on one node:
· Directly via the URL http://host:9010/console/en/monitoring /modules/AM/nodes/node (replace AM by the module name and node by the node name)
Or
·
By navigating the console via ![]() “Monitoring/Click on
“Monitoring/Click on ![]() for the module>node”
for the module>node”
The selected module>node is highlighted with a blue color.
In the example, the detail for the module mirror on node1 is displayed.
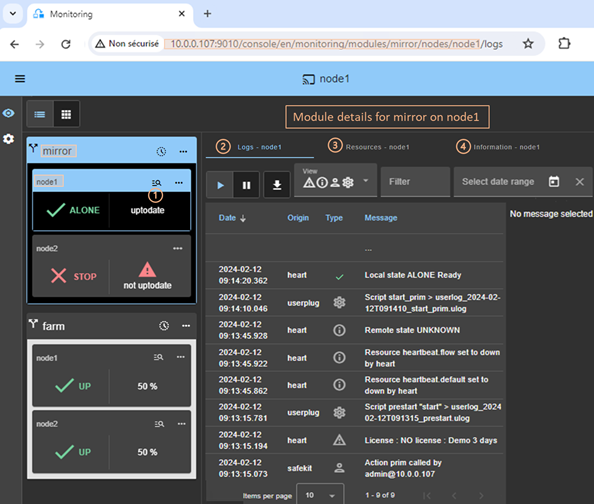
·
Click on ![]() to
open/close details for the module on this node (logs, resources…).
to
open/close details for the module on this node (logs, resources…).
· Click on “Logs” tab to visualize the module logs.
· Click on “Resources” tab to visualize the module resources.
· Click on “Information” tab to visualize information on the node: networks name and addresses defined in the cluster configuration, SafeKit version, license key, hostname, OS.
3.4.4.1 Module logs
You can display logs of a module on one node:
· Directly via the URL http://host:9010/console/en/monitoring /modules/AM/nodes/node/logs (replace AM by the module name and node by the node name)
Or
·
By navigating the console via ![]() “Monitoring/Click on the module>node/Logs tab”
“Monitoring/Click on the module>node/Logs tab”
The left panel displays in real-time the non verbose module log for the selected module>node.
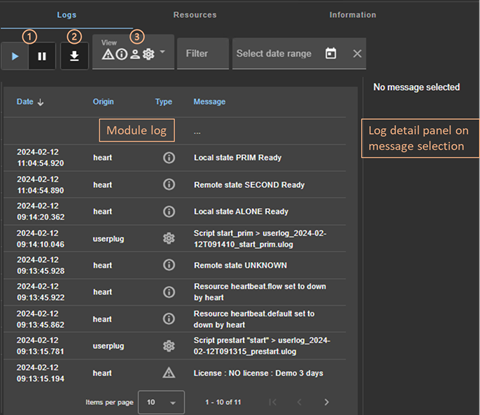
·
Click on ![]() to
resume/suspend the view in real time of the module log.
to
resume/suspend the view in real time of the module log.
Refer to section 7 for an explanation of main messages.
·
Click on ![]() to download the
module log (verbose or not verbose).
to download the
module log (verbose or not verbose).
· Select the message type to view:
|
|
· C(ritical) messages such as error detection · E(vent) messages such as local and remote states · U(ser) messages when the user run action on the module · S(cript) messages when module scripts are executed |
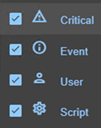
· Click on a message to display the verbose module log or the script log (output of scripts) into the log detail into the right panel.
3.4.4.1.1 Script log
To display the script log, click on the ![]() S(cript) message whose output
you want to view.
S(cript) message whose output
you want to view.
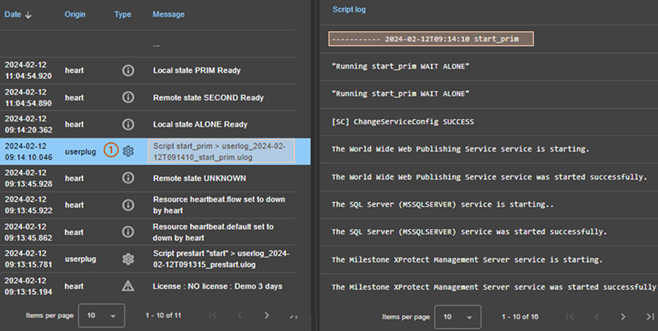
·
(1) Click the ![]() S(cript) message
consisting of:
S(cript) message
consisting of:
o the date and time of the execution of the script
o the name of the script executed
o the name of the name of the corresponding userlog file
The userlog file content is displayed into the right panel. In the example, it is the content of the file SAFEVAR/modules/AM/userlog_2024-02-12T091410_start_prim.ulog (where AM is the module name)
3.4.4.1.2 Verbose log
To display the verbose module log, click on
a message other than ![]() S(cript).
S(cript).

· (1) Click the message consisting of:
o the date and time of the event
o the module message
· All verbose messages between the selected message and the previous one in the table are displayed in the right-hand panel.
3.4.4.2 Module resources
You can display resources of a module on one node:
· Directly via the URL http://host:9010/console/en/monitoring /modules/AM/nodes/node/resources (replace AM by the module name and node by the node name)
Or
·
By navigating the console via ![]() “Monitoring/Click on the module>node/Resources tab”
“Monitoring/Click on the module>node/Resources tab”
3.4.4.2.1 Ressources state
The left panel displays in real-time the current state of the resources for the selected module>node.
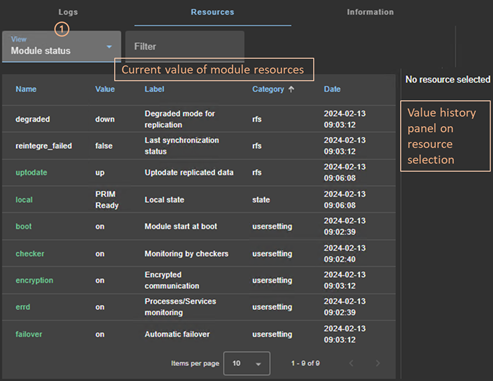
· (1) Select the group of resources to view:
|
|
· Module status Main resources, especially the ones of files replication for a mirror module · Checkers Ressources set by checkers · File replication File replication-specific resources that demonstrate synchronization progress · All resources |
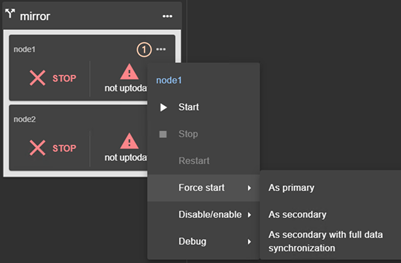
· Click on a resource to display its value over time in the right panel. This history may be empty for some resources (unassigned or cleaned).
Resource’s state is controlled by the failover machine to trigger a failover on failures (see section 13.18).
3.4.4.2.2 Resource’s state value history
To display a resource's value history, click on the resource you're interested in.

· (1) Click on the line consisting of:
o the last date the resource was assigned
o the name and category of the resource. The full resource name is like category.name (custom.checkfile in the example).
The history of resource values is displayed in the right panel. In the example, this is the custom.checkfile resource corresponding to a resource assigned by a custom checker.
3.4.5 Module states timeline
Since SafeKit 8.2.2, you can display the module states timeline:
·
By navigating the console via ![]() “Monitoring/Click on
“Monitoring/Click on ![]() for the module”
for the module”
This provides a global view of the module's state on the cluster. Be aware:
· that the clocks of the two nodes must be synchronized for the mapping of state changes to be meaningful
· it displays a reverse timeline of the module states on all nodes over time, by starting by the newest date.
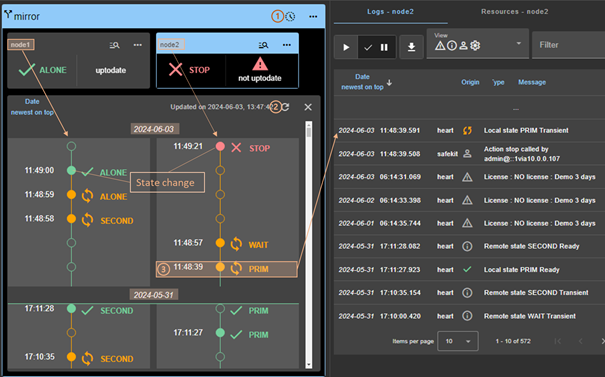
·
Click on ![]() to
open/close the timeline. The timeline displayed is the one available at the
time of loading.
to
open/close the timeline. The timeline displayed is the one available at the
time of loading.
·
Click on ![]() to
refresh the timeline with the latest state changes.
to
refresh the timeline with the latest state changes.
· Click on a state change event to display the module log for the node starting at this date
3.5 Snapshots or logs of module for debug and support
When the problem is not easily identifiable, it is recommended to download logs or snapshots of the module on all nodes as described below. Snapshots allows an offline and in-depth analysis of the module and node status as described in section 7.16. If this analysis fails, send snapshots to support as described in section 8.
In the following example, the module mirror is configured on node1 and node2. Note that a snapshot can be downloaded in any state of the module.

·
(1) Click on ![]() to open the global
menu of the module.
to open the global
menu of the module.
· (2) Click on “Debug” to open the debug submenu.
· (3) Click on “Download the snapshots” to create and download the snapshot of the module for each node.
The web console relies on the web browser's download settings to save the snapshot on the workstation. Some browsers may ask confirmation to download many files and zip files.
The snapshot generation command generates a new dump and creates a .zip file containing the last 3 dumps and the last 3 module configurations.
In this example, it downloads 2 snapshots : snapshot_node1_mirror.zip and snapshot_node2_mirror.zip.
· Click on “Download the logs” to download the module log (verbose or not) for each node.
· In case of file replication issues, click on “Generate the dump files” at the time the problem occurs.
The dump contains the module logs and information on the system and SafeKit state at the time of the dump. It is generated on the server side into SAFEVAR/snapshot/modules/AM/dump_AAAA_MM_DD_hh_mm_ss.
3.6 Secure access to the web console
|
Admin role
|
This role grants all administrative
rights by allowing access to |
|
Control role
|
This role grants monitoring and
control rights by allowing access only to |
|
Monitor role
|
This role grants only monitoring
rights, prohibiting actions on modules (start, stop…) in |
SafeKit provides different setups for the web service to enhance the security
of the SafeKit web console. The predefined setups are listed below from least
secure to most secure:
· HTTP. Same role for all users without authentication
This solution can only be implemented only in HTTP and is not compatible with user authentication methods. It is intended to be used for troubleshooting only.
· HTTP/HTTPS with user authentication based on Apache files and optional role management
It relies on Apache files to store username/password for authenticating users and, optionally, to store the associated role for restricting their access. To connect to the console, the user must enter the username and password as configured with the Apache mechanisms.
This is the default active configuration, applied for HTTP and initialized with a single admin user with the Admin role. The default setup can be extended to add users or to switch to HTTPS.
· HTTP/HTTPS with user authentication based on LDAP/AD authentication. Optional role management
It relies on LDAP/AD authentication server to authenticate users and, optionally, restricts their access based on roles. To connect to the console, the user must enter the username and password as configured into the LDAP/AD server. It supports HTTP or HTTPS.
· HTTPS with user authentication based on OpenId Connect authentication. Optional role management
It relies on OpenID Identity Provider server to authenticate users and, optionally, restricts their access based on roles. To connect to the console, the user must enter the username and password as configured into the Identity Provider server. Since SafeKit 8.2.3, it supports only HTTPS.
To implement them, refer to the section 11.
4. Tests
![]() Section 4.1 “Installation and tests after boot”
Section 4.1 “Installation and tests after boot”
![]() Section 4.2 “Tests of a mirror module”
Section 4.2 “Tests of a mirror module”
![]() Section 4.3 “Tests of a farm module”
Section 4.3 “Tests of a farm module”
![]() Section 4.4 “Tests of checkers common to mirror and farm”
Section 4.4 “Tests of checkers common to mirror and farm”
The following tests help to better understand how SafeKit works and ensure that the deployed solution returns the expected results. They can be used as a basis for the acceptance testing at a client's site.
Subsequently, analysis of test results may require consulting the module log, the scripts log (which contains the output of module scripts) and the state of module resources. To read these logs and resources, see section 7.3.
4.1 Installation and tests after boot
4.1.1 Test package installation
Replace below node1 by the node name and AM by the module name.
· safekit -p executed on the nodes returns among other values, the value of SAFE, the SafeKit root installation path, and SAFEVAR, the SafeKit working directory:
o in Windows
SAFE=C:\safekit if %SYSTEMDRIVE%=C:
SAFEVAR=C:\safekit\var
o in Linux
SAFE="/opt/safekit"
SAFEVAR="/var/safekit"
For details, see section 10.1.
· Editing userconfig.xml of a mirror(/farm) module and its scripts start_prim/start_both, stop_prim/stop_both is made with:
o the web console at /console/en/configuration/modules/AM/config
o under the directory SAFE/modules/AM on the node1
· Module log and scripts log (that contains module scripts output) for the module on one node may be analyzed with :
o the web console at /console/en/monitoring/nodes/node1/modules/AM/logs
o the command executed on node1
safekit logview -m AM
for the module log
o on node1, into files SAFEVAR/modules/AM/userlog_<year>_<month>_<day>T<time>_<script name>.ulog for the scripts logs (output messages of the scripts)
4.1.2 Test license and version
safekit level returns:
Host
: <hostname>
OS : <OS version>
SafeKit : <SafeKit version>
License : Demo (No license)| Invalid Product | Invalid Host | … Expiration… |
<license id> for <hostname>…
or License : Expired license
· "Demo (No license)"
means no license into SAFE/conf/ ; the product stops every 3 days
· "Invalid Product"
means an expired license in SAFE/conf/license.txt
· "Invalid Host"
means no valid hostname in SAFE/conf/license.txt
· " …Expiration…"
means a temporary key
· "<license id> for <hostname>"
means a permanent license
Go to http://www.evidian.com/safekit/requestevalkey.php to get a temporary key of one month for any OS or any hostname.
Go to https://support.evidian.com to get a permanent key based on the hostname and OS.
4.1.3 Test SafeKit services and modules after boot
In Windows, see also section 10.4.
Test safeadmin service
safeadmin service must be automatically started at boot. To check its state:
|
In Windows |
1. Open a PowerShell console as administrator 2. Run Get-Service -name safeadmin Status Name DisplayName ------ ---- ----------- Running safeadmin safeadmin |
|
In Linux |
1. Open a Shell console as root 2. Run systemctl status safeadmin Redirecting to /bin/systemctl status safeadmin.service ● safeadmin.service - The SafeKit Administration Daemon Loaded: loaded (/usr/lib/systemd/system/safeadmin.service; enabled; vendor preset: disabled) Active: active (running) since Tue 2024-11-12 17:30:56 CET; 20h ago … |
When safeadmin service is not running, all safekit commands fail and return for example:
safekit level
Waiting
for safeadmin ..........
Error: safeadmin administrator daemon not running
Refer to section 9.1.1, for starting safeadmin service.
Test safewebserver service
By default, safewebserver service must be automatically started at boot. To check its state:
|
In Windows |
1. Open a PowerShell console as administrator 2. Run Get-Service -name safewebserver Status Name DisplayName ------ ---- ----------- Running safewebserver safewebserver |
|
In Linux |
1. Open a Shell console as root 2. Run systemctl status safewebserver systemctl status safewebserver Redirecting to /bin/systemctl status safewebserver.service ● safewebserver.service - SafeKit Apache Server Loaded: loaded (/usr/lib/systemd/system/safewebserver.service; enabled; vendor preset: disabled) Active: active (running) since Wed 2024-11-13 11:01:31 CET; 2h 58min ago … |
When safewebserver service is not running, the following features are unavailable:
· the SafeKit web console that displays:

· the module checker
· the distributed command line interface that returns for example:
safekit -H "*" level
---------------- Server=https://10.0.0.107:9453 ----------------
curl: (7) Failed to connect to 10.0.0.107 port 9453 after 1022 ms: Couldn't connect to server
---------------- Server=https://10.0.0.108:9453 ----------------
curl: (28) Failed to connect to 10.0.0.108 port 9453 after 21024 ms: Couldn't connect to server
Refer to section 9.1.2, for starting safewebserver service.
Test SNMP service
SNMP monitoring is not enabled by default. Refer to section 10.9, to enable it.
In Windows, it relies on Net-SNMP Agent service. In Linux, it relies on the standard snmpd service. To check its state:
|
In Windows |
1. Open a PowerShell console as administrator 2. Run Get-Service -name "Net-SNMP Agent" Status Name DisplayName ------ ---- ----------- Running Net-SNMP Agent Net-SNMP Agent |
|
In Linux |
1. Open a Shell console as root 2. Run systemctl status snmpd systemctl status snmpd Redirecting to /bin/systemctl status snmpd.service ● snmpd.service - … Active: active (running) since Wed 2024-11-13 11:01:31 CET; 2h 58min ago … |
When the service is not running, the SNMP monitoring is unavailable.
Refer to section 9.1.3, for starting the service.
Test modules
· safekit boot status displays start-up ("on") or not ("off") of modules at boot
· safekit state displays state of all configured modules: STOP (mirror or farm), WAIT (mirror or farm), ALONE (mirror), PRIM (mirror), SECOND (mirror), UP (farm)
· check processes of a module: see section 10.2.
To list the processes of the AM module, execute:
safekit -r processtree list all AM
This command returns all processes with AM in arguments.
· safekit module listid displays name of installed modules with their ids: id of a module must be the same on all servers
4.1.4 Test start of SafeKit web console
For details on the web console, refer to section 3.
· connect a web browser to http://<server IP>:9010
· the web console home page is displayed
4.2 Tests of a mirror module
4.2.1
Test first start of a mirror module on 2 servers
 STOP (NotReady)
On the first start of the module after its configuration:
· message in the logs of both servers (to read logs, see section 7.3)
"Action start called by admin@<IP>via<IP>/SYSTEM/root"
·
the module goes to state ![]() WAIT (NotReady)and
WAIT (NotReady)and
![]() WAIT (NotReady)on
both servers with in the log
WAIT (NotReady)on
both servers with in the log
"Action wait from failover rule rfs_notuptodate_server"
"Data may be not uptodate for replicated directories (wait for the start
of the remote server)"
"If you are sure that this server has valid data, run safekit stop, then safekit prim to force start as primary"
For the first start of a mirror module with replicated directories, the user must force the start as primary the node with the uptodate data. Refer to section 5.3.
4.2.2
Test start of a mirror module on 2 servers  STOP (NotReady)
· message in the logs of both servers (to read logs, see section 7.3)
"Action start called by admin@<IP>via<IP>/SYSTEM/root"
·
the module goes to the stable state ![]() PRIM (Ready)and
PRIM (Ready)and
![]() SECOND (Ready)on
both servers with in the first log
SECOND (Ready)on
both servers with in the first log
"Remote state SECOND
Ready"
"Local state PRIM Ready "
· and in the other log
"Local state SECOND Ready "
"Remote state PRIM Ready "
· application is started in the start_prim script of the module on the PRIM server with message in the log
"Script start_prim"
4.2.3
Test stop of a mirror module on the server  PRIM (Ready)
· message in the log of the stopped node (to read logs, see section 7.3)
"Action stop called by admin@<IP>/SYSTEM/root"
· the stopped node runs the stop_prim script of the module which stops the application on the server with message in the log:
"Script stop_prim"
·
the module becomes ![]() STOP (NotReady)
with messages in the log:
STOP (NotReady)
with messages in the log:
"Local state STOP NotReady"
On the other node:
· the node runs a failover with the message in the log:
"Action alone called by heart : remote stop"
· the application is started with the start_prim script with the message in the log:
"Script start_prim"
·
the module becomes ![]() ALONE (Ready)
with the message in the log:
ALONE (Ready)
with the message in the log:
4.2.4
Test start of a mirror module on the server STOP (NotReady)
Start the module on a node while
the other node is ![]() ALONE (Ready).
ALONE (Ready).
· message in the log of the starting module (to read logs, see section 7.3)
"Action start called by admin@<IP>/SYSTEM/root"
·
the ![]() STOP (NotReady) module becomes
STOP (NotReady) module becomes ![]() SECOND (Ready)
SECOND (Ready)
·
the module ![]() ALONE (Ready)
becomes
ALONE (Ready)
becomes ![]() PRIM (Ready)
and continues to execute the application
PRIM (Ready)
and continues to execute the application
4.2.5
Test restart of a mirror module on the server  PRIM (Ready)
· message in the log of the server where the restart command is passed (to read logs, see section 7.3)
"Action restart called by admin@<IP>/SYSTEM/root"
·
the PRIM module becomes ![]() PRIM (Transient) and then becomes
PRIM (Transient) and then becomes ![]() PRIM (Ready)
PRIM (Ready)
· the scripts of the module stop_prim/start_prim are executed on the PRIM and restarts locally the application on the server with messages in the log:
"Script stop_prim"
"Script start_prim"
·
the other module on the other server stays ![]() SECOND (Ready)
SECOND (Ready)
4.2.6 Test virtual IP address of a mirror module
4.2.7 Test file replication of a mirror module
4.2.8
Test shutdown of the server  PRIM (Ready)
· on Windows, check that the special procedure to stop modules at shutdown has been applied. Refer to section 10.4.
·
make a shutdown of the server ![]() PRIM (Ready)
PRIM (Ready)
·
check in the log of server ![]() SECOND (Ready),
message
SECOND (Ready),
message
"Action alone called by heart : remote stop"
·
the server ![]() SECOND (Ready)
becomes
SECOND (Ready)
becomes ![]() ALONE (Ready);
application in the start_prim script of the module is started on the ALONE server with the
message in the log
ALONE (Ready);
application in the start_prim script of the module is started on the ALONE server with the
message in the log
"Script start_prim"
·
on timeout in the SafeKit console, the old
server ![]() PRIM (Ready)
becomes
PRIM (Ready)
becomes ![]() ERROR (connection error)
ERROR (connection error)
· after reboot of the stopped server, check that the OS shutdown has really called a shutdown of the module
"Action shutdown called by SYSTEM/root"
· Check that the application stop_prim script has been executed with the message
"Script stop_prim"
· And check that the module has been completely stopped before shutting down the server with the last message
"Local state STOP NotReady"
· after reboot of stopped server, if the module is started automatically at boot (safekit boot status), message in the log
"Action start called at boot time"
·
after a start of the module on the stopped
server, the module becomes
![]() SECOND (Ready) on
this server and
SECOND (Ready) on
this server and ![]() PRIM (Ready) on
the other server
PRIM (Ready) on
the other server
4.2.9
Test power-off of the server PRIM (Ready)
In the event of a power outage, the module is not stopped properly as it would be during a server shutdown. Failover is triggered by the loss of heartbeats rather than by detecting the module stop.
|
userconfig.xml with 2 heartbeats: <heart> Note: If you want to make a test with double simultaneous electrical fault on both servers, check that <rfs async="none"> is set in userconfig.xml. For more information, see section 13.6.3. |
·
in the log of the server "Resource heartbeat.default set to down by heart" · messages appear within 30 seconds after the power-off (if no specified timeout configured for <heart>) ·
the server "Script start_prim" ·
on SafeKit console timeout, the former server · after reboot of stopped server, if the module is started automatically at boot (safekit boot status), message in the log "Action start called at boot time" ·
after restart of the module on the stopped
server, the module becomes |
4.2.10 Test split-brain with a mirror module
Split-brain occurs in situation of network isolation between two SafeKit servers. Each server becomes primary ALONE and runs the application. At return of split-brain, a sacrifice must be made by shutting down the application on one of the two servers.
4.2.11 Continue your mirror module tests with checkers
Go to section 4.4 for tests of checkers.
4.3 Tests of a farm module
4.3.1
Test start of a farm module on all servers  STOP (NotReady)
· message in the logs of all servers (to read logs, see section 7.3)
"Action start called by admin@<IP>/SYSTEM/root"
·
the module goes to ![]() UP (Ready) on
all servers
UP (Ready) on
all servers
· the application is started in the start_both script of the module on all servers with the message in the log
"Script start_both"
4.3.2
Test stop of a farm module on one server  UP (Ready)
· message in the log of the stopped server (to read logs, see section 7.3)
"Action stop called by admin@<IP>/SYSTEM/root"
· the stopped module runs the stop_both script which stops the application on this server and with message in the log
"Script stop_both"
·
the stopped module becomes ![]() STOP (NotReady)
with messages in the log:
STOP (NotReady)
with messages in the log:
"Local state STOP NotReady"
·
the other servers stay ![]() UP (Ready)
and continue to run the application
UP (Ready)
and continue to run the application
·
restart the module ![]() STOP (NotReady)
with the start command
STOP (NotReady)
with the start command
4.3.3
Test restart of a farm module on one server  UP(Ready)
· message in the log of the module where the restart command is passed (to read logs, see section 7.3)
"Action restart called by admin@<IP>/SYSTEM/root"
·
the restarted module becomes ![]() UP (Transient) then becomes
UP (Transient) then becomes ![]() UP (Ready)
UP (Ready)
· the module scripts stop_both/start_both are executed on the server to locally restart the application with messages in the log
"Script stop_both"
"Script start_both"
4.3.4 Test virtual IP address of a farm module
4.3.4.1 Configuration with vmac_directed
|
Farm module in the userconfig.xml with load balancing on the safewebserver service (TCP port 9010): <farm> On a remote workstation (or server) in the same LAN, ping of the 2 physical IP addresses + virtual IP + arp -a |
· In the verbose log of all servers: "Virtual IP <virtip of farm> set" · On the 2 servers, ipconfig /all (Windows) or ip addr show (Linux) returns virtip as an alias on the network interface. · On a remote workstation (or server), the pings respond, and ip1.20 is mapped with the MAC address of one of the 2 servers: ping node1_ip_address ping node2_ip_address ping virtip
arp -a
|
4.3.4.2 Configuration with vmac_invisible
4.3.5 Test TCP load balancing on a virtual IP address
|
Farm
module in the state Same load balancing configuration in userconfig.xml as the previous test. On a remote workstation: 1. Connect a browser to http://virtip:9010/safekit/mosaic.html, then fill the module name and on Mosaic
Test. node1, node2 respond 2. safekit stop -m AM on node2 (where AM is the module name). Reload the
URL: node1 responds
Special command to check the load
balancing bitmap for port 9010 on each node safekit -r vip_if_ctrl -l An entry in the bitmap of 256 bits must be 1 on a single server. Furthermore, the 256 bits are fairly
distributed in the bitmaps of all servers |
1. o In the resources of the module, for node1 and node2: FarmProto_0 50% o In the verbose logs of node1 and node2: "farm membership: node1 node2 (group FarmProto_0)" 128/256: 128 bits on 256 are managed by each server o safekit -r vip_if_ctrl -l on node1 and node2. With type="vmac_directed" Bitmap node1: 01010101:01010101:01010101:01010101:ffffffff:ffffffff:ffffffff:ffffffff ffffffff:ffffffff:ffffffff:ffffffff:02020202:02020202:02020202:02020202 01 and 02 corresponds to the node numbers that reply. With type="vmac_invisible" Bitmap node1: 00000000:00000000:00000000:00000000:ffffffff:ffffffff:ffffffff:ffffffff ffffffff:ffffffff:ffffffff:ffffffff:00000000:00000000:00000000:0000000 Bits are fairly distributed between both servers 2. o In the resources of the module, for node1: FarmProto_0 100% o In the verbose log of node1: "farm membership: node1 (group FarmProto_0)" 256/256: all the bits are managed by node1 o safekit -r vip_if_ctrl -l on node1: Bitmap: ffffffff:ffffffff:ffffffff:ffffffff:ffffffff:ffffffff:ffffffff:ffffffff All the bits are managed by node 1 |

4.3.6 Test split-brain with a farm module
Split-brain occurs in case of network isolation between SafeKit servers.
|
Farm module is Same configuration of load balancing in userconfig.xml as the previous test. To get the split-brain, check in userconfig.xml that there are no checkers that can detect isolation: no <interface check="on"> or <ping> checker On the external workstation: 1. Connect a browser to http://virtip:9010/safekit/mosaic.html, then click on Mosaic Test. node1
and node2 respond 2. disconnect the network between node1 and node2. Depending on the
location where the external console is, node 1 responds or node 2 3. reconnect the network and connect to URL Same special
command as in the previous test to check the load balancing bitmap for port 9010
on each node |
1. before split-brain, state o In the resources of the module, for node1 and node2: FarmProto_0 50% o In the verbose logs of node1 and node2: "farm membership: node1 node2 (group FarmProto_0)" 128/256: 128 bits on 256 are managed by each server. o safekit -r vip_if_ctrl -l on node1 and node2: With type="vmac_directed" Bitmap node1: 01010101:01010101:01010101:01010101:ffffffff:ffffffff:ffffffff:ffffffff ffffffff:ffffffff:ffffffff:ffffffff:02020202:02020202:02020202:02020202 01 and 02 corresponds to the node numbers that reply. With type="vmac_invisible" Bitmap node1: 00000000:00000000:00000000:00000000:ffffffff:ffffffff:ffffffff:ffffffff ffffffff:ffffffff:ffffffff:ffffffff:00000000:00000000:00000000:0000000 Bits are fairly distributed between both servers 2. after isolation of servers, split-brain: o In the resources of the module, for node1 and node2: FarmProto_0 100% o In the verbose log of node1: "farm membership: node1 (group FarmProto_0)" 256/256: all the bits are managed by node1 o In the verbose log of node2: "farm membership: node2 (group
FarmProto_0)" 256/256: all the bits are managed by node2 o safekit -r vip_if_ctrl -l on node1 and node2: Bitmap: ffffffff:ffffffff:ffffffff:ffffffff:ffffffff:ffffffff:ffffffff:ffffffff 3. after split-brain when network is reconnected, the same messages can be found in the log and the same bitmaps as those before split-brain. Note: the default behavior of farm in situation of split-brain is good. The recommendation is to put in userconfig.xml a monitoring network <lan> </lan> where the virtual IP address is. The messages in the log and the result of vip_if_ctrl are slightly different depending on the type vmac_directed or vmac_invisible. |


4.3.7 Test compatibility of the network with invisible MAC address (vmac_invisible)
|
Network prerequisite A unicast MAC Ethernet address 5a-fe-xx-xx-xx-xx is associated with the virtual IP address virtip of a farm module. It is never presented by SafeKit servers as source Ethernet address (invisible MAC). Switches cannot locate this address. When they follow a packet to the destination MAC address 5a-fe-xx-xx-xx-xx, they must broadcast the packet on all ports of the LAN or VLAN where the virtual IP address is (flooding). All servers in the farm therefore receive packets destined to the virtual MAC address 5a-fe-xx-xx-xx-xx. Note that this prerequisite does not exist for a mirror module (see section 4.2.6) Server prerequisite The packets are captured by Ethernet cards set in promiscuous mode by SafeKit. And the packets are filtered by the module kernel <vip> according to the load balancing bitmap. To make a test, you need network monitor tool. Network monitoring on Windows 2003 (CD2): 1. install "Network Monitor Tools" in "Management and Monitoring Tools" (capture only packets in source or destination of the server) 2. Start / Network Monitor then Capture Filter / Address Pairs / virtip then Capture / Start then "Stop and View" at the end of capture Network monitoring on Linux: 1. tcpdump host virtip capture all network packets |
1. all servers are 2. the network monitoring is started on each server with a filter on virtip 3. an external workstation sends a single ping to the virtual IP address with ping -n (or -c) 1 virtip o 1 packet sent and received by all servers "ICMP: Echo: From extip To virtip" o there must be as many packets "ICMP: Echo Reply: To extip From virtip" as there are
servers 4. if it is not the case, check if options restrict the "port flooding" in switches and prevent the broadcast of "ICMP: Echo" to all servers 5. be careful: the "port flooding" restriction in switches can occur after a certain number of flooding (time, number of KB flooded): the ping test must be repeated during several hours by creating flooding to the virtual IP address 6. Note: to avoid network monitoring tools, an external Linux console
can be used. The Linux ping prints duplicate packets coming from the 2
servers ping virtip This test may be carried out for several minutes by storing the output of the ping in a file and then ensuring that there was (DUP!) all the time: date > /tmp/ping.txt ; ping virtip >> /tmp/ping.txt |
4.3.8
Test shutdown of a server  UP (Ready)
· on Windows, check that the special procedure to stop modules at shutdown has been performed. Refer to section 10.4.
·
make a shutdown of a ![]() UP (Ready)
server
UP (Ready)
server
·
the other servers stay ![]() UP (Ready)
and continue to run the application
UP (Ready)
and continue to run the application
·
on timeout in the SafeKit console, the old
server ![]() UP (Ready)
becomes
UP (Ready)
becomes ![]() ERROR (connection error)
ERROR (connection error)
· after reboot, check that shutdown of the OS has called a shutdown of the module
"Action shutdown called by SYSTEM"
· Check that the stop_both script which stops the application has been executed with the message
"Script stop_both"
· And check that the module has been completely stopped before stopping the server with the last message
"Local state STOP NotReady"
· after reboot of the stopped server, if the module is started automatically at boot (safekit boot status), message in the log
"Action start called at boot time"
·
after start-up of the module on the stopped
server, the module becomes ![]() UP (Ready)
and it executes the start_both script which restarts the application on this server with the
message in the log
UP (Ready)
and it executes the start_both script which restarts the application on this server with the
message in the log
"Script start_both"
4.3.9
Test power-off of a server  UP (Ready)
In the event of a power outage, the module is not stopped properly as it would be during a server shutdown. Failover is triggered by the loss of heartbeats rather than by detecting the module stop.
·
the other servers stay ![]() UP (Ready)
and continue to run the application
UP (Ready)
and continue to run the application
·
on timeout in the SafeKit console, the old
server ![]() UP (Ready)
becomes
UP (Ready)
becomes ![]() ERROR (connection error)
ERROR (connection error)
· after reboot of the stopped server, if the module is started automatically at boot (safekit boot status), message in the log
"Action start called at boot time"
·
after start-up of the module on the stopped
server, the module becomes
![]() UP (Ready)
and it executes the start_both script which restarts the application on this server with the
message in the log
UP (Ready)
and it executes the start_both script which restarts the application on this server with the
message in the log
"Script start_both"
4.3.10 Continue your farm module tests with checkers
Go to section 4.4 for tests of checkers.
4.4 Tests of checkers common to mirror and farm
4.4.1 Test <errd> checker with action restart or stopstart
For a description of process/service monitoring, refer to section 13.9.
|
In userconfig.xml: <errd> <proc name="appli.exe"
atleast="1" action="restart" class="prim"/> The checker monitors the process named appli.exe. · name="appli.exe" atleast="1": at least one process appli.exe must run · class o class="prim" for mirror module checker started/stopped on the server in state o class="both" for farm module checker started/stopped on all servers · action If appli.exe is not running, the checker set the resource proc.appli.exe to down. Then, it executes a restart or stopstart. o action="restart" it restarts locally the application (stop_xx; start_xx) o action="stopstart" it stops the module, as well as the application, and then automatically starts it |
1. Kill of process appli.exe on the server in o messages in the log: "Process appli.exe not running" o
the module becomes o
in the restart case, the
module becomes o
in the stopstart case, the
module becomes message in the log: "Action start called automatically" Note: a stopstart on 2. Repeat the test on the same server if it still runs the
application (i.e., By default, on the
4th error detection within 24 hours (see maxloop and loop_interval described in section 13.2.3), the module becomes "Action stop called by maxloop" |
4.4.2 Test <tcp> checker with action restart or stopstart
For a description of TCP checker, refer to section 13.11.
|
In userconfig.xml: <check> <tcp ident="id" when="prim"
action="restart" > </chek> The checker checks that the application responds to connection requests. · addr="addr" port="port" test TCP connections on addr:port · when o when="prim" for mirror module checker started/stopped on the server in state o when="both" for farm module checker started/stopped on all servers · action If the connection fails, the checker sets the resource tcp.id to down. The associated failover rule, named t_id, executes a restart or stopstart. o action="restart" It restarts locally the application (stop_xx; start_xx) o action="stopstart" It stops completely the module and then automatically starts it. |
1. Stop the application listening addr:port on
the server in state o messages in the log: "Resource tcp.id set to down by tcpcheck" o
the module becomes o
in case of restart, the module
becomes o
in case of stopstart, the
module becomes Message in the log: "Action start called automatically" Note: a stopstart on 2. Repeat the test on the same server if it still runs the
application (i.e., By default, on the
4th error detection within 24 hours (see maxloop and loop_interval in section 13.2.3), the
module becomes "Action stop called by maxloop" |
4.4.3 Test <tcp> checker with action wait
For a description of TCP checker, refer to section 13.11.
|
<check> <tcp ident="id" when="pre"
action="wait" > </check> The checker checks that an application, external to the module, responds to connection requests. · addr="addr" port="port" It checks TCP connections on addr:port · when="pre" The checker starts before, stops after, the application integrated into the module (in start_xx /stop_xx). · action="wait" If the connection fails, the checker sets the resource tcp.id to down. The associated failover rule, named t_id, executes a wait. It stops the module, and its application, then puts it in the state WAIT, waiting for tcp.id reset to up by the checker. |
1. Stop the external application listening on addr:port, when the server is in o messages in the log: "Resource tcp.id set to down by tcpcheck" o
the module becomes Note: a wait on 2. Restart the application listening on addr:port. o messages in the verbose log "Resource tcp.id set to up by tcpcheck" o
the module becomes 3. Repeat the test. By default, on the
4th error detection within 24 hours (see maxloop and loop_interval in section 13.2.3), the
module becomes "Action stop called by maxloop" Note: This test allows testing of
connectivity to an external service. But if the external service is down or
is unreachable on all servers, all servers are in state |
4.4.4 Test <interface check="on"> with action wait
For a description of interface checker, refer to section 13.13. For its automatic configuration with <interface check="on">, see section 13.5.5.
|
<vip> check="on"/> </real_interface> The checker checks that the Ethernet cable is connected in the interface where the virtual IP address is set. · If the cable is disconnected, the checker set the associated resource intf.172.17.0.0 to down. The prefix is intf and the suffix is the network corresponding to the virtual IP. · The default failover rule, named interface_failure, executes a wait. It stops the module, and its application, then puts it in the state WAIT, waiting for intf.172.17.0.0 reset to up by the checker.
Note: do not use check="on" on bonding or teaming interface because these interfaces bring their own failover mechanisms from interface to interface |
1. Remove the Ethernet cable from the network card (on which the
virtual IP is configured) on the server in o messages in the log: "Resource intf.172.17.0.0 set to down by intfcheck" "Action wait from failover rule interface_failure" o
the module becomes Note: a wait on 2. Plug the cable again o messages in the log "Resource intf.172.17.0.0 set
to up by intfcheck" o
the module becomes 3. Repeat the test on the same server By default, on the
4th error detection within 24 hours (see maxloop and loop_interval in section 13.2.3), the
module becomes "Action stop called by maxloop"
Note: disabling the interface (instead
of unplugging the ethernet cable) leads to |
4.4.5 Test <ping> checker with action wait
For a description of ping checker, refer to section 13.12.
|
<check> <ping ident="id" when="pre" action="wait"> </check> The checker checks that the external device (ex.: a router) with address extip responds to ping. · when="pre" The checker starts before, stops after, the application integrated into the module (in start_xx /stop_xx). · action="wait" If the ping fails, the checker sets the resource ping.id to down. The associated failover rule, named p_id, executes a wait. It stops the module, and its application, then puts it in the state WAIT, waiting for ping.id reset to up by the checker. |
1. Break the link between the pinged external device and the server
the server in o messages in the log: "Resource ping.id set to down by pingcheck" o the module becomes Note: a wait on 2. Restore the network connection o messages in the verbose log "Resource ping.id set to up by pingcheck" o the module becomes 4. Repeat the test By
default, on the 4th error detection within 24 hours (see maxloop
and loop_interval in section 13.2.3), the
module becomes "Action stop called by maxloop" Note: This test allows testing of
connectivity to an external device. But if this one is down or is unreachable
on all servers, all servers are in state |
4.4.6 Test <module> checker with action wait
For a description of module checker, refer to section 13.16.
|
In userconfig.xml of AM module: <check> <module name="othermodule"> </check> The checker in AM checks the module othermodule on its virtual IP address ip. · If the module othermodule is not started, the checker set the associated resource module.othermodule_ip to down. The prefix is module, and the suffix is the other module name and address. · The default failover rule, named module_failure, executes a wait. It stops the module AM, and its application, then puts it in the state WAIT, waiting for module.othermodule_addr reset to up by the checker. · If the module othermodule is restarted, the checker executes a stopstart on AM. Note: if the module AM is a mirror module using file replication and because of rule notuptodate_server, you may experience a wrong behavior with module AM blocked in a WAIT state, if the stopstart action happens when AM in the transition SECOND to ALONE |
1. Stop the module othermodule. And start the module AM on all servers. o messages in the log of module AM "Resource module.othermodule_ip set to down by
modulecheck o
the module AM becomes 2. Start the module othermodule o messages in the verbose log of module AM "Resource module.othermodule_ip set to up by
modulecheck" o
the module AM goes 3. Run a restart on othermodule o messages in the log of module AM "Action stopstart called by modulecheck" o the module AM stops and then automatically starts 4. Repeat the test on the same server By default, on the
4th error detection within 24 hours (see maxloop and loop_interval in section 13.2.3), the
module becomes "Action stop called by maxloop" |
4.4.7 Test <custom> checker with action wait
For a description of custom checker, refer to section 13.15.
|
In userconfig.xml: <check> <custom ident="id" when="pre" exec="customscript"
action="wait" /> </check> The custom checker is an infinite loop that performs a test and assigns the associated resource as up or down based on the test result. · when="pre" The checker starts before, stops after, the application integrated into the module (in start_xx /stop_xx). · exec="customscript" Script located under AM/bin/customscript that sets the resource custom.id: o on error SAFE/safekit set -r custom.id -v down -i customscript o on success SAFE/safekit set -r custom.id -v up -i customscript · action="wait" When the custom.id is down, the associated failover rule, named c_id, executes a wait. It stops the module, its application, and the checker, then puts it in the state WAIT, waiting for custom.id reset to up by the checker. |
1. Cause the failure of the custom checker test when the server is in state o messages in the log: "Resource custom.id set to down by customscript" o
the module becomes Note: a wait on 2. Fix the error tested by the custom checker o messages in the verbose log "Resource custom.id set to up by customscript" o
the module becomes 3. Repeat the test on the same server. By default, on the
4th error detection within 24 hours (see maxloop and loop_interval in section 13.2.3), the
module becomes "Action stop called by maxloop" |
The action associated with the custom checker can be defined through an explicit failover rule instead of the action attribute, which in this case is set to noaction. The following example is equivalent to the previous one, except for the name of the failover rule, which is customid_failure:
<check>
<custom ident="id" when="pre" exec="customscript"
action="noaction" />
</custom>
</check>
<failover>
<![CDATA[
customid_failure: if (custom.id == down) then wait();
]]>
</failover>
This syntax is the one supported before SafeKit 8.
4.4.8 Test <custom> checker with action restart or stopstart
For a description of custom checker, refer to section 13.15.
4.4.8.1 Action through a failover rule
|
In userconfig.xml: <check> <custom ident="id" when="prim" exec="customscript"
action="restart" /> </check> The custom checker is an infinite loop that performs a test and assigns the associated resource as up or down based on the test result. · when o when="prim" for mirror module checker started/stopped on the server in state o when="both" for farm module checker started/stopped on all servers · exec="customscript" Script located under AM/bin/customscript that sets the resource custom.id: o on error SAFE/safekit set -r custom.id -v down -i customscript o on success SAFE/safekit set -r custom.id -v up -i customscript · action When the custom.id is down, the associated failover rule, named c_id, executes a restart or stopstart. o action="restart" It restarts locally the application (stop_xx; start_xx). o action="stopstart" It stops completely the module, its application, and the checker, and then automatically starts it. |
1. Cause the failure of the custom checker test when the server is in state o messages in the verbose log: "Resource custom.id set to down by customscript" and "Action restart from failover rule c_id " or "Action stopstart from failover rule c_id " o
the module becomes o
in case of restart, the module
becomes o
in case of stopstart, the
module becomes Message in the log: "Action start called automatically" Note: a stopstart on 2. Repeat the test on the same server. By default, on the
4th error detection within 24 hours (see maxloop and loop_interval in section 13.2.3), the
module becomes "Action stop called by maxloop" |
The action associated with the custom checker can be defined through an explicit failover rule instead of the action attribute, which in this case is set to noaction. The following example is equivalent to the previous one, except for the name of the failover rule, which is customid_failure:
<check>
<custom ident="id" when="pre" exec="customscript"
action="noaction" />
</custom>
</check>
<failover>
<![CDATA[
customid_failure: if (custom.id == down) then restart();
]]>
</failover>
This syntax is the one supported before SafeKit 8.
4.4.8.2 Action through a command in the custom checker
|
In userconfig.xml: <check> <custom ident="id" when="prim" exec="customscript"
action="noaction" /> </check> The custom checker is an infinite loop that performs a test and execute a restart or stopstart based on the test result. · when o when="prim" for mirror module checker started/stopped on the server in state o when="both" for farm module checker started/stopped on all servers · action="noaction" No failover rule generated. · exec="customscript" Script located under AM/bin/customscript that sets the resource custom.id: o on error SAFE/safekit restart -i customscript It restarts locally the application (stop_xx; start_xx). or o on error SAFE/safekit stopstart -i customscript It stops completely the module, its application, and the checker, and then automatically starts it. |
1. Cause the failure of the custom checker test when the server is in state o messages in the verbose log: "Action restart called by customscript" ou "Action stopstart called by customscript" o
the module becomes o
in case of restart, the module
becomes o
in case of stopstart, the
module becomes Message in the log: "Action start called automatically" Note: a stopstart on 2. Repeat the test on the same server. By default, on the
4th error detection within 24 hours (see maxloop and loop_interval in section 13.2.3), the
module becomes "Action stop called by maxloop" Note: on a direct action in the custom checker, the maxloop counter is incremented only if -i identity is passed to the command restart or stopstart. Without identity, SafeKit considers the command is as an administrative operation. The counter is reset and there is no stop after 4 restarts. |
5. Mirror module administration
![]() Section 5.1 “Operating mode of a mirror module”
Section 5.1 “Operating mode of a mirror module”
![]() Section 5.2 “State automaton of a mirror module (STOP, WAIT, ALONE, PRIM, SECOND -
NotReady, Transient, Ready)”
Section 5.2 “State automaton of a mirror module (STOP, WAIT, ALONE, PRIM, SECOND -
NotReady, Transient, Ready)”
![]() Section 5.3 “First start-up of a mirror module (safekit prim command)”
Section 5.3 “First start-up of a mirror module (safekit prim command)”
![]() Section 5.4 “Different reintegration cases (use of bitmaps)”
Section 5.4 “Different reintegration cases (use of bitmaps)”
![]() Section 5.5 “Start-up of a mirror module with the up-to-date data
Section 5.5 “Start-up of a mirror module with the up-to-date data
![]() STOP (NotReady) -
STOP (NotReady) - ![]() WAIT (NotReady)”
WAIT (NotReady)”
![]() Section 5.6 “Degraded replication mode (
Section 5.6 “Degraded replication mode (![]() ALONE (Ready) degraded)”
ALONE (Ready) degraded)”
![]() Section 5.7 “Automatic or manual failover”
Section 5.7 “Automatic or manual failover”
![]() Section 5.8 “Default primary server (automatic swap after reintegration)”
Section 5.8 “Default primary server (automatic swap after reintegration)”
![]() Section 5.9 “Prim command fails: why? (safekit primforce command)”
Section 5.9 “Prim command fails: why? (safekit primforce command)”
To test a mirror module, see section 4.2.
To analyze a problem, see section 7.
5.1 Operating mode of a mirror module
|
Stable state: primary with secondary.
On the primary: · Virtual IP is set · Application is running · Real-time file replication
The secondary is ready to run a failover and become primary. |
2. Automatic failover
Stable state: primary without secondary.
On primary stop, automatic failover of the virtual IP and application.
|
|
3. Failback and reintegration
Transient state: secondary reintegrating.
Automatic file synchronization without application shutdown and updating only the files that were modified on the primary while the other node was stopped. |
4. Back to normal operation
Stable state: primary with secondary.
|

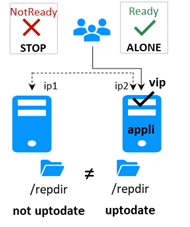
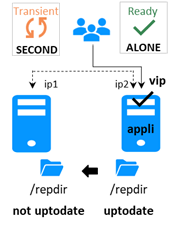
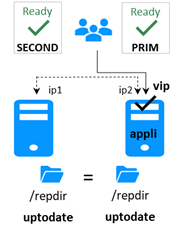
5.2 State automaton of a mirror module (STOP, WAIT, ALONE, PRIM, SECOND - NotReady, Transient, Ready)
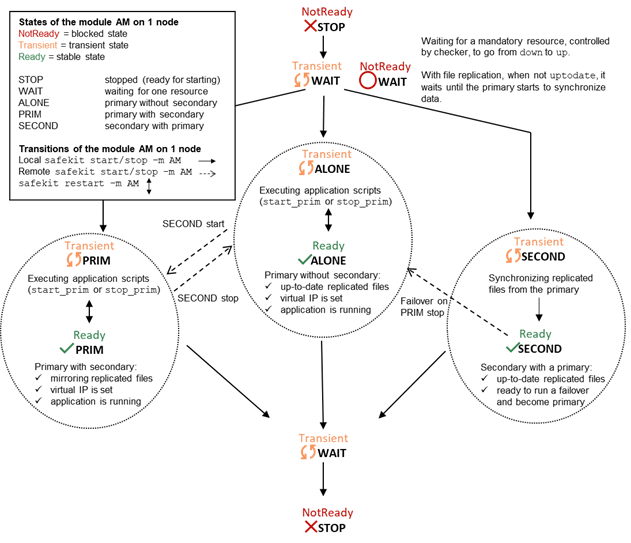
5.3 First start-up of a mirror module (safekit prim command)
|
At first start-up of a mirror
module, if both servers are started with the start command, both go into At first start-up of a mirror module, use the special prim command on the server with the up-to-date directory, and the second command on the other one. Data is synchronized from the primary server to the secondary one. For next start-up, use the start command on both servers.
|
|
|
1. initial state · the mirror module has just been configured with a new directory to replicate between node1 and node2 · node1 has the up-to-date directory · node2 has an empty directory |
(NotReady) (NotReady)
|
|
2. command prim on node1 · use the special prim command to force node1 to become primary · for following start-ups, always prefer start: see section 5.5 · message in the log: "Action prim called by admin@<IP>/SYSTEM/root" |
(Ready) (NotReady)
|
|
3. command second on node2 · start the other server as secondary · the secondary reintegrates replicated directory from primary · message in the log: "Action second called by admin@<IP>/SYSTEM/root" |
(Ready) (Ready)
|


5.4 Different reintegration cases (use of bitmaps)
|
To optimize file reintegration, different cases are considered: 1. The module must have completed the reintegration (on the first start of the module, it runs a full reintegration) before enabling the tracking of modification into bitmaps 2. If the module was cleanly stopped on the server, then at restart of the secondary, only the modified zones of modified files are reintegrated, according to a set of modification tracking bitmaps. 3. If the server crashed (power off) or was incorrectly stopped (exception in nfsbox replication process), or if files have been modified while SafeKit was stopped, the modification bitmaps are not reliable, and are therefore discarded. All the files bearing a modification timestamp more recent than the last known synchronization point minus a grace delay (typically one hour) are reintegrated. 4. A call to the special second fullsync command triggers a full reintegration of all replicated directories on the secondary when it is restarted. |
|
|
1. secondary server2 has been stopped · data is desynchronized |
(Ready) (NotReady)
|
|
2. start command on node2 · data is reintegrated with bitmap optimization (see above) |
(Ready) (Transient)
|
|
3. end of reintegration · data is the same on both servers · only modifications inside files are replicated with a real-time synchronous replication |
(Ready) (Ready)
|


The replication system also keeps track of
the last date on which data was synchronized on each node. This synchronization
date, named synctimestamp, is assigned at the end of the reintegration and changes in the ![]() PRIM (Ready) and
PRIM (Ready) and ![]() SECOND (Ready)states. When
the module is stopped on the secondary node and then restarted, the synctimestamp is one of the reintegration criteria: all files modified around
this date are potentially out of date on the secondary and must be
reintegrated. Since SafeKit 7.4.0.50, the synchronization date is also used to
implement an additional security. When the difference between the
synchronization date stored on the primary and on the secondary is greater than
90 seconds, the replicated data is considered unsynchronized in its entirety.
The reintegration is interrupted with the following message in the module log:
SECOND (Ready)states. When
the module is stopped on the secondary node and then restarted, the synctimestamp is one of the reintegration criteria: all files modified around
this date are potentially out of date on the secondary and must be
reintegrated. Since SafeKit 7.4.0.50, the synchronization date is also used to
implement an additional security. When the difference between the
synchronization date stored on the primary and on the secondary is greater than
90 seconds, the replicated data is considered unsynchronized in its entirety.
The reintegration is interrupted with the following message in the module log:
“| 2021-08-06 08:40:20.909224 | reintegre | E | Automatic synchronization cannot be applied due to an abnormal delta between the dates of the last synchronization”
If the administrator considers that the server is valid, he can force the start in secondary with full synchronization of the data, by executing the command: safekit second fullsync -m AM.
5.5
Start-up of a mirror module with the up-to-date
data
 STOP (NotReady) -
  WAIT (NotReady)
|
SafeKit determines which server must start as primary or not. SafeKit retains the information on the server with the up-to-date replicated directories. To take advantage of this feature, use the command start and NOT the command prim |
|
|
1. initial state · server1 is primary ALONE · directories are up-to-date on this server · the module is stopped on node2 · node2 has desynchronized replicated directories |
(Ready) (NotReady)
|
|
2. command stop on node1 · stop of the server with the up-to-date directories |
(NotReady) (NotReady)
|
|
3. command start on node2
"Data
may be not uptodate for replicated directories (wait for the start of the
remote server)"
|
(NotReady) (NotReady)
rfs.uptodate="down"
|
|
See also section 5.9. |
|


5.6
Degraded replication mode ( ALONE (Ready) degraded)
|
If the replication process nfsbox fails on the primary server (for instance because of an unrecoverable replication problem), the application is not swapped on the secondary server The primary server goes to the ALONE state in a degraded replication mode. Degraded is displayed in the web console. A message is emitted in the log: "Resource rfs.degraded set to up by nfsadmin" safekit state -v -m AM returns resource rfs.degraded up (replace AM by the module name) The primary server continues in ALONE state with a nfsbox process which does not replicate anymore. You must stop and start the ALONE server to come back to a PRIM - SECOND state with replication |
|
|
1. initial state the mirror is in a stable state: node1 node2 |
(Ready) (Ready)
|
|
2. failure of replication process nfsbox on node1
"Resource rfs.degraded set to up by nfsadmin". · safekit state -v AM returns resource rfs.degraded=up (where AM is the module name)
"Action wait from failover rule degraded_server" and with rfs.uptodate="down" |
(Ready) (NotReady)
|
|
3. come back to replication · administrator makes stop command and start command on node1 ALONE · the nfsbox replication process is restarted on node1 ·
node2 reintegrates replicated directories
before becoming ·
node1 becomes |
(Ready) (Ready)
|

5.7 Automatic or manual failover
|
Automatic or manual failover on the secondary server is defined in userconfig.xml by <service mode="mirror" failover="on"|"off">. By default, if the parameter is not defined, failover="on" The failover="off" mode is useful when the failover must be controlled by an administrator. This mode ensures that an application runs always on the same primary server whatever operations are made on the server (reboot, temporary stop of the module for maintenance...). Only an explicit administrative action (prim command) may promote the other server as primary. Note: Failover mode could be set dynamically on a running cluster with the safekit failover on|off -v AM (replace AM by the module name). |
|
|
1. initial state the mirror is in a stable state: node1 node2 |
(Ready) (Ready)
|
|
2. restart with failover="on" ·
if node1 former PRIM fails and
stops, node2 becomes automatically |
(NotReady) (Ready)
|
|
3. behavior with failover="off" ·
if node1 former PRIM fails and
stops, node2 goes to "Failover-off configured" · the administrator in this situation can restart node1: the mirror restarts in its former stable state node1 node2 · the administrator can decide to force node2 to become primary with the command: stop then prim on node2 |
(NotReady) (NotReady)
|
|
See also section 5.9 |
|


5.8 Default primary server (automatic swap after reintegration)
|
After reintegration at failback, a server becomes by default secondary. The administrator may choose to swap the application back to the reintegrated server at an appropriate time with the swap command. This is the default behavior when userconfig.xml <service> is defined without the defaultprim variable If the application must automatically swap back to a preferred server after reintegration, specify a defaultprim server in userconfig.xml: <service mode="mirror" defaultprim="hostname node1"> |
|
|
1. initial state · node1 (former PRIM) fails and stops · node2 secondary becomes automatically ALONE |
(NotReady) (Ready)
|
|
2. failback without defaultprim · node1 is restarted with command start · it reintegrates replicated directories and then becomes secondary · an administrator can swap the primary to node1 with the command swap in a timely manner · swap stops the application on node2 and restarts it on node1 |
(Ready) (Ready) |
|
3. failback with defaultprim="hostname node1" ·
node1 in · it reintegrates replicated directories · just after reintegration, an automatic swap is made on node1 with the message in its log: "Transition SWAP from defaultprim" · the application is then automatically stopped on node2 and restarted on node1 · at the end, node1 is PRIM |
(Ready) (Ready)
|


5.9 Prim command fails: why? (safekit primforce command)
|
A prim command may fail to start a server
as primary: after trying a start-up, the server goes back to |
|
|
1. initial state · node1 ALONE has the up-to-date directory · node2 is in the process of reintegrating files from node1 |
(Ready) (Transient)
Partially synchronized |
|
2. command stop on node2 then on node1 · stop of node2 during its reintegration: stop of node2 can be made while a file that is half copied (corrupted file) · node1 is also stopped |
(NotReady) (NotRead y)
Partially synchronized |
|
3. command prim on node2
"Data
may be inconsistent for replicated directories (stopped during reintegration)"
"Action primforce called by SYSTEM/root" |
(NotReady) (NotRead y)
Partially synchronized
The command prim fails since the data may be corrupted |
|
Note: The safekit primforce -m AM command forces a full reintegration of replicated directories on the secondary when it is restarted. |
|


6. Farm module administration
![]() Section 6.1 “Operating mode of a farm module”
Section 6.1 “Operating mode of a farm module”
![]() Section 6.2 “State automaton of a farm module (STOP, WAIT, UP - NotReady, Transient,
Ready)”
Section 6.2 “State automaton of a farm module (STOP, WAIT, UP - NotReady, Transient,
Ready)”
![]() Section 6.3 “Start-up of a farm module”
Section 6.3 “Start-up of a farm module”
To test a farm module, see section 4.3.
To analyze a problem, see section 7.
6.1 Operating mode of a farm module
|
1. Normal operation Stable state: 2 active nodes.
On all nodes: · Virtual IP is set · Application is running · Network load sharing is distributed among all nodes
Each node is ready to run a failover and take 100% of the load. |
2. Automatic failover
Stable state: 1 active node.
On remote node stop, automatic failover of the network load sharing.
|
|
3. Back to normal operation
Stable state: 2 active nodes. |
|
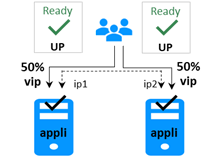
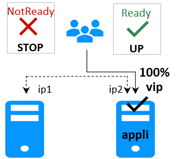
6.2 State automaton of a farm module (STOP, WAIT, UP - NotReady, Transient, Ready)
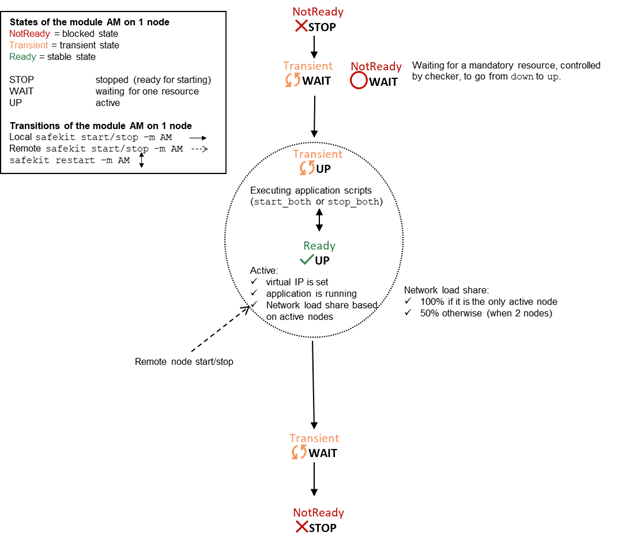
Note: This is also the state automation of a light module. A light module is identified by <service mode="light"> in userconfig.xml file under SAFE/modules/AM/conf (where AM is the module name). The light type corresponds to a module that runs on one node without synchronizing with other nodes (as can-do mirror or farm modules). A light module includes the start and stop of an application as well as the SafeKit checkers that can detect errors.
6.3 Start-up of a farm module
|
Use the start command on each node running the module. An example with a farm of 2 servers is presented below. |
|
|
1. initial state · the farm module has just been configured on node1 and node2 |
(NotReady) (NotReady) |
|
2. command start on node1 and node2
"farm membership: node1 node2 (group FarmProto_0)"
|
(Ready) (Ready) |


7. Troubleshooting
![]() Section 7.1 “Connection issues with the web console”
Section 7.1 “Connection issues with the web console”
![]() Section 7.2 “Connection issues with the HTTPS web console”
Section 7.2 “Connection issues with the HTTPS web console”
![]() Section 7.3 “How to read logs and resources of the module?”
Section 7.3 “How to read logs and resources of the module?”
![]() Section 7.4 “How to read the commands log of the server?”
Section 7.4 “How to read the commands log of the server?”
![]() Section 7.5 “Stable module
Section 7.5 “Stable module ![]() (Ready) and
(Ready) and ![]() (Ready)”
(Ready)”
![]() Section 7.6 “Degraded module
Section 7.6 “Degraded module ![]() (Ready)and
(Ready)and ![]() /
/![]() (NotReady)”
(NotReady)”
![]() Section 7.7 “Out of service module
Section 7.7 “Out of service module ![]() /
/![]() (NotReady) and
(NotReady) and ![]() /
/![]() (NotReady)”
(NotReady)”
![]() Section 7.8 “Module
Section 7.8 “Module ![]() STOP (NotReady): start the module”
STOP (NotReady): start the module”
![]() Section 7.9 “Module
Section 7.9 “Module ![]() WAIT (NotReady): repair the resource="down"”
WAIT (NotReady): repair the resource="down"”
![]() Section 7.10 “Module oscillating from
Section 7.10 “Module oscillating from ![]() (Ready)
to
(Ready)
to ![]() (Transient)”
(Transient)”
![]() Section
7.11 “Message on stop after maxloop”
Section
7.11 “Message on stop after maxloop”
![]() Section 7.12 “Module
Section 7.12 “Module ![]() (Ready) but
non-operational application”
(Ready) but
non-operational application”
![]() Section 7.13 “Mirror module
Section 7.13 “Mirror module ![]() ALONE (Ready) -
ALONE (Ready) - ![]() WAIT/
WAIT/![]() STOP
(NotReady)”
STOP
(NotReady)”
![]() Section 7.14 “Farm module
Section 7.14 “Farm module ![]() UP(Ready)but problem of load balancing in a farm”
UP(Ready)but problem of load balancing in a farm”
![]() Section 7.15 “Problem after Boot”
Section 7.15 “Problem after Boot”
![]() Section 7.16 “Analysis from snapshots of the module”
Section 7.16 “Analysis from snapshots of the module”
![]() Section 7.17 “Problem with the size of SafeKit databases”
Section 7.17 “Problem with the size of SafeKit databases”
![]() Section 7.18 “Problem for retrieving the certification authority certificate from an
external PKI”
Section 7.18 “Problem for retrieving the certification authority certificate from an
external PKI”
![]() Section 7.19 “Still in Trouble”
Section 7.19 “Still in Trouble”
7.1 Connection issues with the web console
If you encounter problems for connecting to the SafeKit web console to SafeKit node, such as no reply or connection error, run the following checks and procedures:
![]() section 7.1.1 “Browser check”
section 7.1.1 “Browser check”
![]() section 7.1.2 “Browser state clear”
section 7.1.2 “Browser state clear”
![]() section 7.1.3 “Server check”
section 7.1.3 “Server check”
Then, it may be necessary to reload the console into the browser.
7.1.1 Browser check
For the web browser:
1. check that it is a supported browser and its level
2. change the proxy settings for direct or indirect connection to the server
3. with Microsoft Edge, change the security settings (add the URL into the trusted zones)
4. clear the browser's state on upgrade as described below
5. check that the web console and the server are at the same level (backward compatibility may not be fully preserved)
7.1.2 Browser state clear
1. Clear the browser cache
A quick way to do this is a keyboard shortcut that works on IE, Firefox, and Chrome. Open the browser to any web page and hold CTRL and SHIFT while tapping the DELETE key. (This is NOT CTRL, ALT, DEL). The dialog box will open to clear the browser. Set it to clear everything and click Clear Now or Delete at the bottom
2. Clear the browser SSL cache if HTTPS is used
Look at advanced settings for the browser and search for SSL cache.
Finally close all windows for the browser, stop the browser process still running in the background if necessary, and re-open it fresh to test what wasn't working for you previously.
7.1.3 Server check
On each SafeKit cluster node check:
1. the firewall
If this has not yet been done, run the SAFE/private/bin/firewallcfg add command which configures the operating system firewall. For other firewalls, add an exception to allow connections between the web browser and the server. For details, see section 10.3.
2. the web server configuration
HTTP access to the web console requires authentication. If it has not yet been done, run the SAFE/private/bin/webservercfg -passwd pwd to initialize (or reinitialize) this configuration with the password of the user admin. For details, see section 11.2.1.
3. the network and the server availability
4. the safeadmin and safewebserver services
They must be started.
5. the SafeKit cluster configuration
Run the command safekit cluster confinfo (see section 9.2). This command must return on all nodes, the same list of nodes and the same value for the configuration signature. If not, reapply the cluster configuration on all nodes (see section 12.2).
7.2 Connection issues with the HTTPS web console
If you encounter problems for connecting the secure SafeKit web console to SafeKit nodes, you can run the following checks and procedures:
![]() section 7.1 “Connection issues with the web console”
section 7.1 “Connection issues with the web console”
![]() section 7.2.1 “Check server certificate”
section 7.2.1 “Check server certificate”
![]() section 7.2.2 “Check certificates installed in SafeKit”
section 7.2.2 “Check certificates installed in SafeKit”
![]() section 7.2.3 “Revert to HTTP configuration”
section 7.2.3 “Revert to HTTP configuration”
7.2.1 Check server certificates
The SafeKit web console connects to a SafeKit node that is identified by a certificate. To get the SafeKit node certificate content with Internet Explorer or Chrome, run the following:
|
1. Click on the lock next to the URL to open the security report 2. Click on the View certificates link. It opens a window that displays the certificate content |
|
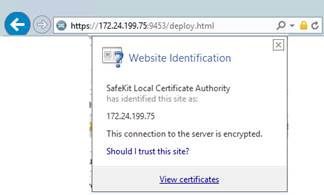
|
3. Check the issuer that must be the appropriate certification authority 4. Check the validity date and the workstation date. If necessary, change the workstation date 5. Check the validity date. If the certificate is expired, you must renew. For certificate generated with the SafeKit PKI, see section 11.3.1.9.1 |
|
|||
|
6. Click on Details tab 7. Select Subject Alternate Name field. Its content is displayed into the bottom panel. The location set into the URL for connecting the SafeKit web console must be included into this list. Change the URL if necessary 8. The address value for the node, set into the SafeKit cluster configuration, must be one of the values listed. If it is not, change the cluster configuration as described in section 12.2. When using DNS name, you must use lower case.
|
|
|||
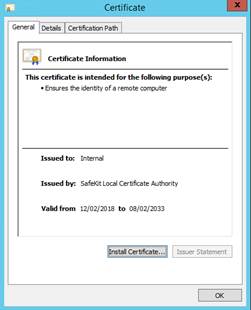

7.2.2 Check certificates installed in SafeKit
You can use the checkcert command for checking all the certificates.
On each SafeKit nodes:
1. Log as administrator/root and open a command shell window
2. Change directory to SAFE/web/bin
3. Run checkcert -t all
It checks all installed certificates and returns a failure if an error is detected
4. You can check that the server certificate contains some DNS name or IP address with:
checkcert -h "DNS name value"
checkcert -i "Numeric IP address value"
|
|
The server certificate must contain all DNS names and/or IP addresses used for HTTPS connection. These ones must also be included into the SafeKit cluster configuration file. |
7.2.3 Revert to HTTP configuration
If the problem cannot be solved, you can revert to the HTTP configuration (where SAFE=C:\safekit in Windows if System Drive=C: ; and SAFE=/opt/safekit in Linux).
On S1 and S2:
1. remove the file SAFE/web/conf/ssl/httpd.webconsolessl.conf
2. run safekit webserver restart
3. clear the browser cache as described in section 7.1.2
7.3 How to read logs and resources of the module?
|
Module log and Scripts log for the module on one node may be analyzed with (replace below node1 by the node name and AM by the module name): ·
the web console at URI /console/en ·
the command executed on node1 · on node1, into files SAFEVAR/modules/AM/userlog_<year>_<month>_<day>T<time>_<script name>.ulog for the scripts log With the module log, you can
understand why the module is no longer in its stable state With the scripts log, you can see the output messages of module scripts (start_xxx and stop_xxx). Note that a module can leave its
stable |
· You will find a list of SafeKit log messages in Log Messages Index. · Messages in the log after an administrator command are: "Action start
called by admin@<IP>/SYSTEM/root" admin@<ip>: via the SafeKit console · If "Action stop called by maxloop" appears in the module log, see section 7.11 |
|
Resources state of the module on one node may be analyzed with (replace below node1 by the node name and AM by the module name): ·
the web console at URI /console/en ·
the command executed on node1 |
· Module status state.local, state.remote usersetting.errd, usersetting.checker, usersetting.encryption · Checkers proc.xxx, intf.xxx, custom.xxx · File replication rfs.uptodate, rfs.degraded, rfs.reintegre_failed |
7.4 How to read the commands log of the server?
There is a log of the safekit commands ran on the server.
Commands log may be displayed using the command safekit cmdlog
See section 10.10 for more details
7.5
Stable module  (Ready) and
(Ready)
(Ready) and
(Ready)
·
A stable mirror module on 2 servers is in the
state ![]() PRIM (Ready) -
PRIM (Ready) - ![]() SECOND (Ready): the
application is running on the PRIM server; on failure, the SECOND server is ready to resume the
application.
SECOND (Ready): the
application is running on the PRIM server; on failure, the SECOND server is ready to resume the
application.
·
A stable farm module is in the state ![]() UP (Ready)on all servers of the farm: the
application is running on all servers.
UP (Ready)on all servers of the farm: the
application is running on all servers.
7.6
Degraded module (Ready)and
 /
/ (NotReady)
A degraded mirror module is in the state ![]() ALONE (Ready)-
ALONE (Ready)- ![]() STOP/
STOP/![]() WAIT (NotReady).
There is no recovery server, but the application is running on the ALONE
server.
WAIT (NotReady).
There is no recovery server, but the application is running on the ALONE
server.
A degraded farm module is in the state ![]() UP (Ready)on at least one server of the
farm, the other servers being in the state
UP (Ready)on at least one server of the
farm, the other servers being in the state ![]() STOP/
STOP/![]() WAIT (NotReady). The
application is running on the UP server.
WAIT (NotReady). The
application is running on the UP server.
In the
degraded case, there is no emergency procedure to implement. Analysis of the
state ![]() STOP/
STOP/![]() WAIT (NotReady)can be
done later. However, you can attempt to restart the module in a stable state:
WAIT (NotReady)can be
done later. However, you can attempt to restart the module in a stable state:
![]() See section 7.8 “Module
See section 7.8 “Module ![]() STOP (NotReady):
start the module”
STOP (NotReady):
start the module”
![]() See section 7.9 “Module
See section 7.9 “Module ![]() WAIT (NotReady):
repair the resource="down"”
WAIT (NotReady):
repair the resource="down"”
7.7
Out of service module /(NotReady) and /(NotReady)
An out of service mirror or farm module is
in the state ![]() STOP/
STOP/![]() WAIT (NotReady)on all
servers. In this case, the application is not operational on any server
anymore. You must restore the situation and restart the module in
WAIT (NotReady)on all
servers. In this case, the application is not operational on any server
anymore. You must restore the situation and restart the module in ![]() (Ready)on at least
one server:
(Ready)on at least
one server:
![]() See section 7.8 “Module
See section 7.8 “Module ![]() STOP (NotReady):
start the module”
STOP (NotReady):
start the module”
![]() See section 7.9 “Module
See section 7.9 “Module ![]() WAIT (NotReady):
repair the resource="down"”
WAIT (NotReady):
repair the resource="down"”
7.8
Module STOP (NotReady):
start the module
1. Start the stopped module (replace below AM by the module name) with:
·
the web console via ![]() Monitoring/
Monitoring/![]() on the node/
on the node/![]() Start/
Start/
· the command safekit start -m AM executed on the node
2. Check that the module becomes ![]() (Ready).
(Ready).
3. Analyze results of start in the module and scripts logs (replace below node1 by the node name and AM by the module name) with:
· the web console at URI /console/en/monitoring/modules/AM/nodes/node1/logs
· the command safekit logview -m AM on node1, for the module log
· the files SAFEVAR/modules/AM/userlog_<year>_<month>_<day>T<time>_<script name>.ulog on node1, for the scripts log
7.9
Module WAIT (NotReady):
repair the resource="down"
|
If the module is in the state You must identify and fix the problem that caused the resource state to go down. To determine the resource involved, analyze the module log and resources (see section 7.3). Notes: A wait checker is started after the prestart script and stopped before poststop. The checker is active on all
servers The action of the checker upon detecting an error is to set a resource to down. A failover rule referencing the resource performs the wait action. The module is locally in state The module exits the |
Messages from wait checkers: · files not up-to-date locally: see section 5 "Data
may be not uptodate for replicated directories (wait for the start of the
remote server)" · <interface check="on"> checker of a local network interface "Resource intf.ip.0 set to down by intfcheck" · <ping> checker of an external IP "Resource ping.id set to down by pingcheck" · <module> checker of another module "Resource module.othermodule_ip set to down by
modulecheck" · <tcp ident="id" when="pre"> checker of an external TCP service "Resource tcp.id set to down by tcpcheck" · <custom ident="id" when="pre"> customized checker "Resource custom.id set to down by customscript" <splitbrain> checker … "Action wait from failover rule splitbrain_failure" · Files not up-to-date locally due to split-brain: see section 13.17 |
7.10
Module oscillating from  (Ready) to
 (Transient)
|
If a module oscillates from state
(Ready)to state By default, after the 4th
unsuccessful restart on a server, the module stops, and the server stabilizes
in Use the module log to determine which checker is the source of the logs (to read logs, see section 7.3). Notes: A restart or stopstart checker is defined in userconfig.xml by: · when="prim" for a mirror module The checker is started
on the node · when="both" for a farm module The checker is started
on all nodes The action of a checker on an error
is to restart or stopstart the module. stopstart on The module is in the state After several oscillations, the module stops with "Action stop called by maxloop" in the module log: see section 7.11. |
Messages from restart or stopstart checkers: · <errd> in userconfig.xml checker of processes "Process appli.exe
not running" · <tcp ident="id" when="prim"|"both"> in userconfig.xml TCP checker of the application "Resource tcp.id
set to down by tcpcheck" · <custom ident="id" when="prim"|"both"> in userconfig.xml custom checker "Resource custom.id
set to down by customscript" or "Action restart|stopstart called by customscript" |
7.11 Message on stop after maxloop
7.12
Module (Ready)
but non-operational application
If a server has a status of ![]() PRIM(Ready)or
PRIM(Ready)or ![]() ALONE(Ready)or
ALONE(Ready)or ![]() UP(Ready), the application can be
non-operational because of undetected errors on start-up. In the following,
replace node1 by the node name and AM by the module name.
UP(Ready), the application can be
non-operational because of undetected errors on start-up. In the following,
replace node1 by the node name and AM by the module name.
1. Check the output messages of application scripts coming from start_prim/start_both and stop_prim/stop_both. They are visible in (replace below node1 by the node name and AM by the module name) with:
· the web console at URI /console/en/monitoring/modules/AM/nodes/node1/logs
· the files SAFEVAR/modules/AM/userlog_<year>_<month>_<day>T<time>_<script name>.ulog, on node1, for the scripts log
Check if there are errors during start or stop of the application. Be careful, sometimes the userlog is disabled because it is too large with <user logging="none"> in userconfig.xml of the module.
2. Check application scripts start_prim(/both) and stop_prim(/both) of a mirror(/farm) and userconfig.xml with:
· the web console at URI /console/en/configuration/modules/AM/config
· under the directory SAFE/modules/AM on the node1
3. Execute a restart of the ![]() PRIM/ALONE/UP(Ready)node to stop and restart locally the application (without failover)
with:
PRIM/ALONE/UP(Ready)node to stop and restart locally the application (without failover)
with:
·
the web console via ![]() Monitoring/
Monitoring/![]() on
the node/Restart/
on
the node/Restart/
· the command safekit restart -m AM executed on the node (replace AM by the module name)
4. If the application is still non-operational, apply a stop ![]() PRIM/ ALONE / UP(Ready)node to
stop and the application (stopstart makes a failover if the other node is Ready)
with:
PRIM/ ALONE / UP(Ready)node to
stop and the application (stopstart makes a failover if the other node is Ready)
with:
·
the web console via ![]() Monitoring/
Monitoring/![]() on
the node/
on
the node/![]() Stop/
Stop/
· the command safekit stop -m AM executed on the node
7.13
Mirror module ALONE (Ready) - WAIT/STOP (NotReady)
If a mirror module stays in state ![]() ALONE(Ready)-
ALONE(Ready)- ![]() WAIT(NotReady), check
the resource state.remote on each node (to read resources, see section 7.3). If this state is UNKNOWN on
the two nodes, there is probably a communication problem between the nodes.
This problem may also lead to
WAIT(NotReady), check
the resource state.remote on each node (to read resources, see section 7.3). If this state is UNKNOWN on
the two nodes, there is probably a communication problem between the nodes.
This problem may also lead to ![]() ALONE(Ready)-
ALONE(Ready)-![]() STOP (NotReady).
STOP (NotReady).
Possible root causes are:
1. Real network problem
Check your network configurations on the two nodes.
2. Firewall rules on one or the two nodes
For details, see section 10.3
3. Not the same SafeKit cluster configuration or cluster cryptographic keys
To communicate, cluster nodes must belong to the same cluster and have the same configuration (see section 12):
· The web console warns if nodes in the cluster nodes list have not an identical configuration
· The command: safekit cluster confinfo on any nodes of the cluster must report an identical configuration signature for all nodes of the cluster (see section 9.2)
If the cluster configuration is not identical, re-apply the cluster configuration on all cluster nodes as described in section 3.2.2.
4. Not the same module cryptographic keys
When cryptographic has been enabled for the module, the resource usersetting.encryption is “on” (to read resources, see section 7.3). If the nodes do not have the same keys for the module, the nodes will not be able to communicate for the internal module communications.
To distribute the same module cryptographic keys, re-apply the module configuration on all nodes.
See section 10.6 for details.
5. Expired cryptographic keys
In SafeKit <= 7.4.0.31, the key for encrypting the module communication has a validity period of 1 year. When it expires in a mirror module with file replication, the secondary fails to reintegrate and the module stops with an error message into the log:
reintegre | D | XXX clnttcp_create: socket=7 TLS handshake failed
In SafeKit > 7.4.0.31, the message is:
reintegre | D | XXX clnttcp_create: socket=7 TLS handshake failed. Check server time and module certificate (expiration date, hash)
To solve this problem, see section 10.6.3.1
7.14
Farm module UP(Ready)but
problem of load balancing in a farm
Even though all servers in the
farm are ![]() UP(Ready), load balancing is not working.
UP(Ready), load balancing is not working.
7.14.1 Reported network load share are not coherent
In a farm module, the sum of the network
load share of all ![]() UP(Ready), module nodes must be equal to
100%.
UP(Ready), module nodes must be equal to
100%.
If it’s not the case, there is probably a communication problem between module nodes. Possible root causes are the same as for a mirror module. See section 7.12 for possible solutions.
See also section 4.3.6.
7.14.2 virtual IP address does not respond properly
If the virtual IP does not respond properly to all requests for connections:
1. choose a node in the farm that receives and processes connections on the virtual IP address (established TCP connections):
· in Windows, use the command netstat -an | findstr <virtual IP address>
· in Linux, use the command netstat -an | grep <virtual IP address>
2. stop the farm module on all nodes except the one that receives
connections and that remains ![]() UP(Ready) with:
UP(Ready) with:
·
the web console via ![]() Monitoring/
Monitoring/![]() on
the node/
on
the node/![]() Stop/
Stop/
· the command safekit stop -m AM (replace AM by the module name)
3. check that all connections to the virtual IP address are handled by
the single server ![]() UP (Ready)
UP (Ready)
For a more detailed analysis on this topic, see:
![]() section 4.3.4 “Test virtual IP address of a farm module”
section 4.3.4 “Test virtual IP address of a farm module”
![]() section 4.3.5 “Test TCP load balancing on a virtual IP address”
section 4.3.5 “Test TCP load balancing on a virtual IP address”
![]() section 4.3.7 “Test compatibility of the network with invisible MAC address”
section 4.3.7 “Test compatibility of the network with invisible MAC address”
7.15 Problem after Boot
If you encounter a problem after boot, see section 4.1.
Note that by default, modules are not automatically started at boot. For this, you must setup the boot start into the module’s configuration with:
· the web console at /console/en/configuration/modules/AM/config
· in file SAFE/modules/AM/conf/userconfig.xml on the node1, with the boot attribute of the service tag (see section 13.2.3)
Then apply the new configuration on all nodes.
7.16 Analysis from snapshots of the module
When the problem is not easily identifiable, it is recommended to take a snapshot of the module on all nodes as described in section 3.5. A snapshot is a zip file that collects, for one module, the configuration files, dumps… Its content allows an offline and in-depth analysis of the module and node status.
|
|
The structure and content of the snapshot varies depending on the version of SafeKit. |
Since SafeKit 8.1, the structure of the snapshot is as follows:
|
|
snapshot_nodename_AM Snapshot for the module AM get from the node named nodename |
|
|
AM Application module name |
|
|
config_year_month_day_hour_mn_sec Last 3 configurations for the module, including the current one |
|
|
dump_year_month_day_hour_mn_sec Last 3 dumps for the module, including the last one |
|
|
for the level 3 support |


7.16.1 Module configuration files
The module configuration files are saved as follows:
|
|
module directory contains the user configuration files · bin directory scripts start_xx, stop_xx, … · conf directory XML configuration userconfig.xml |
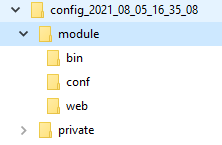
Check the user configuration file and scripts for troubleshooting with the application integration into SafeKit.
7.16.2 Module dump files
The dump contains the state of the module and the SafeKit node as it was at the time of the dump.
|
· csv directory: logs and status in csv format · licences directory: SafeKit licenses get from SAFE/conf directory · userlog directory: module scripts logs · var directory: extract of the SAFEVAR directory · web directory: web server configuration gets from SAFE/web/conf directory |
|
|
|
Module logs (not verbose and verbose) |
|
|
Information file Various information about the node (list and status of installed modules, OS version, disk, and network configuration…) |
|
Or
|
System logs · last.txt and systemevt.txt in Linux Or · applicationevt.txt and systemevt.txt in Windows |
|
|
Commands log for the node |
|
|
Trace files for level 3 support |
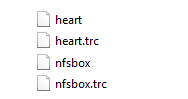
· Check the license file(s) into licenses directory for troubleshooting with the SafeKit license check
· Check the Apache configuration files into web directory for troubleshooting with the SafeKit web service
· Check the module logs, in log.txt and logverbose.txt, for troubleshooting with the module behavior
· Check the module scripts logs userlog/userlog_<year>_<month>_<day>T<time>_<script name>.ulog for troubleshooting with application start/stop
· If necessary, look at heartplug file for some information on the node and search the system logs for events that occurred at the same time as the problem being analyzed
· Check the commands log commandlog.txt for troubleshooting with cluster management or distributed commands
7.16.2.1 var directory
The var directory is mainly for the level 3 support. It is a copy of some part of the SAFEVAR directory. In the var/cluster directory:
· look at the cluster.xml file for checking the cluster configuration
· look at the cluster_ip.xml file for checking the DNS name resolution of names into the cluster configuration
7.16.2.2 csv directory
The logs and reports are also exported into csv format in the csv directory:
|
|
· Logs and status of the module Verbose log Resources status Resources status history
· Logs and status of the node Commands log List of installed modules For the level 3 support
|
Import the csv files into an Excel sheet to facilitate their analysis
To import a file:
1. Create a new sheet
2. From the Data tab, import From Text/CSV

3. In the dialog box, locate and double-click the csv file to import, then click Import
4. Then click on Load
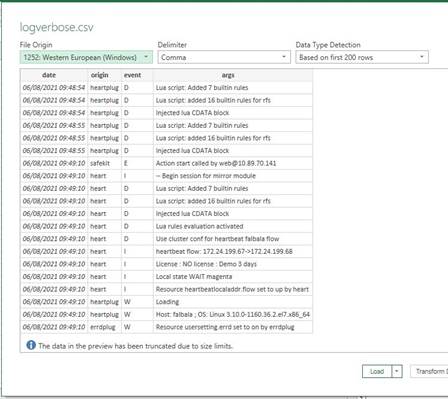
You can use the Excel features to filter rows according to the level of the messages, ... and load in different sheets the csv of each node.
|
|
For the exact date, format cells with Number/Custom jj/mm/aaaa hh:mm:ss,000. |
7.17 Problem with the size of SafeKit databases
SafeKit uses SQLite3 storage to save:
1. The log and the status of the node
· SAFEVAR/log.db contains the commands log
· SAFEVAR/resource.db contains the list of installed modules and its history
These are referred to as node databases.
2. The log and the resources of the module
· SAFEUSERVAR/log.db contains the module log
· SAFEUSERVAR/resource.db contains the state of the module resources and its history
These are referred to as module databases.
The size of the logs and histories increases as events occur on the SafeKit node and modules. Therefore, they should be purged regularly by deleting the oldest entries. This is automatically done thanks to a periodic job (task scheduler in Windows; crontab in Linux) that is controlled by the safeadmin service. The clean of the node databases is always active. The clean of the module databases is active only when the module is running.
To check that the jobs are ready:
1. Job for cleaning node databases
· In Windows, run schtasks /QUERY /TN safelog_clean
· In Linux, run crontab -u safekit -l
The output of this command must contain the safelog_clean entry
2. Job for cleaning AM module databases (where AM is the module name)
· In Windows, run schtasks /QUERY /TN safelog_AM
· In Linux, run crontab -u safekit -l
The output of this command must contain the safelog_clean_AM entry
The clean-up is implemented by a script located into SAFEBIN (in Linux, SAFEBIN=/opt/safekit/private/bin; in Windows, SAFE=C:\safekit\private\bin - if %SYSTEMDRIVE%=C:):
|
dbclean.ps1 in Windows and dbclean.sh in Linux |
Clean the log and history in the node databases |
|
dbclean.ps1 AM in Windows and dbclean.sh AM in Linux |
Clean the log and history in the databases of the module named AM |
If necessary, you can run this script outside the scheduled period to force the databases clean-up.
7.18 Problem for retrieving the certification authority certificate from an external PKI
When using an external PKI, you must provide the certificate of the certification authority CA used to issue server certificates (cacert.crt file containing the chain of certificates for the root and intermediates Certification Authorities)
If you have trouble retrieving these files from an external PKI, you can build them using the procedure described below.
7.18.1 Export CA certificate(s) from public certificates
The following procedure explains how to build from a public certificate, the chain of certificates for the root and intermediates Certification Authorities, into the file combined.cer.
When you have the public certificate (.crt or .cer file in Base-64 encoded X.509 format) generated by the PKI:
1. Copy the .crt (or .cer) file on a Windows workstation
2. Double click on this file to open it with “Crypto Shell Extensions”
3. Select the “Certification Path” tab to view the tree of certification authorities
4. Select an entry (from top to down except the leaf)
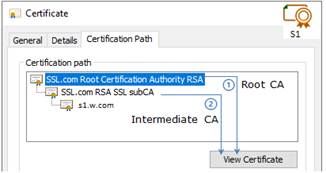
5. Click on “View Certificate”. A new window is opened with details for the selected certificate
6. In this new window, select the “Details” tab and click “Copy to File”
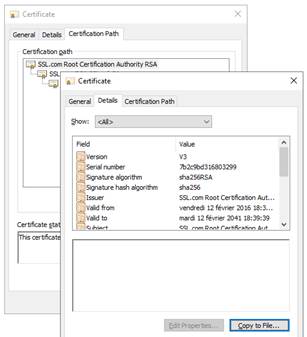
7. It opens the Certificate Export Wizard:
a. Click on “Next” to continue
b. On the “Export File Format” page, select “Base-64 encoded X.509 (.CER).”, and then click “Next”
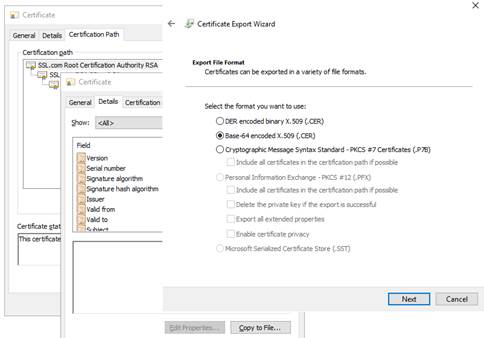
c. For “File to Export”, “Browse” to the location to which you want to export the certificate. Fill “File name” with the name of the certificate file. Then, click “Next”
d. Click “Finish” to export the certificate
e. Your certificate is successfully exported
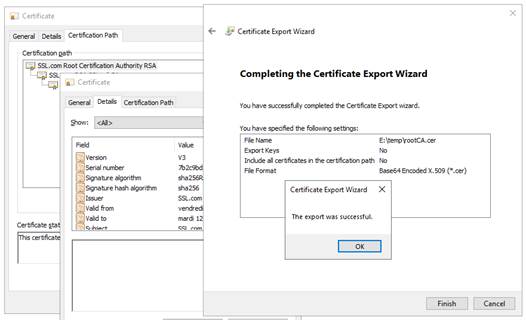
8. Now repeat steps 4-7 for all entries (except the last one) to export all intermediate CA certificates in the Base-64 encoded X.509(.CER) format. For the example, you would repeat steps 4-7 on SSSL.com RSA subCA intermediate CA to extract it as its own certificate.
9. Concatenate all your CA certificates into one file combined.cer
Run the following command with all the CA certificates you extracted earlier:
· In Windows
type intermediateCA.cer rootCA.cer > combined.cer
· In Linux
cat intermediateCA.cer rootCA.cer >> combined.cer
The resulting combined certificate should look something like the following:
This file can be used as the SAFE/web/conf/cacert.crt
7.19 Still in Trouble
![]() See Messages Index
See Messages Index
![]() See section 8.5 for opening a ticket at the call desk
See section 8.5 for opening a ticket at the call desk
8. Access to Evidian support
![]() Section 8.1 Home page of support site”
Section 8.1 Home page of support site”
![]() Section 8.2 “Permanent license keys”
Section 8.2 “Permanent license keys”
![]() Section 8.3 “Create an account”
Section 8.3 “Create an account”
![]() Section 8.4 “Access to your account”
Section 8.4 “Access to your account”
![]() Section 8.5 “Call desk to open a trouble ticket”
Section 8.5 “Call desk to open a trouble ticket”
![]() Section 8.6 “Download and upload area”
Section 8.6 “Download and upload area”
![]() Section 8.7 “Knowledge base”
Section 8.7 “Knowledge base”
8.1 Home page of support site

· https://www.evidian.com/support
· Software Keys: get permanent keys
· Subscription Request: create an account
· Download: download product or upload snapshots
· Call desk: tool for opening a call on problem
· Knowledge Base: base of KB
8.2 Permanent license keys
|
· https://www.evidian.com/support/software-keys/ · Software Keys: get permanent keys · Fill-in the form with the delivery note sent after a purchase order · Take "hostname" and OS of your servers · To obtain a temporary key for any hostname and any OS, for details see section 2.1.5 |
|

8.3 Create an account
|
· https://www.evidian.com/support/registration/ · Subscription Request: create an account ·
The procedure must be executed once with: · Note: your identities are sent by mail if you take an Evidian support contract · What you will obtain: a user account and a private password on the site |
|

8.4 Access to your account
|
· https://www.evidian.com/support/call-desk/ · Login on top at right with your identity and password · Then you have access to all services of support site |
|
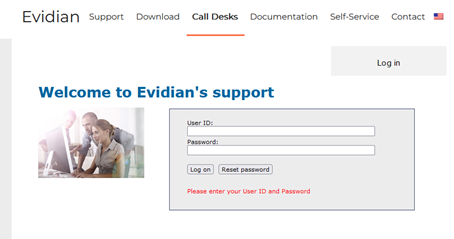
8.5 Call desk to open a trouble ticket
8.5.1 Call desk operations
|
· https://www.evidian.com/support/call-desk/ · Call desk: tool to open a trouble ticket on problem with 2 main operations · Create a call · Search for a Call and exchange with support on a Call |
|
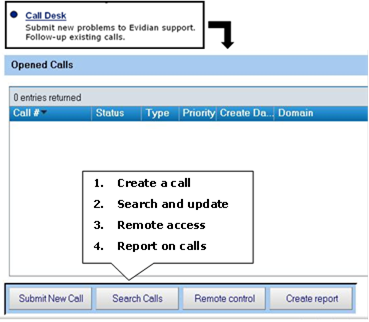
8.5.2 Create a call
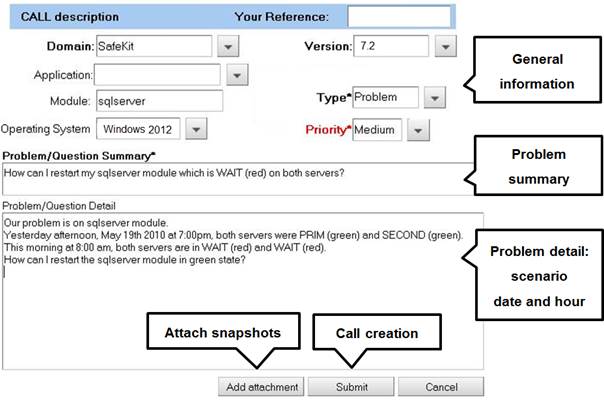
1. In the header, specify the SafeKit version, problem type and priority as well as the module name and the OS
2. Summarize the problem and then describe with more details the scenario and the date and time of the problem
3. Snapshots of the SafeKit module causing problem are necessary for the analysis. See next page for attaching snapshots
4. Create the call by pressing "Submit"
8.5.3 Attach the snapshots

· When there is a problem on a SafeKit module, snapshots of the module on all servers are necessary for analysis
· To get snapshots, see section 3.5
· If the snapshots size is smaller than 10 MBytes, you can attach them with the opening of the call by clicking on "Add"
· Otherwise, downloading snapshots on the support site may take several minutes. In this case indicate in "Remark text" that you download them into your private upload area: see section 8.6.3
8.5.4 Answers to a call and exchange with support
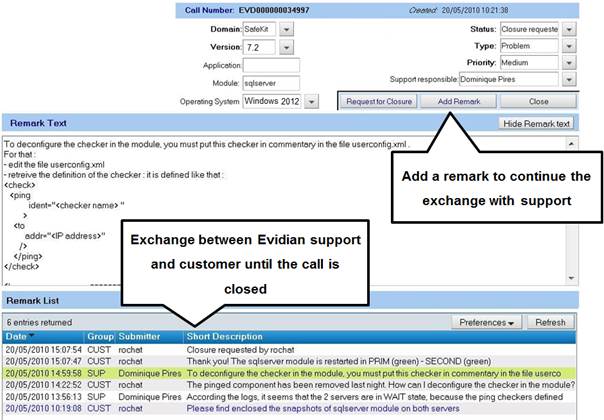
· All exchanges between the support and the customer are made with "Remarks"
· When support adds a remark on a call, the customer is notified by mail. This is the case for first response of the support after the opening of the call
· After consultation of the last remark of support, the customer can add a new remark in turn
· The exchange takes place until the closure of the call by agreement between the customer and Evidian support
8.6 Download and upload area
8.6.1 Two areas of download and upload
|
· https://www.evidian.com/support/download/ · Product download area: area for downloading SafeKit packages · Private area [client identity]: private area to upload files |
|
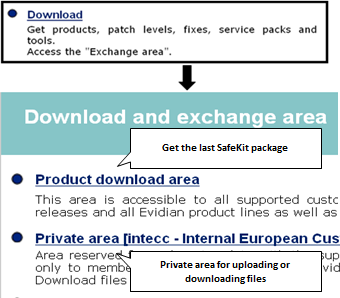
8.6.2 Product download area
|
· Go to <Version 8.2>/Platforms/<Your platform>/Current versions · Download the SafeKit package · For more information on installation, documentation, upgrade, see section 2
|
|
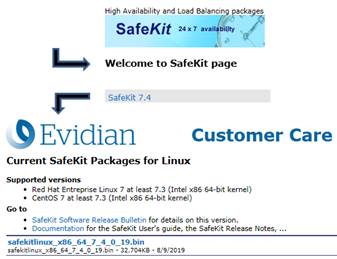
8.6.3 Private upload area
|
·
Create a directory ·
Upload snapshots in this directory with · For building snapshots, see section 3.5 · For attaching snapshots, see section 8.5.3 |
|

8.7 Knowledge base
|
· https://support.evidian.com/knowledge_base/ · Knowledge Base: base of KB · Search for example all articles on the errd component of SafeKit |
|

9. Command line interface
![]() Section 9.1 “Commands to control SafeKit services”
Section 9.1 “Commands to control SafeKit services”
![]() Section 9.2 “Command lines to configure and monitor the cluster”
Section 9.2 “Command lines to configure and monitor the cluster”
![]() Section 9.3 “Command lines to control modules”
Section 9.3 “Command lines to control modules”
![]() Section 9.4 “Command lines to monitor modules”
Section 9.4 “Command lines to monitor modules”
![]() Section 9.5 “Command lines to configure Modules”
Section 9.5 “Command lines to configure Modules”
![]() Section 9.6 “Command lines for support”
Section 9.6 “Command lines for support”
![]() Section 9.7 “Command lines distributed across multiple SafeKit servers”
Section 9.7 “Command lines distributed across multiple SafeKit servers”
![]() Section 9.8 “Examples”
Section 9.8 “Examples”
The SafeKit command-line interface is provided by the safekit command. To use it:
|
In Windows |
1. Open a PowerShell console as administrator 2. Go to the root of the SafeKit installation directory SAFE (by default SAFE=C:\safekit if %SYSTEMDRIVE%=C:) cd c:\safekit 3. Run .\safekit.exe <arguments> for the local command 4. Run .\safekit.exe -H "<hosts>" <arguments> for the command distributed across multiple nodes |
|
In Linux |
1. Open a Shell console as root 2. Go to the root of the SafeKit installation directory SAFE (by default SAFE=/opt/safekit) cd /opt/safekit 3. Run ./safekit <arguments> for the local command 4. Run ./safekit -H "<hosts>" <arguments> for the command distributed across multiple nodes |
9.1 Commands to control SafeKit services
Use the following commands for starting/stopping SafeKit services and their automatic boot start.
9.1.1 safeadmin service
SafeKit main service mandatory and started automatically at boot.
|
In Windows net start safeadmin |
safeadmin can also be controlled using the Windows Services Control Panel applet. To check the service status, run: · In command prompt sc query safeadmin · In PowerShell: Get-Service -name safeadmin |
|
In Linux systemctl start safeadmin |
To check the service status, run: systemctl status safeadmin |
9.1.2 safewebserver service
Service is used by the web console, module checkers and distributed command line interface. By default, it is started automatically at boot. For details, refer to section 10.7.
|
safekit webserver start safekit webserver restart safekit webserver stop |
Control the service via the safekit command. |
|
In Windows net start safewebserver |
Control the service via the net command. To check the service status, run: · In command prompt sc query safewebserver · In PowerShell: Get-Service -name safewebserver |
|
In Linux systemctl start safewebserver systemctl restart safewebserver
|
Control the service via the systemctl command. To check the service status, run: systemctl status safewebserver |
|
safekit boot [webon | weboff | webstatus] |
Controls the automatic start at boot of the safewebserver service ("on" or "off") By default: "on" |
9.1.3 SNMP service
Net-SNMP Agent service in Windows
SNMP monitoring for SafeKit is not enabled by default. To enable and configure it, refer to the section 10.9.
In Windows, SNMP monitoring is provided by Net-SNMP Agent service.
|
safekit safeagent [start | stop | restart | check] |
Control the service via the safekit command. |
|
net start "Net-SNMP Agent" |
Control the service via the net command. To check the service status, run: · In command prompt sc query "Net-SNMP Agent" · In PowerShell: Get-Service -name "Net-SNMP Agent" |
|
safekit boot [snmpon | snmpoff | snmpstatus] |
Controls the automatic start at boot of the Net-SNMP Agent service ("on" or "off") By default: "off" |
Standard snmpd service in Linux
SNMP monitoring for SafeKit is not enabled by default. To enable and configure it, refer to the section 10.9.
In Linux, SNMP monitoring is provided by the standard snmpd Linux agent.
|
systemctl start snmpd |
To check the service status, run: systemctl status snmpd |
9.2 Command lines to configure and monitor the cluster
|
safekit cluster config [filepath .xml or .zip] [lock | unlock] |
Apply the new SafeKit cluster configuration with the content of the file passed as argument, cluster.xml or cluster.zip: · cluster.xml Configure with new cluster.xml and generate new cryptographic keys · cluster.zip Configure with the new cluster.xml and cryptographic keys stored into the zip file When called with no argument, this command keeps the current configuration but generates new cryptographic keys. Ex: safekit cluster config /tmp/newcluster.xml
If the command is called with the parameter lock, future safekit cluster config commands will not be granted until they are called with the unlock parameter. |
|||
|
safekit cluster confcheck filepath |
Check the cluster configuration, with the content of the xml file passed as argument, without applying it |
|||
|
safekit cluster confinfo |
Return, for each active cluster node: · the date of last cluster configuration, · the digital signature of last cluster configuration · the state: locked (1) or unlocked (0) status for the cluster configuration This command allows checking if all node of a cluster have the same configuration. Ex: safekit cluster conf info Node Signature Date Lock rh6server7 6f1032b11a7b2 … 33e67c 2016-05-20T17:06:45 0 rh7server7 6f1032b11a4e0 … 33e67c 2016-05-20T17:06:45 0
|
|||
|
safekit cluster deconfig |
Remove the cluster configuration and the cryptographic key. |
|||
|
safekit cluster state |
Return the global SafeKit modules configuration state For each installed module on each cluster node, this commands list: · the node name, · module name, · module mode (farm or mirror) · internal module id number, · date of last module configuration, · digital signature of last configuration This command list which modules are installed on which nodes of the cluster. Signature and date of last configuration on each node allow checking that a module has the same configuration on all nodes, and if not, which node has the most recent configuration. |
|||
|
safekit cluster genkey |
Create cryptographic key for global SafeKit communication (implemented in the safeadmin process). The cluster configuration must be deployed again (with safekit -G) for this command to take effect. |
|
||
|
safekit cluster delkey |
Suppress cryptographic keys for global SafeKit communication. The cluster configuration must be applied again (with safekit -G) for this command to take effect. |
|
||
|
safekit -H "*" -G |
Distributes the local cluster configuration and associated cryptographic key if it exists, on all cluster nodes. Redo a name resolution for all names specified in cluster.xml and userconfig.xml of modules, without stopping modules (when possible). See section 9.7 for details on this distributed command. |
|
||
9.3 Command lines to control modules
The commands apply to the module named AM, passed as an argument with the -m option.
|
|
When the SAFEMODULE environment variable is set with the module name, -m argument not required. It is set during the execution of the module scripts (see section 14.2). |
|
Starts the module |
|||
|
safekit waitstart -m AM |
Waits for the end of the module start |
||
|
safekit stop -m AM |
Stops the module |
||
|
safekit shutdown |
Stops all running modules |
||
|
safekit waitstop -m AM |
Waits for the end of the module stop |
||
|
safekit waitstate -m AM STOP | ALONE | UP | PRIM | SECOND |
Wait for the required stable state (NotReady or Ready). |
||
|
safekit restart -m AM |
Executes only application stop and start scripts
|
||
|
safekit stopstart -m AM |
Unlike the restart, the stopstart causes a complete stop of the module followed by an automatic start. If the module was PRIM, there is a failover of the PRIM module on the other server.
|
||
|
safekit swap [nosync] -m AM |
Mirror modules only Swaps the roles of primary and secondary nodes. Use nosync to swap without synchronizing the replicated directories. |
||
|
safekit prim -m AM |
Mirror modules only Forces the module to start as primary.
It fails if the other server is already primary. |
||
|
safekit second
[fullsync] |
Mirror modules only Forces the module to start as secondary. It fails if the other server is not primary. Use fullsync to force the full synchronization of the replicated directories. |
||
|
safekit forcestop -m AM |
Forces the module stop to use when the stop has no effect |
||
|
safekit errd off -m AM safekit errd on -m AM |
Suspends/resumes the error detection of module processes defined in <errd> section of userconfig.xml Useful if you want to stop the application without changing the module state. The resource variable usersetting.errd reflects the current setting.
|
||
|
safekit checker off -m AM safekit checker on -m AM |
Used to stop or start all checkers (interface, TCP, IP, custom, etc.) Useful for maintenance operation, when man knows that some checker will detect a problem because some parts of the IT infrastructure will be stopped, and don’t want that Safekit start a failover. Notes: · could be used only on a live module in a stable state (ALONE, UP, PRIM, SECOND, WAIT) · the resource variable usersetting.checker reflects the current setting · if the module is running, a side effect of this command is the execution of the update of the module to apply the new setting |
||
|
safekit failover off -m AM safekit failover on -m AM
|
Used to dynamically set the failover attribute to on or off (see section 13.2.3). Notes: · could be used only on a mirror live module in a stable state (ALONE, PRIM, SECOND,WAIT). · this command must be issued on all machines belonging to the same cluster to not have unexpected results. · the resource variable usersetting.failover reflects the current setting. · if the module, a side effect of this command is the execution of the update of the module to apply the new setting |
||
|
safekit set -m
AM
[-n] [-l]
[-i identity] |
This command sets the state of one resource: safekit set -r custom.myresource -v up safekit set -r custom.myresource -v down Each assignment of the main resources is stored in a log to keep track of their status. Use -n to disable this logging or -l to force it. Use -i to specify the identity of the component, which affects the resource, in the logged message |
|
|
The commands restart, stop, stopstart and swap also accept the argument -i identity. This argument is set when the action is called by checkers or the failover machine for logging purpose and to increment the maxloop counter. When not set, the maxloop counter is reset. |
9.4 Command lines to monitor modules
The commands apply to the module named AM, passed as an argument with the -m option.
|
|
When the SAFEMODULE environment variable is set with the module name, -m argument not required. It is set during the execution of the module scripts (see section 14.2). |
|
Indicates the version of SafeKit and the license With the AM parameter, the module script level is called if exists, and its results displayed |
|
|
safekit state |
Displays the status of all modules |
|
safekit state -m AM
|
Displays the status of the AM module With the verbose option -v, status of all the module resources are listed: see the usefulness of resources in section 7.9. With the option -lq, the command returns status (and exit code): STOP (0), WAIT (1), ALONE (2), UP (2), PRIM (3), SECOND (4) |
|
safekit log -m AM [-s nb] [ -A ] [-l en|fr] |
Displays the last nb messages of the AM module log. Use -A for displaying the verbose log (all messages including debug ones). Use -l option for choosing the language, en(glish) or fr(ench).
Default: -s 300 |
|
safekit logview -m AM [-A] [-l en|fr] |
View in real time the last main messages of the AM module log. Use -A for displaying all messages (including debug ones). Use -l option for choosing the language, en(glish) or fr(ench). |
|
safekit logview -m AM -s 300 [-A ] [-l en|fr] |
View in real time the AM module log messages starting from the last 300 messages |
|
safekit logsave -m AM [-l en|fr] [-A] /tmp/f.txt |
Save main messages of the AM module log in /tmp/f.txt (absolute path mandatory). Use -A for saving all messages (including debug ones). Use -l option for choosing the language, en(glish) or fr(ench). |
|
safekit printi|printe -m AM "message" |
Application start/stop scripts can write messages in the module log with I or E level. |
9.5 Command lines to configure modules
The commands apply to the module named AM, passed as an argument with the -m option.
|
|
When the SAFEMODULE environment variable is set with the module name, -m argument not required. It is set during the execution of the module scripts (see section 14.2). |
|
Apply changes made in files under SAFE/modules/AM in such as userconfig.xml, start_prim/both or stop_prim/both (mirror/farm). It is recommended to run this command when the module is stopped. However, it is allowed in stable states ALONE (Ready)or WAIT (NotReady). But only some configuration parameters can be changed while the module is in these states. This feature is called dynamic configuration. Parameters that could be dynamically changed are reported into section 13 that describes all configuration parameters. |
|||
|
safekit module genkey -m AM |
Generates cryptographic keys for the module instances network exchanges encryption. Considered after the next configuration of the module. |
||
|
safekit module delkey -m AM |
Erase cryptographic keys associated with the module. After the next configuration, module instances network exchanges will be performed without encryption. |
||
|
safekit "*" -E AM |
Distributes the local configuration for the module AM and associated cryptographic key if it exists, to all cluster nodes. See section 9.7 for details on this distributed command. |
||
|
safekit confinfo |
Display information on the active and current configuration of the module AM. · the active configuration is the last configuration successfully applied. It is in SAFE/private/modules/AM · the current configuration is the one located in SAFE/modules/AM. It may be different from the active one when it has been modified and not yet been applied
This command is useful for checking the configuration of the module. It displays: · the signature value and a last modification date (Unix timestamp) for the active configuration · the signature value and last modification date (Unix timestamp) for the current configuration
When the signature values are different, it means that the configurations are not identical and that you may have to apply the current configuration. You can run this command on all the cluster nodes that implement the module to check that the configuration of the module is identical on all nodes. |
||
|
safekit confcheck |
Check the module configuration under SAFE/modules/AM without applying |
||
|
safekit module install -m
AM |
Installs the AM.safe
module file under the AM name [-M id] forces the installation of the module with the id specified as module id · AM.safe default location is SAFE/Application_Modules/ and its subdirectories · An absolute path could be used too · If no AM.safe is given, the command search for file AM.safe in /Application_Modules/ and its subdirectories |
||
|
safekit module package -m AM /…/newAM.safe |
Packages the AM module in /…/newAM.safe (absolute path mandatory) Used by the console to create a backup in SAFE/Application_Modules/backup/ |
||
|
safekit module uninstall -m AM |
Uninstalls the AM module. Deletes the module configuration directory SAFE/modules/AM |
||
|
safekit module list |
Lists the names of the installed modules |
||
|
safekit module listid |
Lists the names and ids of the installed modules |
||
|
safekit module getports -m AM (or -i id) |
Lists the communication ports used by the module to communicate between servers |
||
|
safekit boot -m AM [on | off | status] |
Controls whether the AM module starts automatically at boot or not ("on" or "off"; by default, "off"). In Windows, you may have to apply the procedure described in section 10.4. Without the option -m AM, lists the boot status of all modules.
|
9.6 Command lines for support
The commands apply to the module named AM, passed as an argument with the -m option.
|
|
When the SAFEMODULE environment variable is set with the module name, -m argument not required. It is set during the execution of the module scripts (see section 14.2). |
|
Saves the snapshot of the AM module in /tmp/snapshot_xx.zip (absolute path mandatory) A snapshot creates a dump and gathers under SAFEVAR/snapshot/modules/AM the last 3 dumps and last 3 configurations to collect them in a .zip file To analyze snapshots, see section 7.16 To send snapshots to Evidian support, see section 8 |
|||
|
safekit dump -m AM |
To solve a problem in real time on a server, make a dump of the AM module A dump creates a directory dump dump_year_month_day_hour_mn_sec on the server side under SAFEVAR/snapshot/modules/AM. The dump directory contains the module log and status, as well as information on the system state and SafeKit processes at the time of the dump |
||
|
safekit |
Calls the special command in SAFEBIN with SafeKit environment variables set. |
||
|
safekit clean |
Clean the logs, the resource file, and the main processes of the module AM.
· safekit clean log -m AM Clean the logs (verbose and not verbose logs) of the module. To be used when these logs are corrupted (e.g.: errors in log view). · safekit clean resource -m AM Reinitialize the resource file of the module. To be used when this file is corrupted (e.g.: errors in resources display) · safekit clean process -m AM Kill the main processes (heart) of the module. To be used when the stop and forcestop of the module did not achieve to kill these processes. · safekit clean all -m AM Default value. Clean log, resource, and process. |
9.7 Command lines distributed across multiple SafeKit servers
SafeKit provides a command-line interface for running it on multiple SafeKit servers. Each server must be running the SafeKit web service (see section 10.7).
|
|
The password assigned during the initialization of the SafeKit web service must be the same on all servers, even if they do not belong to the same SafeKit cluster. |
The distributed command applies to the servers specified with the -H "<hosts>" argument described below.
|
-H "*"
-H "<cluster node names list>"
|
Apply the command on nodes defined into the local cluster configuration (see section 12). The protocol and port are those defined in the local configuration of the SafeKit web service. By default, the protocol is http and the port is 9010. · -H "*" for all cluster nodes · -H "<cluster node names list>" list of node names as defined in the cluster configuration, separated by coma. For example: -H "node1,node2" |
|
-H "[[protocol:port],] |
Apply the command to the listed servers, which may not necessarily belong to the local cluster. · Optional specification of the protocol (http or https) and the port to use. If not specified, the protocol and port are those defined in the local configuration of the SafeKit web service. By default, the protocol is http and the port is 9010. · List of SafeKit servers (IP address or name) with a comma as the separator. Examples: -H "[http:9500],10.0.0.107,10.0.0.108" -H "[https],S1.company.com,S2.company.com" |
|
-H "<urls list>" |
Apply the command to the listed URLs, which may not necessarily belong to the local cluster. Example: |
The distributed commands are as follows.
|
safekit -H "<hosts>" <safekit command arguments> |
Executes the safekit command on the servers specified by -H. Almost all safekit commands can be applied on a list of cluster nodes. Exceptions are safekit logview, safekit -p and safekit -r commands which can be used only locally.
Examples: safekit -H "http://192.168.0.2:9010,http://192.168.0.3:9010" level
safekit -H "*" cluster confinfo
safekit -H "node2" module list
safekit -H "[http:9500],server1,server2" start -m AM |
|
safekit -H "<hosts>" |
Exports the configuration of the module named AM on the servers specified by -H. The AM module must be installed locally. This command performs the following actions: · creates AM.safe from local SAFE/modules/AM · transfers and installs AM.safe on the list of servers · installs the module on remote servers with the local module id · if the module was configured locally, configures it on remote servers See the usage example in section 9.8.3. |
|
safekit -H "<hosts>" |
Exports the local cluster configuration on the servers specified by -H. This command performs the following actions: · collect the content of the SAFEVAR/cluster directory · transfer and copy the collected files into the target servers’ SAFEVAR/cluster directory · trigger safeadmin configuration reload See the usage example in section 12.2.2 |
9.8 Examples
9.8.1 Local and distributed command
For instance, to display the levels (SafeKit, OS…):
· for the local host
safekit level
· for all hosts configured in the SafeKit cluster
safekit -H "*" level
9.8.2 Cluster configuration with command line
See section 12.2.2.
9.8.3 Module configuration with command line
In the following, replace AM by your module name; replace node1 and node2 by the name of your cluster nodes set during the SafeKit cluster configuration.
1. Log as administrator/root and open a command shell window on one node
For instance, log-in node1
2. Optional
Only during the first configuration, run safekit module install -m AM SAFE/Application_Modules/generic/mirror.safe
to install a new module named AM, from mirror.safe template.
This is not necessary when reconfiguring an already installed module.
3. Edit the module configuration and scripts in SAFE/modules/AM/conf and SAFE/modules/AM/bin
4. Optional
Run safekit module genkey -m AM or safekit module delkey -m AM
to create or delete cryptographic key for the module.
You do not have to create new cryptographic key on each reconfiguration of the module.
5. Run safekit -H "node1,node2" -E AM
to (re)install the module AM and apply its configuration, which is get from the node running the command (node1 in this example). It applies it on all listed nodes (node1 and node2).
9.8.4 Module snapshot with command line
The command line the module snapshot is described below. Replace AM by your module name.
1. Log as administrator/root and open a command shell window on one node
For instance, log-in node1
2. Run safekit snapshot -m AM /tmp/snapshot_node1_AM.zip
To save the snapshot of the AM module in /tmp/snapshot_node1_AM.zip (absolute path mandatory) locally (that is on node1).
Repeat all these commands on the other nodes in the cluster.
10. Advanced administration
![]() Section 10.1 “SafeKit environment variables and directories”
Section 10.1 “SafeKit environment variables and directories”
![]() Section 10.2 “SafeKit services”
Section 10.2 “SafeKit services”
![]() Section 10.3 “Firewall settings”
Section 10.3 “Firewall settings”
![]() Section 10.4 “Boot and shutdown setup in Windows”
Section 10.4 “Boot and shutdown setup in Windows”
![]() Section 10.5 “Antivirus settings”
Section 10.5 “Antivirus settings”
![]() Section 10.6 “Securing module internal communications”
Section 10.6 “Securing module internal communications”
![]() Section 10.7 “SafeKit web service”
Section 10.7 “SafeKit web service”
![]() Section 10.8 “Mail notification”
Section 10.8 “Mail notification”
![]() Section 10.9 “SNMP monitoring”
Section 10.9 “SNMP monitoring”
![]() Section 10.10 “Commands log of the SafeKit server”
Section 10.10 “Commands log of the SafeKit server”
10.1 SafeKit environment variables and directories
10.1.1 Global
|
Description |
|
|
SAFE |
SafeKit installation directory: · In Windows C:\safekit on Windows if SystemDrive=C: · In Linux /opt/safekit |
|
SAFEVAR |
SafeKit working files directory: SAFEVAR=C:\safekit\var on Windows and SAFEVAR=/var/safekit on Linux |
|
SAFEBIN |
SafeKit binary installation directory: C:\safekit\private\bin on Windows and /opt/safekit/private/bin on Linux. Useful to access SafeKit special commands (see section 14.5) |
|
SAFE/Application_Modules |
Installable .safe modules directory. Once a module has been installed, the module is located under SAFE/modules |
|
SAFE/conf |
Contains the SafeKit license file. |
10.1.2 Module
|
Variable |
Description |
||
|
SAFEMODULE |
The name of the module. The safekit command no longer needs the module name parameter (-m AM = -m SAFEMODULE) |
||
|
SAFE/modules/AM and SAFEUSERBIN
|
Editing a module, named AM, and its scripts is made inside directory SAFE/modules/AM. There are userconfig.xml file and application start and stop scripts start_prim, stop_prim for a mirror, start_both, stop_both for a farm (online edition or through the SafeKit console) After a module configuration, scripts are copied to the runtime directory SAFE/private/modules/AM/bin: this is the value of SAFEUSERBIN (do not modify scripts at this place) |
||
|
SAFEVAR/modules/AM and SAFEUSERVAR
|
Module, named AM,
working files directory Output messages of application scripts are in SAFEVAR/modules/AM/userlog_year-month-date_striptname.ulog. To check if there are errors during start or stop of the application.
|
||
|
SAFEVAR/snapshot/modules/AM
|
Directory of dumps and configurations put in a snapshot of the module named AM. See section 9.6 that describes command lines for support. |
The module tree (packaged into a .safe or installed into SAFE/modules/AM) is the following:
|
AM |
Application module name |
||
|
|
|
|
|
|
|
|
User XML configuration file |
|
|
|
|
Internal use only |
|
|
|
|
Optional. Internal use only (encryption of the module internal communications) |
|
|
|
|
Optional. Internal use only (encryption of the module internal communications) |
|
|
|
|
|
|
|
|
|
Module script executed on module start |
|
|
|
|
Module script to start the application in mirror or farm module |
|
|
|
|
Module script to stop the application in mirror or farm module |
|
|
|
|
Module script executed on module stop |
|
|
|
|
|
|
|
|
|
Obsolete (for the web console < SafeKit 8) |
|
|
|
|
Internal use only |
|
Since SafeKit 8, you cannot anymore customize the module quick configuration display (since index.html is obsolete).
10.2 SafeKit services and daemons
See section 10.3.3.1 and section 10.3.3.2 for full details on SafeKit processes name and ports used.
10.2.1 SafeKit services
|
|
In Windows, processes names have the .exe extension. |
|
safeadmin (safeadmin process) |
SafeKit main service mandatory and started automatically at boot. |
|
safewebserver (httpd process) |
Service used by the web console, module checkers and distributed command line interface. |
|
Net-SNMP Agent (safeagent process) |
In Windows Service that implements the SafeKit SNMP agent |
For the commands to control SafeKit services, refer to section 9.1.
10.2.2 SafeKit daemons per module
|
|
In Windows, processes names have the .exe extension. |
|
heart |
Manages the state automaton of the module and the recovery procedures |
|
errd ipcheck intfcheck tcpcheck pingcheck modulecheck |
Checkers that manage error detection |
|
vipd |
Synchronizes a farm of servers |
|
arpreroute |
Manages arp requests for the virtual IP address (sends ARP packet) |
|
nfsadmin nfsbox reintegre |
Manages the real-time replication and data synchronization |
10.3 Firewall settings
If a firewall is active on the SafeKit server, you must add rules to allow network traffic:
· between servers for internal communication (global runtime and module specific)
· between servers and workstations running the SafeKit console
See below the command to configure the Microsoft Windows Firewall in Windows ; firewalld/iptables in Linux. If you opted for automatic firewall configuration during the SafeKit installation, this command has already been executed.
|
SAFE/private/bin/firewallcfg add
where SAFE=C:\safekit (if %SYSTEMDRIVE%=C:) in Windows SAFE=/opt/safekit in Linux |
On all SafeKit servers: 1. Open a PowerShell/shell window as administrator/root 2. Run SAFE/private/bin/firewallcfg add This configures the operating system firewall for SafeKit. |
For configuring other firewalls, refer to section 10.3.3 that details SafeKit processes name and ports used.
10.3.1 Firewall settings in Linux
If you opted-in for automatic firewall configuration during SafeKit installation, you do not have to apply the following procedure.
If you opted-out for automatic firewall configuration, you must configure the firewall.
When using the operating system firewall (firewalld/iptables), you may use the firewallcfg command. It inserts (or remove) the firewall rules required by the SafeKit services and modules.
Administrators should review conflicts with local policy before applying it.
|
SAFE/private/bin/firewallcfg add
SAFE/private/bin/firewallcfg del
where SAFE=/opt/safekit |
Add (or delete) the firewalld or iptable firewall rules for the SafeKit safeadmin and safewebserver services. · SAFE/private/bin/firewallcfg add Add firewall rules for safeadmin and safewebserver · SAFE/private/bin/firewallcfg del Delete firewall rules for safeadmin and safewebserver |
||
|
SAFE/private/bin/firewallcfg add AM
SAFE/private/bin/firewallcfg del AM
where SAFE=/opt/safekit |
Add (or delete) the firewalld or iptable firewall rules for the SafeKit modules. · SAFE/private/bin/firewallcfg add AM Add firewall rules for the module named AM
· SAFE/private/bin/firewallcfg del AM Delete firewall rules for the module named AM |
10.3.2 Firewall settings in Windows
If you opted-in for automatic firewall configuration during SafeKit installation, you do not have to apply the following procedures.
If you opted-out for automatic firewall configuration, you must configure the firewall.
When using the operating system firewall (Microsoft firewall), you may use the firewallcfg command. It inserts (or remove) the firewall rules required by the SafeKit services (safeadmin, safewebserver, safeacaserv and Net-SNMP Agent) and modules.
Administrators should review conflicts with local policy before applying it.
|
SAFE/private/bin/firewallcfg add
SAFE/private/bin/firewallcfg del
where SAFE=C:\safekit (if %SYSTEMDRIVE%=C:) |
Add (or delete) the Microsoft firewall rules. · SAFE/private/bin/firewallcfg add Add firewall rules for SafeKit core and modules processes. · SAFE/private/bin/firewallcfg del Delete firewall rules for SafeKit core and modules processes. |
10.3.3 Other firewalls
If you use another firewall or want to check rules against local policy, the following lists processes and ports used by SafeKit services and modules that may be useful to configure the firewall.
10.3.3.1 List of processes
10.3.3.1.1 Processes performing local-only network exchanges
Processes for a mirror module
· errd: manages detection of process death
· nfsadmin, nfscheck: manage the file replication
Processes for a farm module
· errd: manages detection of process death
· heart: manages the recovery procedures
10.3.3.1.2 Processes performing external network exchanges
Processes common to all the SafeKit servers, one process by server, started at boot:
· safeadmin service (safeadmin process): main and mandatory administration service
· safewebserver service (httpd process): web service for the console, for <module> checkers and the distributed commands
· safecaserv (httpd process): web service for securing the web console with the SafeKit PKI (optional)
· In Windows, Net-SNMP Agent service (safeagent process): SafeKit SNMP v2 agent (optional)
Processes for a mirror module (depending on its configuration):
· heart: manages the recovery procedures
· arpreroute: manages arp requests (sends ARP packet)
· nfsadmin, nfsbox, reintegre: manage the file replication and reintegration
· splitbraincheck: manage the split-brain detection (sends ICMP ping packets)
Processes for a farm module (depending on its configuration):
· vipd: synchronizes a farm of servers
· arpreroute: manages arp requests (sends ARP packet)
Processes for a mirror or a farm module depending on checkers configuration:
· intfcheck: for checking interface (interface checker configuration automatically generated when <interface check=on>)
· pingcheck: for pinging an address (<ping> configuration)
· ipcheck: for checking a locally defined ip address (virtual ip checker automatically generated when <virtual_addr check=on>)
· modulecheck: for checking a SafeKit module (<module> configuration)
· tcpcheck: for checking a TCP connection ( <tcp> configuration)
10.3.3.2 List of ports
The following list ports used by SafeKit services and modules.
10.3.3.2.1 Ports used by services
· safeadmin
By default, remote access on UDP port 4800 (to communicate with safeadmin instances on other SafeKit servers)
For changing this value , see section 12.1.3.
· safewebserver
Local and remote TCP access, by default, on port 9010 for HTTP or port 9453 for HTTPS. For the ports value definition, see section 10.7.
This service is accessed locally and from remote SafeKit servers and remote workstation running the SafeKit console.
· safecaserv (optional)
Local and remote access on TCP port 9001 by default. For the port value definition, see section 11.3.1.9.4.
This service is accessed locally, and from remote SafeKit servers and remote workstation running the HTTPS configuration wizard with the SafeKit PKI.
· Net-SNMP Agent (Windows only, optional)
Local and remote access on UDP port 3600 by default. For the port value definition, see section 10.9.
10.3.3.2.2 Ports used by modules
When a module is configured on a SafeKit server, you can run the command safekit module getports -m AM to list the external ports used by the module AM. For firewall configuration, you must configure all SafeKit servers to enable communications targeted at these ports.
The ports values for one module are automatically computed depending on its module id. Run the command safekit module listid to list all the installed modules with their name and id.
The following gives rules for computing ports values depending on the module id. When checkers are configured for the module, you may also need to change the firewall configuration according to the checkers configuration. You must enable all communications on localhost between SafeKit processes.
For a mirror module
·
Port used by heart
UDP port used for sending heartbeats between SafeKit servers
port=8888 +(id-1)
·
Ports used by rfs (file replication)
TCP port used for replications requests between SafeKit servers
safenfs_port=5600 +(id-1)x4
To list ports used by the mirror module with id 1, run safekit module getports -m mirror. It returns:
List of the ports used by SafeKit
Process Ports
safeadmin
port UDP 4800
webconsole
port TCP 9010
heart
port UDP 8888
rfs
safenfs_port TCP 5600
For a farm module
·
Port used by farm: UDP port
used for communications between all SafeKit nodes
port 4803 + (id-1)x3
To list ports used by the farm module with id 2, run safekit module getports -m farm. It returns:
List of the ports used by SafeKit
Process Ports
safeadmin
port UDP 4800
webconsole
port TCP 9010
farm
port UDP 4806
For configured checkers
·
Ping checker for mirror or farm module
Change ICMP settings to allow ping at destination to the address defined into
the configuration.
·
TCP checker for mirror or farm module
Allow TCP connections at destination to the address defined into the
<tcp> configuration if this address is not local.
·
Module checker
Allow TCP connections at destination to 9010 port of the node running the
module that is checked.
·
Split-brain checker
Change ICMP settings to allow ping at destination to the witness defined into
the <splitbrain> configuration.
10.4 Boot and shutdown setup in Windows
safeadmin service is configured for automatically starting on boot and stopping on shutdown. In turn, this service starts modules configured for starting at boot and shutdown all modules.
On some Windows platforms, the safeadmin boot start fails because the network configuration is not ready, and the modules shutdown does not have time to complete since the timeout for services shutdown is too short. If you encounter such problems, apply one of the following procedures.
|
|
When using the SNMP agent, adapt the following procedures to set the manual start of the Net-SNMP Agent service and include its start/stop into SafeKit start-up (safekitbootstart.cmd) and shutdown (safekitshutdown.cmd) scripts. |
10.4.1 Automatic procedure
You can run the script as follow:
1. open a PowerShell window as administrator
2. cd SAFE\private\bin
3. run addStartupShutdown.cmd
This script sets the manual start for safeadmin service and adds default SafeKit start-up (safekitbootstart.cmd) and shutdown (safekitshutdown.cmd) scripts as part of the computer group policy start-up/shutdown scripts. If the script fails, apply the manual procedure below.
10.4.2 Manual procedure
You must apply the following procedure that uses the Group Policy Object Editor.
1. set manual start for safeadmin service
2. start the MMC console with the mmc command line
3. File - Add/Remove Snap-in Add - "Group Policy Object Editor" - OK
4. under "Console Root"/"Local Computer Policy"/"Computer Configuration"/"Windows Settings"/"Scripts (Start-up/Shutdown)", double click on "Start-up". Click on Add then set for "Script Name:" c:\safekit\private\bin\safekitbootstart.cmd. This script launches the safeadmin service.
5. under "Console Root"/"Local Computer Policy"/"Computer Configuration"/"Windows Settings"/"Scripts (Start-up/Shutdown)", double click on "Shutdown". Click on Add then set for "Script Name:" c:\safekit\private\bin\safekitshutdown.cmd. This script shutdowns all running modules.
10.5 Antivirus settings
Antiviruses may face detection challenges with SafeKit due to its close integration with the OS, virtual IP mechanisms, real-time replication, and restart of critical services. It may then be necessary to configure the antivirus to exclude certain directories and processes. The list of directories and processes is provided below.
Directories
|
SAFE |
SafeKit installation directory: · In Windows C:\safekit on Windows if SystemDrive=C: · In Linux /opt/safekit |
|
SAFEVAR |
SafeKit working files directories: · In Windows C:\safekit\var if SystemDrive=C: · In Linux /var/safekit |
|
Replicated folders |
All replicated folders defined into mirror modules |
Processes
The SafeKit processes for services and daemons are listed into the section 10.2.
Executables are in:
|
safekit command |
|
|
SAFE/private/plugin/*/* |
Executables that are run on module state changes |
|
SAFE/private/bin |
SafeKit executables |
|
SAFE/web/bin |
SafeKit web service executables |
10.6 Securing module internal communications
You can secure communications for the module between cluster nodes by creating cryptographic keys associated with the module. By default, these keys are generated by SafeKit with a “private” certification authority (SafeKit PKI). In SafeKit <= 7.4.0.31, the generated key has a validity period of 1 year. See section 10.6.3.1 for solutions when the key expires.
Since SafeKit 7.4.0.16, you can also provide your own certificates generated with your trusted certification authority (enterprise PKI or commercial PKI). See section 10.6.3.2 for details.
Since SafeKit 7.4.0.32, the module can be reconfigured with new keys while it is in ALONE state (dynamic update).
|
|
When encryption is not properly configured (e.g.: not the same key on all cluster nodes of the module), the module internal communications between nodes are rejected. In this case, the module configuration is not identical on all nodes. You must apply it again on all nodes. Then, you can check it by running on each node the command safekit confinfo -m AM where AM is the module name (see section 9.5). |
The encryption resource reflects the current communication mode of the module: "on"/"off" when encryption is active/not active. To read resources, see section 7.3. The resource name is usersetting.encryption.
10.6.1 Configuration with the SafeKit Web console
When configuring the module with the SafeKit web console, communication encryption is enabled in the step 3 of the module configuration wizard (see section 3.3.2).
10.6.2 Configuration with the Command Line Interface
The commands line equivalent for configuring a module, named AM, with cryptographic key are:
1. Stop the AM module on all nodes
2. On one node, log as administrator/root and open a command shell window
3. Run safekit module genkey -m AM
4. Run safekit -H "server1,server2" -E AM
where server1 and server2 are the nodes that implement the module
The commands line equivalent for re-configuring a module without cryptographic key are:
1. Stop the AM module on all nodes
2. On one node, log as administrator/root and open a command shell window
3. Run safekit module delkey -m AM
4. Run safekit -H "server1,server2" -E AM
where server1 and server2 are the nodes that implement the module
For more details on commands, refer to section 9.5.
10.6.3 Advanced configuration
10.6.3.1 Advanced configuration with the SafeKit PKI
In SafeKit <= 7.4.0.31, the key for encrypting the module communication has a validity period of 1 year. When it expires in a mirror module with file replication, the secondary fails to reintegrate. You must re-configure the module with a new key, as explained in SK-0084, for reverting to normal behavior. In SafeKit > 7.4.0.31, the validity period has been set to 20 years.
If you cannot upgrade SafeKit, you can generate new keys with a longer validity period. For this apply the following procedure:
1. Stop the AM module on all nodes
2. On one node, log as administrator/root and open a command shell window
3. Run safekit module genkey -m AM
4. Delete the file SAFE/modules/AM/conf/modulekey.p12
5. Change to the directory SAFE/web/bin
6. Run ./openssl req -config ../conf/ssl.conf -subj "/O=SafeKiModule/CN=mirror" -new -x509 -sha256 -nodes -days 3650 -newkey rsa:2048 -keyout pkey.key -out cert.crt
Set the -days value to the validity period you want
7. Run ./openssl pkcs12 -export -inkey ./pkey.key -in ./cert.crt -name "Module certificate" -out modulekey.p12
This command requires to fill a password. Contact Evidian support to get the correct value for the password
8. Delete the files pkey.key and cert.crt
9. Move the file modulekey.p12 into SAFE/modules/AM/conf
10. Run safekit -H "server1,server2" -E AM
where server1 and server2 are the nodes that implement the module
The module is configured, on the 2 nodes, with the new key and ready to start.
10.6.3.2 Advanced configuration with an external PKI
Since SafeKit 7.4.0.16, you can provide your own key generated with your trusted certification authority (enterprise PKI or commercial PKI). For this apply the following procedure:
1. Stop the AM module on all nodes
2. On one node, log as administrator/root and open a command shell window
3. Run safekit module genkey -m AM
4. Delete the file SAFE/modules/AM/conf/modulekey.p12
5. Append the X509 certificate in PEM format, for your certification authority (certificate of the CA or certificate bundle of all the certificate authorities) to the file SAFE/web/conf/cacert.crt
6. Change to the directory SAFE/web/bin
7. Generate your certificate with the PKI with the subject set to "/O=SafeKiModule/CN=mirror"
8. Copy the generated files pkey.key and cert.crt into the directory SAFE/web/bin
9. Run ./openssl pkcs12 -export -inkey ./pkey.key -in ./cert.crt -name "Module certificate" -out modulekey.p12
This command requires to fill a password. Contact Evidian support to get the correct value for the password
10. Delete the files pkey.key and cert.crt
11. Move the file modulekey.p12 into SAFE/modules/AM/conf
12. Run safekit -H "server1,server2" -E AM
where server1 and server2 are the nodes that implement the module
The module is configured, on the 2 nodes, with the new key and ready to start.
10.7 SafeKit web service configuration
SafeKit comes with a web service, safewebserver, which runs on each SafeKit server. It is a standard Apache web service that is mandatory for running:
· the web console (see section 3)
· the distributed command line interface (see section 9.7)
· the <module> checkers (see section 13.16)
safewebserver starts automatically at the end of SafeKit package install and on server reboot. If you do not need the SafeKit web service and want to remove the automatic boot start, refer to section 9.1.
The default configuration is HTTP with file-based authentication, initialized with a single admin user that got the Admin role. This could be changed via configuration files.
10.7.1 Configuration files
The configuration of an instance of safewebserver on a SafeKit server is contained in the SAFE/web/conf directory. It consists in standard Apache configuration files (see http://httpd.apache.org). The configuration is split into many files, but for most common configurations, only the main configuration file httpd.conf need to be modified.
|
|
· After changes, you must restart the service with the command: safekit webserver restart (see section 9.1). · Do not edit .default files since they are backups of delivered configuration files. |
The httpd.conf file consists essentially in a set of Define statements. Comment character # disables the definition.
The mains Define are:
|
Define httpport 9010 Define httpsport 9453 Set the listening port in http and https mode. (See section 10.7.2 for usage). |
|
User authentication definition: Define usefile # Define useldap # Define useopenid … Select which user authentication to use. At most one must be defined. usefile is the default. (See section 11.4 for details.) |
|
Apache logging definition: #Define Loglevel info #Define accesslog Uncomment these lines to enable the logging for debug purposes. Logging files httpd.log and access.log are in SAFEVAR. |
|
Session validity period definition: Define SessionMaxAge 28800 Since SafeKit 8.2.1, the user is automatically logged out after 8 hours of inactivity (28800 seconds). If necessary, adjust this value. |
Other Define are self-documented in the httpd.conf file.
The other configuration files are listed below. Modifying one of them may cause problems when upgrading SafeKit :
|
Global configuration |
httpd_main.conf |
|
File based authentication and role mapping |
httpd.webconsolefileauth.conf |
|
Form authentication configuration |
httpd.webconsoleformauth.conf |
|
LDAP/AD authentication configuration |
httpd.webconsoleldap.conf using a LDAP/AD server |
|
OpenID Connect authentication configuration |
httpd.webconsoleopenidauth.conf using an OpenID connect identity provider |
|
HTTPS configuration |
httpd.webconsolessl.conf in SAFE/web/conf/ssl |
User authentication configurations may optionally use group.conf (for HTTP) or sslgroup.conf (for HTTPS) files in SAFE/web/conf for user to role mapping.
10.7.2 Connection ports configuration
By default, connect the web console with the URL http://host:9010. The SafeKit web server will redirect to the appropriate section according to your security settings.
If you need to change the default value:
1. Edit SAFE/web/conf/httpd.conf and change the value of httpport or httpsport variables.
2. Restart the service using the command safekit webserver restart.
The HTTP and HTTPS configurations cannot be active simultaneously. See section 11.3 for how to configure HTTPS.
The port value 9010(HTTP)/9453(HTTPS) is also used by the module checker. Therefore, if the configuration of a module defines a <module> checker:
1. Edit the module configuration file userconfig.xml
2. Edit the port attribute and assign it to the new port value
<check>
<module name="mirror">
<to addr="192.168.1.31" port="9010"/>
</module>
</check>
3. Apply the new configuration of the module
10.7.3 HTTP/HTTPS and user authentication configuration
· The default configuration is for HTTP.
The default configuration is also set with file-based authentication, initialized with a single admin user that got the Admin role.
· The HTTPS configuration requires the installation of certificates and the definition of user authentication.
For a detailed description, see section 11.
To re-enable the HTTP configuration if it has been changed to HTTPS see section 11.2.1.1.
10.7.4 SafeKit API
Use Swagger UI to visualize and interact with the SafeKit API provided by the SafeKit web service. For this, connect a browser at the URL http://host:9010/swagger-ui/index.html. It may be useful to debug issues with the SafeKit web console and/or API.
10.8 Mail notification
You may need to send a notification, such as an e-mail, when the module is started, stopped, or run a failover. This is implemented thanks to the scripts of the module.
For mail notification, you have first to
choose a command line program to send mail. In Windows, you can use the Send-MailMessage from the Microsoft Powershell Utility. For Linux, you can use the mail command.
· Notification on the start and the stop of the module
The module scripts prestart/poststop can be used for sending a notification on the start/stop of the module.
· Notification on the failover of the module
The module script transition can be used to send a notification on main local state transitions of the module running on the local server. For instance, it may be useful to know when the mirror module is going ALONE (on failover for instance).
For details on module scripts, see section 14.
|
|
For a full example with the demonstration module notification.safe, see section 15.12. Since SafeKit 8, this .safe is delivered with the SafeKit package. |
10.9 SNMP monitoring
SafeKit could be monitored by snmp. Since version 8, snmp monitoring implementation differs in Windows and Linux : In Windows, SafeKit use its own snmp agent service, when in Linux, the operating system’s snmp agent is used.
10.9.1 SNMP monitoring in Windows
For using the SafeKit SNMP agent, you must:
1. configure it to start on boot, with the command
|
safekit boot [snmpon | snmpoff | snmpstatus] |
Controls the automatic start at boot of the Net-SNMP Agent service ("on" or "off"; by default, "off") |
2. add the corresponding firewall rule
When using the operating system firewall, the firewall has already been configured for Net-SNMP Agent if you have applied the command:
SAFE/private/bin/firewallcfg add
3. start it with the command
|
safekit safeagent [start | stop | restart | check] |
Controls start/stop of the Net-SNMP Agent service that implements the SafeKit SNMP agent. |
The configuration of the Net-SNMP Agent is defined in the self-documented SAFE/snmp/conf/snmpd.conf file. It is a standard net-snmp configuration file as described in http://net-snmp.sourceforge.net. By default, the service is listening on UDP agentaddress port 3600 and accepts read request from the public community and write requests from the private community. Read requests are used to get module status and write requests to run actions on the module.
You can change the default configuration according to your needs. When you modify snmpd.conf, you must manually change the firewall rule and restart the service to load the new configuration with: safekit safeagent restart.
|
|
Since SafeKit 8, the service name is Net-SNMP Agent instead of safeagent in previous releases. |
10.9.2 SNMP monitoring in Linux
Since SafeKit 8, Safekit did not come with its own snmp agent anymore, so the following safekit commands are obsoleted in Linux: safeagent install, safeagent start, safeagent stop, boot snmpon, boot snmpoff, boot snmpstatus.
Instead, it is possible to configure the standard snmpd Linux agent to access safekit mib:
1. Install net-snmp
dnf install net-snmp
net-snmp-utils
2. If selinux is in enforced mode, you have to set snmpd in permissive
mode for snmp by :
semanage permissive
-a snmpd_t
3. If firewall is active, you have to open the snmp ports with:
firewall-cmd --permanent
--add-service snmp
firewall-cmd --reload
4. Edit /etc/snmp/snmpd.conf
Add the following lines :
pass
.1.3.6.1.4.1.107.175.10 /opt/safekit/snmp/bin/snmpsafekit
view systemview included .1.3.6.1.4.1.107.175.10
Note : the “view systemview” line set the access rights. You could have to
adapt it to your general snmpd configuration.
5. Enable and Start the snmp agent
systemctl enable
snmpd
systemctl start snmpd
10.9.3 The SafeKit MIB
The SafeKit MIB is common to Windows and Linux implementation. It is delivered in SAFE/snmp/mibs/safekit.mib .
The SafeKit MIB is accessed with the following identifier (OID, prefix of SafeKit SNMP variables): = enterprises.bull.safe.safekit (1.3.6.1.4.1.107.175.10).
The SafeKit MIB defines:
· The module table: skModuleTable
The index on the module table is the ID of the application module as returned by the command safekit module listid.
Through the MIB, you can read and display the status of an application module on a server (STOP, WAIT, ALONE, UP, PRIM, SECOND) or you can take an action on the module (start, stop, restart, swap, stopstart, prim, second).
For example, the status of the module with ID 1 is read by an SNMP get to the variable: enterprises.bull.safe.safekit.skModuleTable.skModuleEntry.skModuleCurrentState.1 = stop (0)
Use the snmpwalk command to check all MIB entries.
· The resource table: skResourceTable
Each element defines a resource as for instance the one corresponding to the network interface checker "intf.192.168.0.0" and its status (unknown, init, up, down).
Example: SNMP get request to enterprises.bull.safe.safekit.skResourceTable.skResourceEntry.skResourceName.1.2 means name of resource 2 in application module 1.
10.10 Commands log of the SafeKit server
There is a log of the safekit commands ran on the server. It allows auditing the actions performed on the server to help support for instance. The log records all the safekit commands that are run and that modify the system such as a module install and configuration, a module start/stop, the safekit webserver start/stop, …
The command log is stored in the SAFEVAR/log.db file in SQLite3 format. For viewing its content:
· run the command safekit cmdlog
or
· click on the commands log tab into the web console
Below is the raw extract of this log:
| 2021-07-27 14:37:33.205122 | safekit | mirror | 6883 | START | config -m mirror
| 2021-07-27 14:37:33.400513 | cluster | mirror | 0 | I | update cluster state
| 2021-07-27 14:37:33.405597 | cluster | mirror | 0 | I | module state change on node centos7-test3
| 2021-07-27 14:37:34.193280 | | | 6883 | END | 0
| 2021-07-27 14:37:34.718292 | cluster | mirror | 0 | I | update cluster state
| 2021-07-27 14:37:34.722080 | cluster | mirror | 0 | I | module state change on node centos7-test4
| 2021-07-27 14:37:37.510971 | | | 6871 | END | 0
| 2021-07-27 14:38:05.092924 | safekit | mirror | 7017 | START | prim -m mirror -u admin@10.0.0.103
| 2021-07-27 14:38:05.109368 | | | 7017 | END | 0
Each field has the following meaning:
· The 1st field in the log entry is the date and time of the message
· The next one is the type of the action
· The next one is the module name when the action is not global
· The next one is the pid of the process that runs the command. It is used as the identifier of the log entry
· The next ones are START when the command starts and the command’s arguments; or END when the command has finished with the return value.
10.11 SafeKit log messages in system journal
Since SafeKit 8, SafeKit modules log messages are sent to system log too. To view them:
· In Windows, open a PowerShell window and run
Get-EventLog -Logname Application -Source Evidian.SafeKit that returns:
47086 Nov 23 11:27 Information Evidian.SafeKit 1073873154 mirror | heart | Remote state UNKNOWN Unknown...
47085 Nov 23 11:27 Information Evidian.SafeKit 1073873154 mirror | heart | Resource heartbeat.flow set to down by heart...
47084 Nov 23 11:26 Information Evidian.SafeKit 1073873154 mirror | heart | Local state ALONE Ready...
47082 Nov 23 11:26 Warning Evidian.SafeKit 2147614977 mirror | heartplug | Action alone called by heart : remote stop...
47081 Nov 23 11:25 Information Evidian.SafeKit 1073873154 mirror | heart | Remote state PRIM Ready...
47080 Nov 23 11:25 Information Evidian.SafeKit 1073873154 mirror | heart | Local state SECOND Ready...
47079 Nov 23 11:25 Information Evidian.SafeKit 1073873154 mirror | rfsplug | Reintegration ended (default)...
· In Linux, open a shell window and run
journalctl -r -t safekit that returns:
Nov 23 15:22:43 localhost.localdomain safekit[3689940]: mirror | heart | Local state ALONE Ready
Nov 23 15:22:43 localhost.localdomain safekit[3689940]: mirror | heart | Local state PRIM Ready
Nov 23 15:16:48 localhost.localdomain safekit[3689940]: mirror | heart | Local state ALONE Ready
Nov 23 15:16:48 localhost.localdomain safekit[3690096]: mirror | userplug | Script start_prim > userlog_2023-11-23T151648_start_prim.ulog
Nov 23 15:16:48 localhost.localdomain safekit[3690066]: mirror | rfsplug | Uptodate replicated file system
Nov 23 15:16:24 localhost.localdomain safekit[3689940]: mirror | heart | Remote state UNKNOWN Unknown
11. Securing the SafeKit web service
![]() Section 11.1 “Overview”
Section 11.1 “Overview”
![]() Section 11.2 “HTTP setup”
Section 11.2 “HTTP setup”
![]() Section 11.3 “HTTPS setup”
Section 11.3 “HTTPS setup”
![]() Section 11.4 “User authentication setup”
Section 11.4 “User authentication setup”
11.1 Overview
The SafeKit web service is mainly used by:
· the web console (see section 3)
· the distributed command line interface (see section 9.7)
SafeKit provides different setups for this web service to enhance the security of the SafeKit web console and distributed commands.
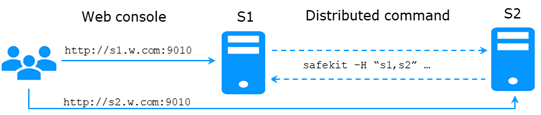
|
Protocol |
Authentication |
Role management |
|
ü HTTP ü HTTPS |
ü None (http only) ü File based ü LDAP/AD ü OpenID Connect |
ü Admin ü Control ü Monitor |
The most secure setups are based on HTTPS and user authentication. SafeKit provides a “private” certification authority (the SafeKit PKI). This allows SafeKit to be quickly secured without the need for an external PKI (enterprise PKI or commercial PKI) that provides trusted certification authority.
SafeKit offers also optional role management based on 3 roles:
|
Admin role
|
This role grants all administrative
rights by allowing access to |
|
Control role
|
This role grants monitoring and
control rights by allowing access only to |
|
Monitor role
|
This role grants only monitoring
rights, prohibiting actions on modules (start, stop…) in |
11.1.1 Default setup
The default setup is the following:
|
Setup |
Protocol |
Authentication Role management |
|
Default |
ü HTTP |
ü File-based authentication (username/password stored in an Apache file) ü Initialization with a single user named admin with the Admin role
|
11.1.2 Predefined setups
The predefined setups are as follows:
|
Setup |
Protocol |
Authentication Role management |
|
Unsecure |
ü HTTP |
ü No authentication ü Same role for all users For troubleshooting purpose only.
|
|
File-based |
ü HTTP ü HTTPS
To configure HTTPS with:
|
ü username/password stored in a local Apache file ü Optional role management stored in a local Apache file
|
|
LDAP/AD |
ü HTTP ü HTTPS
To configure HTTPS with:
|
ü LDAP/AD authentication ü Optional role management
|
|
OpenID Connect |
ü HTTPS
To configure HTTPS with:
|
ü OpenID Connect authentication ü Optional role management
|
|
|
On Linux, for all files added under SAFE/web/conf, change their rights with: chown safekit:safekit SAFE/web/conf/<filename> chmod 0440 SAFE/web/conf/<filename>. |
11.2 HTTP setup
By default, after the SafeKit install, the web service is configured for HTTP with file-based authentication that must be initialized.
This default configuration can be extended as described in section 11.2.1.
It can also be replaced by the unsecure setup described in section 11.2.2 or anyone of the predefined setups.
11.2.1 Default setup
The default setup relies on HTTP with file-based authentication. It requires some initialization described below. It is a mandatory step.
This default configuration can be extended:
· to add users and assign them a role as described in section 11.4.1.1
· to switch to HTTPS with:
![]() the SafeKit PKI described in section
11.3.1
the SafeKit PKI described in section
11.3.1
![]() an external PKI described in section 11.3.2
an external PKI described in section 11.3.2
After the installation of SafeKit, the configuration and restart of the web service is not necessary since this is the default configuration and the web service has been started with it.
11.2.1.1 Reset to default HTTP Setup
If you have changed the default user authentication configuration and want to revert to it, see section 11.4.1.
If you want to revert to HTTP from HTTPS, on all SafeKit servers:
1. Remove SAFE/web/conf/ssl/httpd.webconsolessl.conf
2. Run safekit webserver restart
(where SAFE=C:\safekit in Windows if System Drive=C: and SAFE=/opt/safekit in Linux)
11.2.1.2 Initialization for the web console and distributed command
SafeKit provides a command to get the web console and distributed commands up and running quickly.
If you opted-in for automatic configuration during SafeKit package installation, the initialization has already been done.
If you opted-out for automatic configuration, you must execute this command.
In both cases, you will have to give the password value, pwd for the admin user.
|
SAFE/private/bin/webservercfg -passwd pwd
where SAFE=C:\safekit (if %SYSTEMDRIVE%=C:) in Windows SAFE=/opt/safekit in Linux |
On all nodes: 1. Open a PowerShell/shell window as administrator/root 2. Run SAFE/private/bin/webservercfg -passwd pwd pwd is the password value You must set the same password on all nodes. |
|
|
The password must be identical on all nodes that belong to the same SafeKit cluster. Otherwise, web console and distributed commands will fail with authentication errors. |
Once this initialization is done on all the cluster nodes:
· you can authenticate in the web console with the name admin and the password you provided. The role is Admin by default (unless you change the default behavior by providing the group.conf file as described in section 11.4.1.1)
On authentication failure in the web console, you may need to reinitialize the admin password. For this, run again SAFE/private/bin/webservercfg -passwd pwd on all nodes.
· you can run distributed commands. It is based on a dedicated user rcmdadmin with the Admin role. It is managed in a different, private user file that you do not have to change.
On authentication failure for distributed commands, you may need to reset rcmdadmin password. To reset only this one, without changing the admin password, run SAFE/private/bin/webservercfg -rcmdpasswd pwd on all nodes.
11.2.1.3 Test the web console and distributed command
The setup is complete; you can now test that it is operational.
· Test the web console
1. Start a browser on the user’s workstation
2. Connect it to the default URL http://host:9010 (where host is the name or Ip address of one of the SafeKit nodes)
3. In the login page, enter admin as user’s name and the password you gave on initialization (the value for pwd)
4. The loaded page authorizes accesses that corresponds to the Admin role by default
· Test the distributed command
1. Connect on S1 or S2 as administrator/root
2. Open a system console (PowerShell, shell, …)
3. Change directory to SAFE
4. Run safekit -H "*" level
that should return the level for all nodes
11.2.2 Unsecure setup based on identical role for all
It is based on the configuration of a single role that is applied to all users without requiring authentication. This solution can only be implemented in HTTP and is incompatible with user authentication methods. It is intended to be used for troubleshooting only.
11.2.2.1 Configure and restart the web service
To configure where SAFE=C:\safekit in Windows if System Drive=C: ; and SAFE=/opt/safekit in Linux):
|
|
On S1 and S2: 1. edit SAFE/web/conf/httpd.conf file 2. comment all authentication variants (usefile, useldap, useopenid) #Define usefile … #Define useldap … #Define useopenid 3. select the desired role by uncommenting the associated line (httpadmin for Admin role, httpcontrol for Control role) ; if both lines are commented, the default role is Monitor. Define httpadmin |
|
|
On S1 and S2, disable HTTPS if you had configured it: 4. remove the file SAFE/web/conf/ssl/httpd.webconsolessl.conf |
|
|
On S1 and S2: 5. run safekit webserver restart |

11.2.2.2 Test the web console and distributed command
The setup is complete; you can now test that it is operational.
· Test the web console
1. Start a browser on the user’s workstation
2. Connect it to the default URL http://host:9010 (where host is the name or Ip address of one of the SafeKit nodes)
3. The loaded page authorizes only the actions corresponding to the selected role
· Test the distributed command
1. Connect on S1 or S2 as administrator/root
2. Open a system console (PowerShell, shell, …)
3. Change directory to SAFE
4. Run safekit -H "*" level
that should return the level for all nodes
11.3 HTTPS setup
The HTTPS web service relies on the existence of a set of certificates listed below:
|
|
The certificate of the Certification Authority CA used to issue the server certificate for S1 and S2 |
|
|
The server certificate of S1 and S2
used to assert the nodes’ identity |
Apply one of the following 2 procedures to configure HTTPS and associated certificates:
![]() section 11.3.1 “HTTPS setup using the SafeKit PKI”
section 11.3.1 “HTTPS setup using the SafeKit PKI”
Go to this section to quickly setup HTTPS with the SafeKit “private” certification authority.
![]() section 11.3.2 “HTTPS setup using an external PKI”
section 11.3.2 “HTTPS setup using an external PKI”
Go to this section to setup HTTPS with an external PKI (enterprise PKI or commercial PKI) that provides trusted certification authority.
At the end of HTTPS setup, you must implement one of the authentication methods described in section 11.4.
11.3.1 HTTPS setup using the SafeKit PKI
|
|
Verify that the system clock is set to the current date and time on all SafeKit nodes and workstations that will run the HTTPS SafeKit web console. Certificates are timestamped, and a time difference between systems may have an impact on certificate validity. |
11.3.1.1 Choose the Certificate Authority server
First, choose one SafeKit node to act as the Certificate Authority server. The selected node will be hereafter called the CA server. The other cluster nodes are called non-CA server. Then go through all the next subsections to activate the HTTPS configuration with the SafeKit PKI.
11.3.1.2 Start the CA web service on the CA server
On the CA server:
1. Log as administrator/root and open a command shell window
2. Change to the directory SAFE/web/bin
3. Run the command ./startcaserv
When prompted, enter a password to protect the access to this service for the CA_admin user (for instance, PasW0rD). This command starts the safecaserv service.
|
|
Remember this password since it will be required to connect to this service in next steps. The CA web service running on the first server is also accessed by the additional non-CA servers. |
|
|
Since the service listens to TCP port 9001, make sure TCP port 9001 is not used, and is allowed in the firewall configuration. On Linux, the TCP 9001 port is automatically opened in local firewall by the startcaserv command. In Windows, the SAFE/private/bin/firewallcfg add command opens safecaserv service communications. |
11.3.1.3 Generate Certificates on the CA server
During this step, the environment for generating certificates is set up: certificate authority, local server and client certificates are created; and server-side certificates are installed in their expected location.
On the CA server:
1. Log as administrator/root and open a command shell window
2. Change to the directory SAFE/web/bin
3. List server DNS names and IP addresses
By default, the server certificate includes all the locally defined IP addresses and DNS names. They are listed into the files: SAFE/web/conf/ipv4.json and SAFE/web/conf/ipv6.json and SAFE/web/conf/ipnames.json.
For building these files, run the command:
· In Linux
./getipandnames
This command relies on the host command delivered with the bind-utils package. Install it if necessary or manually fill the DNS names into the file SAFE/web/conf/ipnames.json.
· In Windows
./getipandnames.ps1
|
|
If the service will be accessed using another DNS name or IP address, edit the corresponding file to insert the new value before executing the initssl command. This is required for instance in the clouds using NAT, where the server has a public address mapped on a private address. |
./initssl sca
This command :
· Create a CA certificate conf/ca/certs/cacert.crt and its associated key conf/ca/private/cacert.key
· Create server certificate conf/ca/certs/server_<HOSTNAME>.crt and its corresponding key conf/ca/private/server_<HOSTNAME>.key
· Install the CA certificate, server certificate and key in the conf directory
|
|
This command creates a Certificate Authority certificate with the default subject name (that is “SafeKit Local Certificate Authority”). To customize the subject name, run the command with an extra parameter: ./initssl sca "/O=My Company/OU=My Entity/CN=My Company Private Certificate Authority". |
11.3.1.4 Generate certificates on non-CA server
During this step, on non-CA servers, local certificate requests are created, signed certificates are retrieved from the CA server, and finally certificates are installed at their expected locations.
Apply the following procedure sequentially on each non-CA servers:
1. Log on as administrator/root and open a command shell window
2. Change to the directory SAFE/web/bin
3. List server DNS names and IP addresses
By default, the server certificate includes all the locally defined IP addresses and DNS names. They are listed into the files: SAFE/web/conf/ipv4.json, SAFE/web/conf/ipv6.json and SAFE/web/conf/ipnames.json. For building these files, run the command:
· In Linux
./getipandnames
This command relies on the host command delivered with the bind-utils package. Install it if necessary or manually fill the DNS names into the file SAFE/web/conf/ipnames.json.
· In Windows
./getipandnames.ps1
|
|
If the service will be accessed using another DNS name or IP address, edit the corresponding file to insert the new value before executing the initssl command. This is required for instance in the clouds using NAT, where the server has a public address mapped on a private address. |
4. Run the command:
./initssl req https://CAserverIP:9001 CA_admin
where CAserverIP is the DNS name or IP address of the CA server.
Then enter, each time it is required, the password you specified when you started the CA web service on the CA server (for instance, PasW0rD)
Or
./initssl req https://CAserverIP:9001 CA_admin:PasW0rD
|
|
If necessary, set the environment variables HTTPS_PROXY and HTTP_PROXY to adequate values. |
|
|
If you get the error "Certificate is not yet valid", it means the system clock of the server is not synchronized with the system clock of the CA server. You should synchronize your server clocks and re-run the initssl command if the time difference is not acceptable. |
11.3.1.5 Enable HTTPS on CA server and non-CA server
To enable HTTPS, on all SafeKit servers:
1. copy SAFE/web/conf/httpd.webconsolessl.conf to SAFE/web/conf/ssl/httpd.webconsolessl.conf
2.
On Linux run :
chown safekit:safekit
SAFE/web/conf/ssl/httpd.webconsolessl.conf
a. chmod 0440 SAFE/web/conf/ssl/httpd.webconsolessl.conf
3. run safekit webserver restart
(where SAFE=C:\safekit in Windows if System Drive=C: and SAFE=/opt/safekit in Linux)
11.3.1.6 Configure the firewall on CA server and non-CA server
When the SafeKit web service runs in HTTPS mode, it is safe to allow network communication with this server and configure the firewall. For this, apply the instructions described in section 10.3.
11.3.1.7 Set the HTTPS SafeKit Web console
1. Log-in the user’s workstation
2. Download from the CA server the CA certificates (cacert.crt file) located into SAFE/web/conf/ca/certs.
|
3. Click on the downloaded cacert.crt file for opening the certificate window. Then click on Install Certificate button
|
|
||
|
4. It opens the Certificate Import Wizard. Select Current User and click on the Next button
|
|
||
|
5. Browse stores to select the Trusted Root Certification Authorities store. Then click on Next button
|
|
||
|
6. Then complete the certificate import. |
|
||
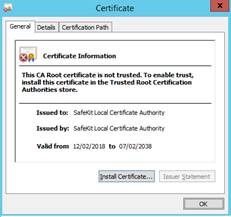
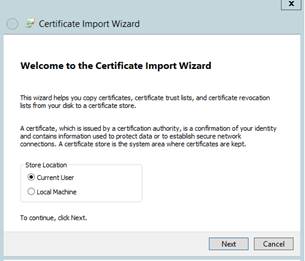

11.3.1.8 Stop the CA web service on CA server
Once all SafeKit servers have been configured, it is recommended to bring the CA web service (safecaserv service) offline on the CA server, to limit the risk of accidental or malicious access.
For stopping the SafeKit CA web service with the command line:
1. Log as administrator/root and open a command shell window
2. Change to the directory SAFE/web/bin
3. Run the command ./stopcaserv
|
|
On Windows, this command also removes the service entry to prevent any accidental start of the service afterwards. On Linux, the 9001 port is automatically closed on local firewall. |
When all foreseeable certificate generation and installation is done, it is a good practice to make sure files unnecessary at production time are not accessible. This step is not mandatory.
The files that constitute the CA, i.e., the SAFE/web/conf/ca file tree (especially the private keys stored under SAFE/web/conf/ca/private/*.keys) should be stored for future use on a removable storage media and removed from the server. Store the removable media in a secure place (i.e., a vault). This also applies to the files located under the SAFE/web/conf/ca directory of non-CA servers. The CA files should be restored into the same location before using the CA again (for example, if adding a new SafeKit cluster node).
11.3.1.9 SafeKit PKI advanced configuration
11.3.1.9.1 Renewing certificates
Every certificate has an expiration date. The default expiration date of the CA certificate is set to 20 years after the CA installation date. The default expiration date of the server certificates is set to 20 years after the certificate request date.
Expired server certificates will trigger warnings when the browser connects to the server. Expired CA certificates cannot be used to validate issued certificates.
It is possible to renew certificates using the original certificate requests and the private keys stored under the SAFE/web/conf/ca directory tree. You may also create a new certificate request using the existing private key. The procedure to do so is beyond the scope of this document, see openssl (or your certificate authority) documentation.
Creating a new set of certificates (and private keys) will have the side effect of renewing all certificates. To create a new set of certificates:
1. Erase the web/conf/ca directory on all SafeKit servers related to the CA, including the CA SafeKit server itself
2. Suppress existing certificates from the client machines certificate stores
3. Apply the full procedures described in section 11.3
11.3.1.9.2 Revoking certificates
It is possible to modify the SafeKit web service configuration to use a CRL containing the revoked certificates list. Setting up such a configuration is beyond the scope of this document. Refer to the Apache and openssl documentation.
Creating a new set of certificates and replacing the old set with the new one will have the side effect of effectively revoking the previous certificate set, since the CA certificate is different.
11.3.1.9.3 Commands for certificate generation
These commands are located, and must be run from, the SAFE/web/bin directory.
All paths below are relative to SAFE/web directory.
initssl sca [<subject>]
Parameters
<Subject>: the optional CA certificate subject, that identify in human readable form the owner of the CA.
Examples
initssl ca "/O=My Company/OU=My Unit/CN=My Company Private Certificate Authority"
Description
This command :
· Create a CA certificate conf/ca/certs/cacert.crt and its associated key conf/ca/private/cacert.key
· Create server certificate conf/ca/certs/server_<HOSTNAME>.crt and its corresponding key conf/ca/private/server_<HOSTNAME>.key
· Install the CA certificate, server certificate and key in the conf directory
It initializes a conf/ca file tree needed for the SafeKit PKI related commands.
|
|
Note that the best practice is to protect private keys with a password, but it needs more complex configuration on the server and is beyond the scope of this document. See the Apache and OpenSSL documentation for more information. |
initssl rca
Description
As initssl sca, but reuse the existing CA infrastructure to reissue the server certificate and key (re)install the CA certificate , server certificate and key in the conf directory
initssl req <url> <user>[:<password>]]
Parameters
· <url>: URL of the CA service. (https://CA_server:9001)
· <user>,<password>: user and password used to authenticate against the CA web service.
<user> preconfigured value is CA_admin. <password> is the one entered by the administrator at the start of CA web service. If these optional field are not present, the password will be asked interactively several times, when needed.
Example
initssl req https://192.168.0.1:9001 CA_admin:PasW0rD
Description
This command :
· Creates a certificate request for a server certificate that includes all the locally defined IP addresses and DNS names. The certificate request is stored in conf/ca/private/server_<hostname>.csr. The corresponding key is stored in conf/ca/private/server_<hostname>.key.
· Creates a certificate request for a client certificate with the Admin role (to be used by the distributed commands). The certificate request is stored in conf/ca/private/user_Admin_<hostname>.csr. The corresponding key is stored in conf/ca/private/user_Admin_<hostname>.key.
· Retrieves the CA certificate from the CA server
· Retrieves signed certificates corresponding to the certificate requests above, from the CA server (using provided login)
· Installs certificates and keys in the conf directory
· Checks certificates are OK
If no <url> is given, the command stops after having generated the certificate requests corresponding to:
· The local server, in the conf/ca/private/server_<hostname>.csr
· An Admin role client certificate, in conf/ca/private/user_Admin_<hostname>.csr
Those certificate requests are stored in a base64 encoded file ready to be submitted to an external certificate authority such as Microsoft Active Directory Certificate Services (refer to the Microsoft documentation on how to submit a base64 encoded certificate request file).
makeusercert <name> <role>
Parameters
<name> is the subject's CN name of the certificate, usually the subject's username.
<role> is subject's role as a console user. The valid value is Admin or Control or Monitor.
Examples
makeusercert administrator Admin
makeusercert manager Control
makeusercert operator Monitor
Description
Creates a client certificate request (and certificate + pkcs12 file containing certificate and key if started on the CA SafeKit server) for the <name> and <role>.
When the pkcs12 file is generated, the command asks twice for a password to protect the file. The generated unencrypted private key is stored into conf/ca/private/user_<role>_<name>.key file. If applicable, the generated certificate and pkcs12 files are stored into conf/ca/certs/user_<role>_<name>.crt and conf/ca/private/user_<role>_<name>.p12 files respectively.
Client certificates could be used as an authentication method on an HTTPS server. They are transmitted to the web service by the browser and verified on the server as part of the HTTPS connection handshake. A certificate corresponding to the desired role must be installed in the browser certificate store before the SafeKit web console can be used.
11.3.1.9.4 SafeKit CA web service
The SafeKit CA web service configuration is stored in SAFE/web/conf/httpd.caserv.conf file.
This service implements limited PKI.
CA certificates are accessible at the https://CAserverIP>:9001/certs/<certificate name>.crt URL.
For example, the CA certificate is accessible at https://CAserverrIP>:9001/certs/cacert.crt.
Certificate signature requests are processed by posting a form at the URL: https://<CA server IP>:9001/caserv .
The form takes the following parameters:
· action = signrequest
· name = <certificate name>
· servercsr = <file content of the server certificate request>
Or
· usercsr = <file content of the client certificate request>
11.3.2 HTTPS setup using an external PKI
Apply steps below to setup HTTPS with your trusted certification authority (your enterprise PKI or commercial PKI).
11.3.2.1 Get and install server certificates
11.3.2.1.1 Get certificate files
You must get server certificates from the PKI with the expected format.
|
|
The certificate of the Certification Authority CA used to issue the server certificates |
||||
|
|
The server certificate to assert the S1 identity. |
||||
|
|
The server certificate to assert the S2 identity. |
||||
|
s1.crt s2.crt |
X509 certificate file in PEM format. The subfield CN (Common Name) into the subject field, or the Subject Alternative Name field of the certificate, must contain : · S1 name(s) and/or IP address(es) for s1.crt · S2 names and/or IP address(es) for s2.crt
|
||||
|
s1.key s2.key |
The private, *unencrypted* key corresponding to the certificates s1.crt and s2.crt |
11.3.2.1.2 Install files in SafeKit
Install the certificates as follow (where SAFE=C:\safekit in Windows if System Drive=C: ; and SAFE=/opt/safekit in Linux):
|
s1.crt s1.key |
On S1: 1. copy s1.crt to SAFE/web/conf/server.crt 2. copy s1.key to SAFE/web/conf/server.key |
|
s2.crt s2.key |
On S2: 3. copy s2.crt to SAFE/web/conf/server.crt 4. copy s2.key to SAFE/web/conf/server.key |
|
5. On Linux, on S1 and S2, run: chown safekit:safekit SAFE/web/conf/server.crt SAFE/web/conf/server.key chmod 0440 SAFE/web/conf/server.crt SAFE/web/conf/server.key |
|
You can check the installed certificates with:
cd
SAFE/web/bin
checkcert -t server
It returns a failure if an error is detected.
You can check that the certificate contains some DNS name or IP address with:
checkcert -h "DNS name value"
checkcert -i "Numeric IP address value"
11.3.2.1.3 Example
Consider the following architecture:
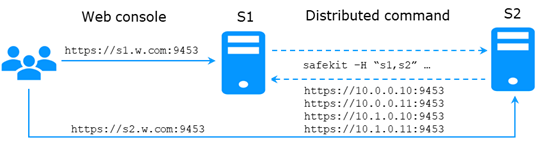
The corresponding SafeKit cluster configuration file, SAFEVAR/cluster/cluster.xml must contain these values into addr field:
<?xml version="1.0"?>
<cluster>
<lans>
<lan name="default">
<node name="s1" addr="10.0.0.10"/>
<node name="s2" addr="10.0.0.11"/>
</lan>
<lan name="private">
<node name="s1" addr="10.1.0.10"/>
<node name="s2" addr="10.1.0.11"/>
</lan>
</lans>
</cluster>
The server certificates must contain the same values (DNS names and/or IP addresses) as those in the cluster configuration and the values used to connect the web console. If not, the SafeKit web console and distributed commands will not work properly.
To check that the certificate file is correct:
1. Copy the .crt (or .cer) file on a Windows workstation
2. Double click on this file to open it with Crypto Shell Extensions
3. Click on the Details tab
4. Verify the Subject Alternative Name field
|
|
If you prefer the command line interface, you can run on each the SafeKit node: SAFE/web/bin/openssl.exe x509 -text -noout -in SAFE/web/conf/server.crt and look for the value after Subject Alternative Name. |
|
|
|
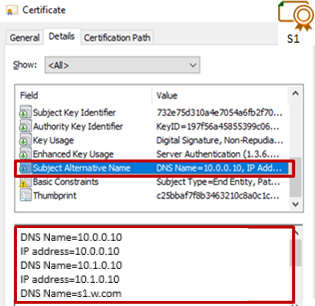

11.3.2.2 Get and install the CA certificate
11.3.2.2.1 Get certificate file
You must get these certificates from the PKI with the expected format.
|
cacert.crt |
The Certification Authority CA certificate used to issue the server certificates. X509 certificate file in PEM format. The chain of certificates for the root and intermediates CA |
Server certificates for S1 and S2 |
If you have trouble retrieving this file from the PKI, you can build it using the procedure described in section 7.18.
11.3.2.2.2 Install file in SafeKit
Install certificates files as follow (where SAFE=C:\safekit in Windows if System Drive=C: ; and SAFE=/opt/safekit in Linux):
|
cacert.crt |
On S1 and S2: 1. copy cacert.crt to SAFE/web/conf/cacert.crt 2. On Linux, run: chown safekit:safekit SAFE/web/conf/cacert.crt chmod 0440 SAFE/web/conf/cacert.crt |
You can check the installed certificates with:
cd
SAFE/web/bin
checkcert -t CA
It returns a failure if an error is detected.
You must also check that the cacert.crt contains the chain of certificates for the root and intermediates Certification Authorities.
11.3.2.3 Configure and restart the web service
To enable HTTPS, on all servers :
1. copy SAFE/web/conf/httpd.webconsolessl.conf to SAFE/web/conf/ssl/httpd.webconsolessl.conf
2. On Linux, run :
chown safekit:safekit SAFE/web/conf/ssl/httpd.webconsolessl.conf
chmod 0440 SAFE/web/conf/ssl/httpd.webconsolessl.conf
3. run safekit webserver restart
where SAFE=C:\safekit in Windows if System Drive=C: ; and SAFE=/opt/safekit in Linux
11.3.2.4 Change the firewall rules
You can run the firewallcfg command to change the firewall rules. It set SafeKit rules into the operating system default firewall (in Windows, Microsoft Windows Firewall ; in Linux, firewalld or iptables).
|
Firewall |
On S1 and S2: 1. run SAFE/private/bin/firewallcfg add where SAFE=C:\safekit in Windows if System Drive=C: ; and SAFE=/opt/safekit in Linux |
Don’t run this command if you want to configure the firewall yourself or if you use a different firewall than the system one. For the list of SafeKit processes and ports, see section 10.3.
11.4 User authentication setup
Setup one of the following user authentication methods:
![]() section 11.4.1 “File-based authentication setup”
section 11.4.1 “File-based authentication setup”
![]() section 11.4.2 “LDAP/AD authentication setup”
section 11.4.2 “LDAP/AD authentication setup”
![]() section 11.4.3 “OpenID authentication setup”
section 11.4.3 “OpenID authentication setup”
At the end of this setup, you can start using the secure SafeKit web console.
11.4.1 File-based authentication setup
File-based authentication setup can be applied in HTTP or HTTPS. It relies on the following files:
|
|
User file configuration that defines authorized users |
|
|
Optional file to restrict the user’s role. If the group.conf file is not present, all authenticated users will have the Admin role. |


11.4.1.1 Manage users and groups
The users and groups must be identical on S1 and S2, as well as passwords. It is defined by the files user.conf and group.conf into SAFE/web/conf directory (SAFE=C:\safekit in Windows if System Drive=C: ; and SAFE=/opt/safekit in Linux).
|
|
During the default setup initialization, described in section 11.2.1, the user named admin has been created and thus is present into user.conf. You can decide to remove this user if you create others. |
1. Create a new user
Users are created with the SAFE/web/bin/htpasswd command.
For instance, to add the new user manager and set its password managerpassword, run:
SAFE/web/bin/htpasswd -bB SAFE/web/conf/user.conf manager managerpassword
The new user is inserted into SAFE/web/conf/user.conf the file.
|
|
admin:$2y$05$oPquL6Z2Y78QcXpHIako.O58Z6lWfa5A86XD.eCbEnbRcguJln9Ce manager:$apr1$U2GLivF5$x39WKmSpq6BGmLybESgNV1 operator1:$apr1$DetdwaZz$hy5pQzpUlPny3qsXrIS/z1 operator2:$apr1$ICiZv2ru$wRkc3BclBhXzc/4llofoc1 |
2. Assign the role of the users (optional)
By default, all users have the Admin role. If you want to assign distinct roles to different users, you must create the SAFE/web/conf/group.conf file and assign user’s role. The group file can contain the 3 groups Admin, Control, Monitor. Users in these groups will have the corresponding roles.
|
|
Each line of the group file must contain the group name followed by a colon, followed by the member users name separated by spaces. See the example above. |
For instance, assign the Control role to the new user manager:
|
|
Admin : admin Control : manager Monitor : operator1 operator2 |

|
|
Each line of the group file must contain the group name followed by a colon, followed by the member users name separated by spaces. See the example above. |
3. Delete a user, …
Use htpasswd -? for all user management commands (add/delete, ...).
11.4.1.2 Install files
Install the files as follow (where SAFE=C:\safekit in Windows if System Drive=C: ; and SAFE=/opt/safekit in Linux):
|
|
On S1 and S2: 1. copy user.conf to SAFE/web/conf/user.conf |
|
|
On S1 and S2 if groups are set: 2. copy group.conf to SAFE/web/conf/group.conf |
|
3. On Linux, on S1 and S2, run: chown safekit:safekit SAFE/web/conf/user.conf SAFE/web/conf/group.conf chmod 0440 SAFE/web/conf/user.conf SAFE/web/conf/group.conf |
|
These files must be identical on all nodes.
11.4.1.3 Configure and restart the web service
To configure the file-based authentication (where SAFE=C:\safekit in Windows if System Drive=C: ; and SAFE=/opt/safekit in Linux):
|
|
On S1 and S2: 1. edit SAFE/web/conf/httpd.conf file 2. if necessary uncomment usefile Define usefile |
|
|
On S1 and S2: 3. run safekit webserver restart |
This is the default content of httpd.conf.
11.4.1.4 Test the web console and distributed command
The setup is complete; you can now test that it is operational.
· Test the web console
1. Start a browser on the user’s workstation
2. Connect it to the default URL http://host:9010 (where host is the name or Ip address of one of the SafeKit nodes). If HTTPS is configured, there is an automatic redirection to https://host:9453
3. In the login page, specify in the user’s name and password
With the SafeKit default configuration, you can log-in with the user admin by giving the password you assigned during initialization.
4. The loaded page only allows access authorized by the user's role. If the groups have not been defined, all users have the Admin role.
· Test the distributed command
1. Connect on S1 or S2 as administrator/root
2. Open a system console (PowerShell, shell, …)
3. Change directory to SAFE
4. Run safekit -H "*" level
that should return the level for all nodes
11.4.2 LDAP/AD authentication setup
LDAP/AD authentication setup can be applied in HTTP or HTTPS. It requires:
|
|
LDAP/Active Directory account configuration used to assert the user identity |
|
|
Optional LDAP/Active Directory group configuration to restrict the user’s role. When groups are not defined, all authenticated users have the Admin role. |

|
|
On some Linux distributions (such as RedHat 8 and CentOS 8), the web server start fails when it is configured with LDAP/AD authentication. In this case, apply the solution described in SK-0092. |
Apply the steps described below after verifying that S1 and S2 can connect to the LDAP controller domain port (default is 389).
11.4.2.1 Manage users and groups
If necessary, ask your LDAP administrator to create users of the SafeKit web console.
If you want to define user’s role, ask your LDAP administrator to create groups for Admin, Control, Monitor roles and assign users to groups. When groups are not defined, all users will have the Admin role.
11.4.2.2 Configure and restart the web service
To configure the LDAP/AD authentication (where SAFE=C:\safekit in Windows if %SYSTEMDRIVE%=C: ; and SAFE=/opt/safekit in Linux):
|
|
On S1 and S2: Initialize the authentication for the distributed command. This may have already been done if you initialized the default configuration after SafeKit installation. Otherwise: 1. Run SAFE/private/bin/webservercfg -rcmdpasswd pwd where pwd is the password for the private user rcmdadmin. You don’t need to memorize it. |
||
|
|
On S1 and S2: 2. edit SAFE/web/conf/httpd.conf file 3. uncomment useldap Define useldap 4. Locate the following lines and replace bold values according to your LDAP/AD service configuration: Define binddn "CN=bindCN,OU=bindOU1,OU=bindOU2,DC=domain,DC=fq,DC=dn" Define bindpwd "Password0" Define searchurl "ldap://ldaporad.fq.dn:389/OU=searchou, DC=domain, DC=fq, DC=dn?sAMAccountName, memberOf?sub?(objectClass=*)" the binddn and bindpwd variables must contain the credentials of an account with search rights on the directory. the searchurl variable defines the RFC2255 search URL to authenticate the user.
If the group configuration is not enabled, all authenticated users will have the Admin role. |
||
|
On S1 and S2 To enable group management (optional): 5. edit SAFE/web/conf/httpd.conf file 6. uncomment the following lines and replace bold values according to your LDAP/AD service configuration: Define admingroup "CN=Group1CN,OU=Group1OU1,OU=Group1OU2,DC=domain,DC=fq,DC=dn" Define controlgroup "CN=Group2CN,OU=Group2OU1,OU=Group2OU2,DC=domain,DC=fq,DC=dn" Define monitorgroup "CN=Group3CN,OU=Group3OU1,OU=Group3OU2,DC=domain,DC=fq,DC=dn" Users set into the LDAP/AD groups associated to admingroup, controlgroup and monitorgroup, will respectively have Admin, Control and Monitor roles. For more sophisticated authentication, read Apache web service documentation (see http://httpd.apache.org). |
|||
|
|
On S1 and S2: 7. run safekit webserver restart |
11.4.2.3 Test the web console and distributed command
The setup is complete; you can now test that it is operational.
· Test the web console
1. Start a browser on the user’s workstation
2. Connect it to the default URL http://host:9010 (where host is the name or Ip address of one of the SafeKit nodes). If HTTPS is configured, there is an automatic redirection to https://host:9453
3. In the login page, specify in the user’s name and password
4. The loaded page only allows access authorized by the user's role. If the groups have not been defined, all users have the Admin role.
· Test the distributed command
1. Connect on S1 or S2 as administrator/root
2. Open a system console (PowerShell, shell, …)
3. Change directory to SAFE
4. Run safekit -H "*" level
that should return the level for all nodes
11.4.3 OpenID authentication setup
|
|
Since SafeKit 8.2.3, OpenID authentication works only with HTTPS. To setup HTTPS, refer to section 11.3. |
OpenID authentication relies on the mod_auth_openidc Apache module. It must be set with HTTPS. It requires:
|
|
OpenID Identity provider client application registration and account configuration used to assert the user identity |
|
|
Optional OpenID claims configuration to restrict the user’s role. When claims are not defined, all authenticated users have the Admin role. |

|
|
On some Linux distributions you may need to install the mod_auth_openidc module from the distribution repository. |
Apply the steps described below after verifying that S1 and S2 can connect to the OpenID Identity Provider. You may need to setup a proxy configuration, see relevant httpd.conf section and mod_auth_openidc documentation for details.
11.4.3.1 Manage app, users and groups
If necessary, ask your OpenID administrator to create users of the SafeKit web console.
Ask your OpenID administrator to register the webconsole App into the OpenID provider (OP) and retrieve the assigned credentials (ClientID and ClientSecret) values (you will need those values during the httpd.conf configuration step below).
Set the app’s redirect URI to https://host:9453/openid. If you plan to connect to more than one server, enter the URL of each connection server.
If you want to define user’s role on the Identity Provider, ask your OpenID administrator to create groups or roles for Admin, Control, Monitor roles and assign users to the created groups or roles, then fill in the AdminClaim, ControlClaim and MonitorClaim variables in httpd.conf with the corresponding claims. When the above is not defined, all authenticated users will have the Admin role.
You may also define the groups on the SafeKit Web Server by filling in the group.conf file as in the File-based authentication case (see “Assign the role of the users” in section 11.4.1.1).
11.4.3.2 Configure and restart the web service
To configure the OpenID authentication (where SAFE=C:\safekit in Windows if %SYSTEMDRIVE%=C: ; and SAFE=/opt/safekit in Linux):
|
|
On S1 and S2: Initialize the authentication for the distributed command. This may have already been done if you initialized the default configuration after SafeKit installation. Otherwise: 1. Run SAFE/private/bin/webservercfg -rcmdpasswd pwd where pwd is the password for the private user rcmdadmin. You don’t need to memorize it. |
|
|
On S1 and S2: 2. edit SAFE/web/conf/httpd.conf file 3. uncomment useopenid Define useopenid 4. Locate the following lines and replace values according to your OpenID service configuration: OIDCProviderMetadataURL <Your OpenId provider metadata URL> OIDCClientID <Your OpenID client ID> OIDCClientSecret <Your OpenID client secret> OIDCRemoteUserClaim <The Claim in ID token that identifies the user, if not set, defaults to sub> ## openid connect scope request; this defines which claims are returned by the IDP. OIDCScope "openid email" · the OIDCClientID and OIDCClientSecret variables must contain the credentials of the registered app in the OpenID Identity Provider. · the OICDScope variable defines the scopes needed to return the RemoteUser and optionally roles claims. openid should always be specified. If neither the AdminClaim, ControlClaim and MonitorClaim configuration nor the group.conf configuration is enabled, all authenticated users will have the Admin role. |
|
On S1 and S2 To enable role claim management: 5. edit SAFE/web/conf/httpd.conf file 6. uncomment the following lines and replace the values according to your OpenID service configuration: # Define AdminClaim roles:SKAdmin # Define ControlClaim roles:SKControl # Define MonitorClaim roles:SKMonitor Users’ tokens bearing the claims defined by the AdminClaim, ControlClaim and MonitorClaim, will respectively have Admin, Control and Monitor roles. For more details, see the mod_auth_openidc documentation (GitHub - OpenIDC/mod_auth_openidc: OpenID Certified™ OpenID Connect Relying Party implementation for Apache HTTP Server 2.x). |
|
|
|
On S1 and S2: 7. run safekit webserver restart |
11.4.3.3 Test the web console and distributed command
The setup is complete; you can now test that it is operational.
· Test the web console
1. Start a browser on the user’s workstation
2. Connect it to the default URL http://host:9010 (where host is the name or Ip address of one of the SafeKit nodes). Since HTTPS must be configured, there is an automatic redirection to https://host:9453
3. In the login page, specify in the user’s name and password
4. The loaded page only allows access authorized by the user's role. If the groups have not been defined, all users have the Admin role.
· Test the distributed command
1. Connect on S1 or S2 as administrator/root
2. Open a system console (PowerShell, shell, …)
3. Change directory to SAFE
4. Run safekit -H "*" level
that should return the level for all nodes
12. Cluster.xml for the SafeKit cluster configuration
![]() Section 12.1 “Cluster.xml file”
Section 12.1 “Cluster.xml file”
![]() Section 12.2 “SafeKit cluster Configuration”
Section 12.2 “SafeKit cluster Configuration”
SafeKit uses the configuration file cluster.xml. This file defines all the servers that make up the SafeKit cluster as well as the IP address (or name) of these servers on the networks used to communicate with the cluster nodes. These are global cluster and module internal communications; these communications are encrypted. This network is also used for executing the global safekit command (with argument -H).
You must define at least one network that includes all nodes in the cluster. It is recommended to define several networks to tolerate at least one network failure.
The cluster can be configured:
· Either via the cluster configuration wizard in the SafeKit web console
· Or by directly editing the cluster configuration file and applying the configuration via command line
Both methods are described in section 12.2.
|
|
For full examples of cluster configurations refer to section 15.1.1 and section 15.2.1. It presents the configuration via the web console along with the corresponding cluster.xml. |
12.1 Cluster.xml file
Each network (lan) has a logical name that will be used in the configuration of the modules to name the monitoring networks:
· into the heartbeat section for a mirror module (for details, see section 13.3)
· into the lan section for a farm module (for details, see section 13.4)
The node name is the one that is used by the SafeKit administration service (safeadmin) for uniquely identifying a SafeKit node. You must always use the same name for designing a given server on different networks. This name is also used by the SafeKit web console when displaying the node’s name.
12.1.1 Cluster.xml example
· In the example below, two networks are defined. One of them can be dedicated to file replication in a mirror module.
<cluster>
<lans>
<lan name="default">
<node name="node1" addr="192.168.1.67"/>
<node name="node2" addr="192.168.1.68"/>
</lan>
<lan name="repli">
<node name="node1" addr="10.0.0.1"/>
<node name="node2" addr="10.0.0.2"/>
</lan>
</lans>
</cluster>
· In the example below, a unique network is used, but in a Network address translation (NAT) configuration. For each node two addresses must be defined: the local one laddr (defined on local interface) and the external one addr (as seen by other servers).
All nodes must be able to communicate to the others via the NATted addresses.
<cluster>
<lans>
<lan name="default">
<node name="node1" addr="server1.dns.name" laddr="10.0.0.1"/>
<node name="node2" addr="server2.dns.name" laddr="10.0.0.2"/>
</lan>
</lans>
</cluster>
12.1.2 Cluster.xml syntax
<cluster>
<lans [port="4800"]>
<lan name="lan_name" [command="on|off"] >
<node name="node1 name" addr="node1 IP address or name"
[ laddr="local_IP1_address" ]/>
<node name="node2 name" addr="node2 IP address or name"
[ laddr="local_IP2_address" ] />
…
</lan>
…
</lans>
</cluster>
12.1.3 <lans>, <lan>, <node> attributes
|
Begin the definition of the cluster nodes and network topology. |
|
|
[port="xxxx"] |
Defines the UDP port with which the membership protocol is exchanged. Default: 4800 |
|
[pulse="xxxx"] |
Defines the period of the membership protocol messages emission. Longer pulse makes the membership protocol use less bandwidth but react more slowly. |
|
[mlost_count="xx"] |
Defines the number of periods elapsed without message before electing a new leader. |
|
[slost_count="xx"] |
Defines the number of periods elapsed without messages before declaring a follower node offline. |
|
<lan |
Definition of a LAN (i.e., IPv4 broadcast domain, IPv6 link) on which the membership protocol will be transmitted. At least one LAN must be defined. Define one such tag per used LAN. |
|
name="lan name" |
Single logical name for the lan. This name is used into module configuration to name networks used by the module. |
|
command="on"|"off" |
Set command="on" to use this network for running distributed commands on the cluster. In this case, this <lan> section must include all nodes in the cluster. You can set only one <lan> section with command="on". When this attribute is not set, it is the first <lan> section that is used for running distributed commands on the cluster. Default: off |
|
<node |
Definition of one node in the SafeKit cluster. Define as many <node> tags as there are nodes in the cluster (at least 2). |
|
name="node name" |
Single logical name to the SafeKit server. You must always use the same name for designing a given server on different lans. |
|
addr= |
IPv4 or IPv6 address, or name of the node as it is known by other nodes on this LAN (IP address recommended to be independent from a DNS server). On NAT configuration, it must be the external address. When defining an IPv6 address, use literal format: the address is enclosed in square brackets (e.g. [2001::7334]) |
|
laddr= |
Local IP address on this LAN. To be used only on NAT configurations, where local address is different from external one. IPv4 address or literal IPv6 address. |
|
|
In SafeKit < 8.2, the cluster configuration had attributes console and framework on <lan> tag. These attributes were necessary for the legacy web console and are obsolete with the new one. If presents, these attributes are ignored in SafeKit 8.2. |
12.2 SafeKit cluster Configuration
12.2.1 Configuration with the SafeKit web console
The SafeKit web console provides a configuration wizard for editing the cluster.xml file and applying the configuration on all the cluster nodes.
|
|
· The cluster configuration requires to log in the web console with a user having Admin role · If the cluster is not configured, the web console automatically opens the Cluster configuration wizard · When the cluster is configured, the current cluster configuration is loaded from the connection node specified in the browser URL |
Open the cluster configuration wizard:
· Directly via the URL http://host:9010/console/en/configuration/cluster/config
Or
· Navigate in the console
In this example, the console is loaded from 10.0.0.107, which corresponds to node1 in the existing cluster. This is the connection node.
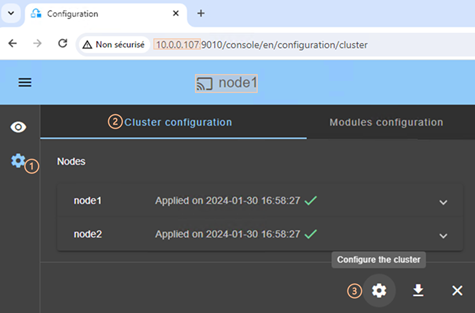
·
Click on ![]() “Configuration” in the
navigation sidebar
“Configuration” in the
navigation sidebar
· Click on “Cluster configuration” tab
·
Click on ![]() “Configure the cluster” button
“Configure the cluster” button
|
For details on the cluster configuration wizard, see section 3.2.1. |
12.2.2 Configuration with command line
· (1) Log as administrator/root
· (2) Edit the file SAFEVAR/cluster/cluster.xml
In Windows, SAFEVAR= C:\safekit\var si %SYSTEMDRIVE%=C:
In Linux, SAFEVAR=/var/safekit
· (3) Apply the cluster configuration with a new encryption key by executing:
1. safekit cluster
Configure locally, from the cluster.xml file, and generate a new encryption key for communication between the nodes.
2. safekit -H "*" -G
It applies the local configuration, defined into cluster.xml, on all cluster nodes.
To re-configure the cluster without cryptographic key, execute :
1. safekit cluster delkey
2. safekit -H "*" -G
To regenerate encryption keys and propagate them on cluster nodes:
1. safekit cluster genkey
2. safekit -H "*" -G
|
|
For the full description of commands, refer to section 9.2. |
12.2.3 Configuration changes
When changing the cluster configuration, the new configuration must be applied on all cluster nodes. When the configuration is applied only on a subset of the nodes present into the cluster configuration, only this subset will be able to communicate with each other. This is also the case when the cryptographic key is not identical on all nodes. This can have the effect of disrupting the operation of the modules installed on servers.
For a correct behavior, you must re-apply the configuration on all the nodes that belong to the cluster as described above.
|
|
You can check the configuration by running the command safekit cluster confinfo on each node (see section 9.2). When the configuration is operational, this command must return on all nodes, the same list of nodes and the same value for the configuration signature. |
Changing the cluster configuration could have important impact on module configurations since the lan names set into the cluster configuration are used into the module’s configuration. Any change in the cluster configuration, will trigger modules updates: each module will reload its configuration to adapt the changes. Such changes could lead to module stop in case of incompatibility (for example if a lan used by a module is removed from the cluster configuration). So, great care must be taken when modifying cluster configuration when modules are running.
13. Userconfig.xml for a module configuration
![]() Section 13.1 “Macro definition - <macro>”
Section 13.1 “Macro definition - <macro>”
![]() Section 13.2 “Farm or mirror module - <service>”
Section 13.2 “Farm or mirror module - <service>”
![]() Section 13.3 “Heartbeats - <heart>, <heartbeat >”
Section 13.3 “Heartbeats - <heart>, <heartbeat >”
![]() Section 13.4 “Farm topology - <farm>, <lan>”
Section 13.4 “Farm topology - <farm>, <lan>”
![]() Section 13.5 “Virtual IP address - <vip>”
Section 13.5 “Virtual IP address - <vip>”
![]() Section 13.6 “File replication - <rfs>, <replicated>”
Section 13.6 “File replication - <rfs>, <replicated>”
![]() Section 13.7 “Enable module scripts - <user>, <var>”
Section 13.7 “Enable module scripts - <user>, <var>”
![]() Section 13.8 “Virtual hostname - <vhost>, <virtualhostname>”
Section 13.8 “Virtual hostname - <vhost>, <virtualhostname>”
![]() Section 13.9 “Process or service monitoring - <errd>, <proc>”
Section 13.9 “Process or service monitoring - <errd>, <proc>”
![]() Section 13.10 “Checkers - <check>”
Section 13.10 “Checkers - <check>”
![]() Section 13.11 “TCP checker - <tcp>”
Section 13.11 “TCP checker - <tcp>”
![]() Section 13.12 “Ping checker - <ping>”
Section 13.12 “Ping checker - <ping>”
![]() Section 13.13 “Interface checker - <intf>”
Section 13.13 “Interface checker - <intf>”
![]() Section 13.14 “IP checker - <ip>”
Section 13.14 “IP checker - <ip>”
![]() Section 13.15 “Custom checker - <custom>”
Section 13.15 “Custom checker - <custom>”
![]() Section 13.16 “Module checker - <module>”
Section 13.16 “Module checker - <module>”
![]() Section 13.17 “Splitbrain checker - <splitbrain>”
Section 13.17 “Splitbrain checker - <splitbrain>”
![]() Section 13.18 “Failover machine - <failover>”
Section 13.18 “Failover machine - <failover>”
Each time you modify userconfig.xml, the configuration must be applied to all the nodes of the cluster onto which the module is installed, to become the active configuration.
To apply the new configuration modified on node1, on all cluster nodes, follow the procedure below (replace node1, node2 by the nodes name and AM by the module name).
·
the web console, connected to node1, by
navigating to ![]() “Configuration/Modules
configuration/
“Configuration/Modules
configuration/
![]() Configure
the module/”
Configure
the module/”
· or the web console, connected to node1, by directly entering the URI /console/en/configuration/modules/AM/config/
· or the command safekit config -H "node1,node2" -E AM executed on node1
Example of userconfig.xml:
<safe>
<!-- Insert below <macro> <service> tags -->
</safe>
|
|
With the web console, the module must be stopped before applying the configuration. With command line, it is possible to
apply a new configuration while the module is running, but only in |
13.1 Macro definition - <macro>
Use a macro to associate a name with a value. In the userconfig.xml, the name, enclosed by the % character, is replaced by the value of the corresponding macro.
|
|
The syntax %identifier% can also be used in userconfig.xml to represent the value of an environment variable named identifier. In case of conflict, it is the macro value that is expanded. |
13.1.1 <macro> example
In the example below, %PATH% is replaced by e:\path.
<macro name="PATH" value="e:\path"/>
<service>
…
<rfs>
<replicated dir="%PATH%" />
</rfs>
</service
|
|
For an example of macro usage, refer to section 15.3. It presents the configuration via the web console along with the corresponding userconfig.xml. |
13.1.2 <macro> syntax
<macro
name="identifier"
value="value"
/>
13.1.3 <macro> attributes
|
<macro |
|
|
name="identifier" |
A character string that identifies the macro. |
|
value="value" |
The value that will replace each occurrence of %identifier% in the rest of userconfig.xml. |
|
/> |
|
13.2 Farm or mirror module - <service>
13.2.1 <service> example
· Example for a mirror module
<service mode="mirror" defaultprim="alone" maxloop="3" loop_interval="24" failover="on">
<!-- Insert below <hearbeat> <rfs> <vip> <user> <vhost> <errd> <check> <failover> tags -->
</service>
|
|
For a full example of a mirror module, refer to section 15.1. It presents the configuration via the web console along with the corresponding userconfig.xml. |
· Example for a farm module
<service mode="farm" maxloop="3" loop_interval="24">
<!-- Insert below <farm> <vip> <user> <vhost> <errd> <check> <failover> tags -->
</service>
|
|
For a full example of a farm module, refer to section 15.2. It presents the configuration via the web console along with the corresponding userconfig.xml. |
13.2.2 <service> syntax
<service mode="mirror"|"farm"|"light"
[boot="off"|"on"|"auto"|"ignore"]
[boot_delay="0"]
[failover="on"|"off"]
[defaultprim="alone"|"server_name"|"lastprim"]
[maxloop="3"] [loop_interval="24"]
[automatic_reboot="off"|"on"]>
</service>
|
|
Only boot, maxloop, loop_interval and automatic_reboot attributes can be changed with a dynamic configuration. |
13.2.3 <service> attributes
|
<service |
Top level section of userconfig.xml |
||||
|
mode= |
· mode="mirror" for mirror module (section 1.2) The synchronization protocol between the 2 servers is defined in section 13.3.
· mode="farm" for farm module (see section 1.3) The synchronization protocol between the 2 servers is defined in section 13.4.
· mode="light" for light (see section 1.2.9) It is a module set to the minimum needed for one server with error detection and local restart only (no failover). |
||||
|
[boot= |
· boot="on" the module is automatically started at boot time. · boot="off" the module is not started at boot time. · boot="auto" the module is automatically started at boot time if it was started before the reboot. · boot="ignore" Before SafeKit 7.5, the configuration to start the module at boot was done with the command safekit boot -m AM on | off (which had to be executed on each node). If you prefer to continue using this command, remove the boot attribute or set it to ignore (the default). The module will not be started at boot time unless the safekit boot -m AM on command is executed. The state of the
boot configuration is visible in the usersetting.boot resource.
The status of resources is visible in web console/ Default value: ignore |
||||
|
[boot_delay="0"] |
The delay, in seconds, before starting the module at boot. Default value: 0 (no delay) |
||||
|
[failover= |
For mirror module only. · failover="on" An automatic failover on the secondary server is triggered if the primary fails or stops. · failover="off" When the primary server fails or stops, the secondary server waits (no automatic failover is triggered). Only the prim command can start the secondary server as primary. See description in section 5.7. Default value: on |
||||
|
[defaultprim= |
For mirror module only. defaultprim specifies which server among two servers is the default primary server for an application module. This option is useful when a module is ALONE on a server and the module is started on the other server. · defaultprim="alone" The ALONE module becomes PRIM while the module on the other server becomes SECOND. Value recommended avoiding swap of application after reintegration. · defaultprim="server_name" When the module is running on two servers, the primary server among the two servers is the one set in defaultprim. This value can be useful for active/active (see section 1.4.2) or N-1 active (see section 1.4.3) architectures. · defaultprim="lastprim" The restarted module becomes PRIM if it was PRIM before its last stop. Default value: alone |
||||
|
[maxloop="3"] |
Number of
consecutive error detections before stopping. The counter is reset at the expiration of the loop_interval timeout and upon safekit start, restart, swap, stopstart… administrative commands execution. Note that a safekit command sent by a detector passes the -i identity parameter and increments the counter, whereas administrator issued commands reset it.
The maxloop is represented by the resource heart.stopstartloop. Its current value corresponds to the date on which the counter was initialized (in the form of a Unix Epoch timestamp); and its assignment date corresponds either to its initialization or to a stopstart, restart. View the resource history to see each increment of the maxloop counter. Default value: 3 |
||||
|
[loop_interval |
Time interval during which maxloop applies. If set to 0, the maxloop counter becomes inactive. Default value: 24 hours.
|
||||
|
[automatic_reboot |
If set to on, stopstart triggers a reboot instead of stopping and restarting the module. Default value: off
|
13.3 Heartbeats - <heart>, <heartbeat >
Heartbeats must be used only for mirror architecture. For farm architecture, see section 13.4.
The basic mechanism for synchronizing two servers and detecting server failures is the heartbeat, which is a monitoring data flow on a network shared by a pair of servers. Normally, there are as many heartbeats as there are networks shared by the two servers. In normal operation, the two servers exchange their states (PRIM, SECOND, the resource states) through the heartbeat mechanism and synchronizes their application start and stop procedures.
If all heartbeats are lost, it is interpreted as if the other server was down, and the local server switches to the ALONE state. Although not mandatory, it is better to have two heartbeat channels on two different networks for synchronizing the two servers to avoid the split-brain case.
The network used by the heartbeat is defined by the logical name of a network set into the SafeKit cluster configuration (for details, see section 12).
13.3.1 <heart> example
|
|
For a full example of in a mirror module, refer to section 15.1. It presents the configuration via the web console along with the corresponding userconfig.xml. |
· Basic example to configure heartbeat on the cluster network named default
<heart>
<heartbeat name="default" />
</heart>
· Example with 2 heartbeats, one dedicated replication network configured with ident="flow" on the cluster network named private
<heart>
<heartbeat name="default" />
<heartbeat name="private" ident="flow"/>
</heart>
13.3.2 <heart> syntax
<heart
[port="xxxx"] [pulse="700"]
[timeout="30000"]
[permanent_arp="on"]
>
<heartbeat
[port="xxxx"] [pulse="700"] [timeout="30000"] name="network" [ident="name"]
>
</hearbeat>
…
</heart>
|
|
The <heart> tag and full subtree can be changed with a dynamic configuration. |
13.3.3 <heart>, <heartbeat > attributes
|
<heart |
|
||
|
[port="xx"] |
UDP port on which all the heartbeats are exchanged. Default: depends on the id of the application module. Returned by the safekit module getports command. |
||
|
[pulse="700"] |
The delay, in milliseconds, between two heartbeat packets. Default value: 700 ms |
||
|
[timeout="30000"] |
Timeout value for heartbeat loss detection. Default value: 30 000 ms |
||
|
<heartbeat |
Definition of one heartbeat. There are as many <heartbeat> tags as there are networks used to probe servers’ mutual connectivity. At least one heartbeat must be defined. |
||
|
[port="xx"] |
Redefines the UDP port for the heartbeat. Default value is the same as the one defined in <heart> tag. |
||
|
[pulse="700"] |
Redefines the delay in milliseconds between two heartbeat packets. Default value is the same as the one defined in <heart> tag. |
||
|
[timeout= |
Redefines the timeout value for heartbeat loss detection. Default value is the same as the one defined in <heart> tag. |
||
|
name="network" |
Network named used by the heartbeat. network must be the name of a network set into the SafeKit cluster configuration (for details, see section 12). This attribute is mandatory in new config syntax (since SafeKit 7.2). |
||
|
[ident="name"] |
Set how the heartbeat will be labelled in the web console and in internal resources. The associated resource name heartbeat.name. If no ident attribute is present the value of the name attribute will be used.
|
||
|
[permanent_arp= |
Regularly, heart sets a permanent ARP entry for the ip addresses associated with the heartbeats. On some Linux systems, it may cause heart to freeze. Set this parameter to off in this case and manually set permanent arp for the remote server on boot. On Linux, this can be done by inserting the following line into a script that is executed at boot: arp -s hostname hw_addr Default value: on |
||
|
[<server addr= |
Legacy definition of the server address in the heartbeat. The <server> tag is a legacy syntax used in previous SafeKit version (before SafeKit 7.2). It’s supported for compatibility reason but must not be used for new modules.
|
13.4 Farm topology - <farm>, <lan>
The basic mechanism to synchronize a farm of servers is a group communication protocol which automatically detects the available members of the farm. Normally, the membership protocol is configured on all networks connecting the N servers.
The network used by the protocol is defined by the logical name of a network set into the SafeKit cluster configuration (for details, see section 12).
13.4.1 <farm> example
Basic example to use the cluster network named default.
<farm>
<lan name="default" />
</farm>
|
|
For full examples in a farm module, see section 15.2. It presents the configuration via the web console along with the corresponding userconfig.xml. |
13.4.2 <farm> syntax
<farm [port="xx"]>
<lan name="network"></lan>
…
</farm>
|
|
The <farm> tag and subtree cannot be changed with a dynamic configuration. |
13.4.3 <farm>, <lan> attributes
|
<farm |
Begin the definition of a farm topology. |
||
|
[port="xx"] |
UDP port with which the membership protocol is exchanged. Default: depends on the id of the application module. Returned by safekit module getports command. |
||
|
[pulse="xx"] |
The period of the membership protocol messages emission. Longer pulse makes the membership protocol use less bandwidth but reacts more slowly. |
||
|
[mlost_count="xx"] |
Number of periods elapsed without message before electing a new leader. |
||
|
[slost_count="xx"] |
Number of periods elapsed without messages before declaring a follower node offline. |
||
|
<lan |
Definition of a LAN (i.e., IPv4 broadcast domain, IPv6 link) on which the membership protocol will be transmitted. At least one LAN must be defined. Define one such tag per used LAN. |
||
|
name="network" |
Define the name of network used. network must be the name of a network set into the SafeKit cluster configuration (see section 12). This attribute is mandatory in new config syntax (since SafeKit 7.2). |
||
|
[<node name="identity" addr= "IP1_address" />] |
Legacy address and name of the node on this lan. The node tag is a legacy syntax used in previous SafeKit version (before SafeKit 7.2). It’s supported for compatibility reason but must not be used for new modules.
|
13.5 Virtual IP address - <vip>
|
|
If you install and run several application modules on the same server, the virtual IP addresses must be different for each application module. |
13.5.1 <vip> example in a mirror module
The following example configures the virtual IP address on the primary node of an on-premises cluster.
<vip>
<interface_list>
<interface check="off" arpreroute="on">
<real_interface>
<virtual_addr addr="192.168.1.222" where="one_side_alias" check="on"/>
</real_interface>
</interface>
</interface_list>
</vip>
|
|
See also the full example in section 15.1. It presents the configuration via the web console along with the corresponding userconfig.xml. |
13.5.2 <vip> example in a farm module
The following example configures load balancing to port 80 and virtual IP address between nodes in an on-premises cluster. The virtual IP address is configured on all nodes.
<vip>
<interface_list>
<interface check="on" arpreroute="on" arpinterval="60" arpelapse="10">
<virtual_interface type="vmac_directed">
<virtual_addr addr="192.168.1.222" where="alias" check="on"/>
</virtual_interface>
</interface>
</interface_list>
<loadbalancing_list>
<group name="FarmProto">
<rule port="80" proto="tcp" filter="on_port"/>
</group>
</loadbalancing_list>
</vip>
|
|
See also the full example in section 15.2. It presents the configuration via the web console along with the corresponding userconfig.xml. |
13.5.3 Alternative to <vip> for servers in different networks
The configuration of a virtual IP address with a <vip> section in userconfig.xml requires servers in the same IP network (network rerouting and load balancing made at level 2).
If servers are in different IP networks, the <vip> section cannot be configured. In this case, an alternative is to configure the virtual IP in a load balancer. The load balancer routes packets to the physical IP addresses of servers by testing an URL status named health check and managed by SafeKit.
So, SafeKit provides a health check for SafeKit modules. For this, configure the health check in the load balancer with:
· HTTP protocol
· port 9010, the SafeKit web service port
· URL /var/modules/AM/ready.txt, where AM is the module name
In a mirror module, the health check:
·
returns OK, that means that the instance is
healthy, when the module state is ![]() PRIM(Ready) or
PRIM(Ready) or ![]() ALONE(Ready)
ALONE(Ready)
· returns NOT FOUND, that means that the instance is unhealthy, in all other states
In a farm module, the health check:
·
returns OK, that means that the instance is
healthy, when the farm module state is ![]() UP (Ready)
UP (Ready)
· returns NOT FOUND, that means that the instance is out of service, in all other states
Another alternative is that you implement a special DNS configuration and a DNS rerouting command inserted in the SafeKit restart scripts.
13.5.4 <vip> syntax
13.5.4.1 Virtual IP loadbalancing in farm architecture
<vip [tcpreset="off"|"on"]>
<interface_list>
<interface
[check="off"|"on"]
[arpreroute="off"|"on"]
[arpinterval="60"]
[arpelapse="1200"]
>
<virtual_interface
[type=""vmac_directed"|"vmac_invisible"]
[addr="xx:xx:xx:xx:xx"]
>
<virtual_addr
addr="virtual_IP_name or virtual_IP_address"
[where="alias"]
[check="off"|"on"]
[connections="off"|"on"]
/>
…
</virtual_interface>
</interface>
</interface_list>
<loadbalancing_list>
<group name="group_name"
<cluster>
<host name="node_name" power="value" />
…
</cluster>
<rule
[virtual_addr="*"|"virtual_IP_name"|"virtual_IP_address"]
[port="*"|"value"]
proto="udp"|"tcp"
filter="on_addr"|"on_port"|"on_ipid"
/>
…
</group>
…
</loadbalancing_list>
</vip>
|
|
The <vip> tag and subtree cannot be changed with a dynamic configuration. |
13.5.4.2 Virtual IP failover in mirror architecture
For on-premises SafeKit cluster:
<vip [tcpreset="off"|"on"]>
<interface_list>
<interface
[check="off"|"on"]
[arpreroute="off"|"on"]
[arpinterval="60"]
[arpelapse="1200"]
>
<real_interface>
<virtual_addr
addr="virtual_IP_name or virtual_IP_address"
where="one_side_alias"
[check="off"|"on"]
[connections="off"|"on"]
/>
…
</real_interface>
</interface>
…
</interface_list>
</vip>
13.5.5 <vip><interface_list>, <interface>, <virtual_interface>, <real_interface>, <virtual_addr> attributes
|
<vip |
|
|
[tcpreset="off"|"on"] |
Before unconfiguring the virtual IP address, all connections with the virtual IP address as IP source are reset. The reset is disabled when set to off. Default value: on |
|
<interface_list> |
|
|
<interface |
Definition of an interface with virtual IP addresses. Define as many <interface> sections as there are network interfaces to configure. |
|
[check="off"|"on"] |
Set an interface checker on the interface to stop the service and put it in the WAIT state when the interface is down. The name of the interface checker is intf.<network_IP_mask> (intf.192.168.0.0). Default value: on For more information, see section 13.13. |
|
[arpreroute="off"|"on"] |
Automatically broadcast gratuitous ARP on virtual IP addresses defined in <real_interface> section. Default value: off. |
|
[arpinterval="60"] |
Time in seconds between two gratuitous ARP. Default value: 60 s |
|
[arpelapse="1200"] |
Time during which gratuitous ARP are sent. Default value: 1200 s |
|
[name="interface name"] |
Linux only You can specify the name of the network interface on which the
virtual IP addresses will be set. Default: no value, SafeKit detects the network interface with virtual IP addresses set on it. |
13.5.5.1 <virtual_interface>, <virtual_addr> attributes in farm architecture
Use with farm modules for virtual IP load balancing :
|
<virtual_interface |
Definition of virtual IP addresses configured on an Ethernet interface. |
||
|
type= "vmac_directed"| "vmac_invisible" |
· type="vmac_directed" Advertise the MAC address of one of the servers as the associated mac address, as with normal traffic. No promiscuous mode needed. For details, see section 13.5.7.3. · type="vmac_invisible" The virtual MAC address never visible in Ethernet headers to allow broadcasting of switch. Needs promiscuous mode. For details, see section 13.5.7.2.
Note: can be used for a mirror module with a need of transparent rerouting. |
||
|
[addr="xx:xx:xx:xx:xx"] |
Unicast virtual MAC address value. If not set, default is the concatenation of "5A:FE" (Safe) and the first configured virtual IP address in hexadecimal. Ignored in vmac_directed mode. |
||
|
<virtual_addr |
Definition of one Virtual IP address. Set as many <virtual_addr> sections as there are virtual IP addresses on the interface. |
||
|
addr="virtual_IP_name"| |
Name or address of the virtual IP (prefer an IP address to be independent from the name server). IPv4 or IPv6 address. |
||
|
where="alias" |
Configuration for farm module: the virtual IP address is defined on all servers as an alias IP address. Load balancing rules apply only for this type of virtual IP addresses. Note : when VMAC is used with a mirror module, set here where="one_side_alias" |
||
|
[check="off"|"on"] |
Defines an ip checker on the virtual IP address to stopstart the module when the virtual IP is deleted or in conflict. The name of the ip checker is ip.<addr value> (ip.192.168.1.99). Default value: on For more information, see section 13.14 |
||
|
[connections="off"|"on"] |
Enables counting of the number of active connections on the virtual address. This count is stored in the resource named connections.<virtual addr value> (for example: connections.192.168.1.99) which is assigned every 10 seconds. This value is provided as a guideline only. Default value: off |
||
|
netmask="defaultnetmask" |
Linux and IPV4 only. By default, the netmask of the network interface on which the virtual IP address is set. Set the netmask if there are several netmasks on the interface. |
||
|
</virtual_interface> |
|
13.5.5.2 <real_interface>, <virtual_addr> attributes in mirror architecture
Use with mirror modules for virtual IP failover:
|
<real_interface> |
Definition of virtual IP addresses associated with the real MAC address of the interface. |
|
<virtual_addr |
Definition of one virtual IP address. Set as many virtual_addr sections as there are virtual IP addresses on the interface. |
|
addr= |
Name or address of the virtual IP (prefer an IP address to be independent from the name server). IPv4 or IPv6 address. |
|
where="one_side_alias" |
The Virtual IP address will be aliased on the server on which the module becomes PRIM or ALONE. |
|
[check="off"|"on"] |
Defines an ip checker on the virtual IP address to stopstart the module when the virtual IP is deleted or in conflict. The name of the ip checker is ip.<addr value> (ip.192.168.1.99). Default value: on For more information, see section 13.14. |
|
[connections="off"|"on"] |
Enables counting of the number of active connections on the virtual address. This count is stored in the resource named connections.<virtual addr value> (for example: connections.192.168.1.99) which is assigned every 10 seconds. This value is provided as a guideline only. Default value: off |
|
netmask="defaultnetmask" |
Linux and IPV4 only. By default, the netmask of the network interface on which the virtual IP address is set. Set the netmask if there are several netmasks on the interface. |
|
</real_interface> |
|
13.5.6 <loadbalancing_list>, <group>, <cluster>, <host> attributes
Use with farm module.
|
|
For many load-balancing examples, see section 15.2. It presents the configuration via the web console along with the corresponding userconfig.xml. |
|
<loadbalancing_list> |
|
||
|
<group |
Definition of a load balancing group. Define as many sections as there are groups.
|
||
|
name="group_name" |
Name of the load balancing group. |
||
|
<cluster |
Optional definition of the server set on which the load current group balancing will be applied. If no <cluster> section is defined, the rules apply to all servers of the farm. |
||
|
<host |
Definition of one node in the cluster. Define as many hosts sections as there are nodes configured for the module. |
||
|
name="node_name" |
Define the name of the host. node_name must be the name of a node name set into the SafeKit cluster configuration (see section 12). |
||
|
power="value" |
Relative weight to apply to the current node in this load balancing group’s cluster. Can be equal to 0, which means no traffic will be dispatched to this node. See section 13.5.7.4 for more information. |
||
|
</cluster> |
|
||
|
<rule |
Definition of a load balancing rule for the group. Define as many sections as there are load balancing rules for this group. |
||
|
[virtual_addr= |
Virtual IP name or address scope of the rule. By default, all virtual IP addresses: * |
||
|
[port="*"|"value"] |
TCP or UDP port to which the load balancing rule applies. By default, all ports: * |
||
|
proto="udp" | "tcp" | "arp" |
· proto="udp" Load balancing rule applies to the UDP protocol. · proto="tcp" Load balancing rule applies to the TCP protocol. · proto="arp" Load balancing rule applies to the IP<->MAC resolution protocol (arp or neighbor discovery) |
||
|
filter="on_addr" | |
· filter="on_addr" Load balancing criteria is the source IP address (client, far end of the connection) · filter="on_port" Load balancing criteria is the source port (client, far end of the connection). · filter="on_ipid" Load balancing is made on the client ip_id at input. Useful for UDP. No sense for TCP and for IPv6 addresses. |
13.5.7 <vip> Load balancing description
13.5.7.1 <vip> prerequisites
See network prerequisites described in section 2.3.2.
13.5.7.2 What is the vmac_invisible type?
When type="vmac_invisible", a virtual MAC address is mapped on the virtual IP address with a unicast MAC Ethernet address on several network nodes. When a network device tries to resolve the virtual IP address into its corresponding MAC address, the SafeKit servers respond with the virtual MAC address. However, SafeKit servers use its physical MAC address to communicate. To “see” the packets sent to the virtual MAC address the interface is set to promiscuous mode. So, the virtual MAC address is invisible to layer 2 network devices. Ethernet switches therefore forward virtual MAC address directed packets to all the ports in the same vlan as the source, reaching all the servers of the farm. A kernel module running on each farm server is responsible for filtering out the packets that should not be processed by a given farm node, according to the load balancing rules defined.
With the virtual MAC address technology, the failover time is null. There is no network rerouting after a failure: all network equipment keeps their mapping virtual IP address, virtual MAC address.
|
|
When running SafeKit into a virtual machine, you may have to turned on the promiscuous mode on the virtual network adapter. See SK-0099 for the procedure to follow for Hyper-V and VMware ESXi. |
To test a virtual MAC address in your network, see section 4.3.7.
13.5.7.3 What is the vmac_directed type?
When type="vmac_directed", there is in fact no virtual MAC address. Farm servers reply to virtual IP resolution requests with their own physical MAC address. A kernel module running on each farm server is responsible for filtering and dispatching the packets to their designated target farm node according to the load balancing rules defined. In vmac_directed mode there is a short failover time for clients that have resolved the virtual IP address as the MAC address of the failed server. This is comparable to what happens in “real interface” mode. Clients that have another farm server’s MAC address in their cache are not affected.
To help minimize failover time in ipv4, set the arpreroute attribute to "on" on the corresponding <interface> tag, and tune the arpelapse and arpinterval attributes to the desired values. Ipv6 does not need arpreroute, it has a built-in mechanism that takes care of the failover.
13.5.7.4 How does load balancing work?
On all the servers of the farm, the load balancing algorithm filters received packets according to the identity of the sender. The criteria to check is defined by configuration in userconfig.xml: client IP address, client port… (i.e.: level 3 load balancing), or requestor address (arp rules, i.e., level 2 load balancing). The criteria are hashed into a value representing the server on which the packet is to be accepted.
When a server fails, the membership protocol reconfigures the filters to re-balance the traffic of the failed server on the available servers.
Each server can have a power (=1, 2…) and then takes more or less traffic. The power is implemented by the number of bits set to 1 in the hash table (a bitmap of 256 bits).
|
|
A bitmap example is given in section 4.3.5. |
13.6 File replication - <rfs>, <replicated>
For mirror modules only.
In Linux, you must set the same value for uid/gid on the two nodes for replicating file permissions. When replicating a filesystem mount point, you must apply a special procedure described in section 13.6.4.2.
In Windows, it is strongly recommended to enable the USN journal on the drive that contains the replicated directory as described in section 13.6.4.3.
|
|
If you install and run several application modules on the same server, the replicated directories must be different for each application module. |
13.6.1 <rfs> example
· Example in Windows:
<rfs async="second">
<replicated dir="c:\safedir" mode="read_only"/>
</rfs>
· Example in Linux:
<rfs async="second">
<replicated dir="/safedir" mode="read_only"/>
</rfs>
|
|
See also a full example at section 15.1. For the configuration of a dedicated replication network, refer to section 15.1.2.2. It presents the configuration via the web console along with the corresponding userconfig.xml. |
13.6.2 <rfs> syntax
<rfs
[acl="on"|"off"]
[async="second"|"none"]
[iotimeout="nb seconds"]
[locktimeout="100"]
[sendtimeout="30"]
[nbrei="3"]
[ruzone_blocksize="8388608"]
[namespacepolicy="0"|"1"|"3"|"4"]
[reitimeout="150"]
[reicommit="0"]
[reidetail="on"|"off"]
[allocthreshold="0"]
[checktime="220000"]
[checkintv="120"]
[nfsbox_options="cross"|"nocross"]
[scripts="off"]
[reiallowedbw="20000"]
[syncdelta="nb minutes"]
[syncat="synchronization scheduling"]
>
<replicated dir="absolute path of a directory"
[mode="read_only"]
>
<tocheck path="relative path of a file or subdir" />
<notreplicated path="relative path of a file or subdir" />
<notreplicated regexpath="regular expression on relative path of a file or subdir" />
…
</replicated>
</rfs>
|
|
Only async, nbrei, reitimeout and reidetail attributes of <rfs> tag can be changed with a dynamic configuration. The <flow> tag, describing the replication flow, can also be changed dynamically. |
13.6.3 <rfs>, <replicated> attributes
|
<rfs |
|
||||||
|
[mountoversuffix= "suffix"] |
Linux only During the module configuration, the replicated directory "/a/dir" is renamed "/a/dirsuffix". The directory /a/dir is created and it is: · a mount point to /a/dirsuffix when the module is started · a link to "/a/dirsuffix" when the module is stopped By default, suffix value is “_For_SafeKit_Replication”.
|
||||||
|
[acl= |
Setting acl to on activate the replication of ACL on files and directories. Default value: off
|
||||||
|
[async= |
Setting async mode to second is a way to improve file replication performances: modification operations are cached on the secondary server and the acknowledgements are sent more quickly to the primary server. · async="none" It ensures more robustness: modification operations are put on disk of the secondary before sending acknowledgement to the primary. · async="second" In case of double failure at the same time of both PRIM and SECOND servers, if the PRIM server cannot restart, then the SECOND server does not have up-to-date data on its disk. There is data loss if the SECOND server is forced to start as primary with the prim command. Default value: second
|
||||||
|
[packetsize] |
Linux only Maximum size in bytes for NFS replication packets. It must be lower than the maximum size allowed by the NFS server of both servers. When it is set into the configuration, it is used as mount options for rsize and wsize. By default, the size is the one of the NFS server. |
||||||
|
[reipacketsize="8388608"] |
Maximum size in bytes of reintegration packets. In Linux, this value must be less or equal to packetsize. Default value in Linux: value of packetsize if it is set into the configuration and is lower than 8388608; else 8388608 Default value in Windows: 8388608 bytes |
||||||
|
[ruzone_blocksize="8388608"] |
Size of a zone for the modification bitmap of a file. It must be a multiple of reipacketsize attribute. Default value: value of reipacketsize if it is set into the configuration; else 8388608 |
||||||
|
[iotimeout] |
Windows only IO time out in seconds in the Windows file system filter. If an IO cannot be replicated and if the timeout expires in the filter, then the PRIM server becomes ALONE. If not set, the default value is dynamically calculated. |
||||||
|
[roflags="0x10"| "0x10000"]
|
Windows only · roflags="0x10" To ensure the consistency of the data replicated on the 2 servers, the modification of the replicated directories/files must only take place on the PRIM server. If changes are made on the SECOND server, they are notified in the module log with the identification of the process responsible so that the administrator can correct this anomaly. · roflags="0x10000" With this flag, since SafeKit 7.4.0.31, the module is also be stopped on the SECOND server. Default value: 0x10 |
||||||
|
[locktimeout= |
Timeout in seconds for replication requests. If a request cannot be served within this timeout, the PRIM server becomes ALONE. Default value: 100 seconds |
||||||
|
[sendtimeout= |
Since SafeKit > 7.4.0.5 Timeout in seconds for sending TCP packets to the remote node. If a packet cannot be sent within this timeout, the PRIM server becomes ALONE. Increase this value in case of low networks. Default value: 30 seconds
|
||||||
|
[nbrei="3"] |
Number of reintegration threads running in parallel for resynchronizing files. Default value: 3
|
||||||
|
[namespacepolicy="0"|"1"|"3"|"4"] |
· namespacepolicy="0" Deactivate the zone reintegration on Windows or Linux · namespacepolicy="1" In Windows, zone reintegration after reboot when the module has been properly stopped is not active · namespacepolicy="3" In Windows, it allows zone reintegration after reboot when possible. It activates the USN change journal on the volume containing the replicated directories (see fsutil usn command for creating USN change journal on a volume). Even with this configuration, full reintegration is used instead of zone reintegration when: o the USN change journal associated with the volume has been deleted/recreated for administration reasons o discontinuity in the USN journal is detected · namespacepolicy="4" When zone synchronization is not possible (on the first reintegration or when zones are not available), the files that need to be synchronized are fully copied. If this reintegration does not complete, the next one will copy again these files. To avoid this, set namespacepolicy="4". This option also enables USN journal checking in Windows. Default value: 4 since SafeKit > 7.4.0.5 (not supported in previous releases) |
||||||
|
[reitimeout= |
Timeout in seconds for reintegration requests. The timeout can be increased to avoid reintegration failure on heavy load of the primary server. Default value: 150 seconds
|
||||||
|
[reicommit="0"] |
Linux only Set reicommit="nb blocks" to commit every (nb blocks)* reipacketsize when reintegrating one file (in addition to the commit at the end of the copy). This can help to succeed reintegration of big files but slows down reintegration time. Default value: 0 that means no intermediate commit |
||||||
|
[reidetail= |
Detailed logging for reintegration. Default value: off
|
||||||
|
[allocthreshold= |
Windows only Size in Gb to apply the allocation policy before reintegration. When allocthreshold> 0, enable fast allocation of disk space for files to be synchronized on the secondary node. This feature avoids a timeout when the primary writes at the end of the file, when the file is large (> 200 Gb) and not yet completely copied. Since SafeKit 7.4.0.64, the allocation policy has changed and is applied for: · Newly created files (files that did not exist on the secondary when the reintegration starts) · Files with size on the primary >= allocthreshold (size in Go) · Full synchronization on the first reintegration ; on start with full synchronization (safekit second fullsync) ; when synchronization by zones is disabled (namespacepolicy="0") Default value: 0 (that disables the feature) |
||||||
|
[nbremconn="1"] |
Number of TCP connections between the primary and the secondary nodes. This value may be increased to improve the replication and synchronization throughput when the network has high latency (in cloud for instance). Default value: 1 |
||||||
|
[checktime= |
Linux only Timeout in milliseconds for the null request that checks the local replicated file system. Run the safekit stopstart command when the timeout is reached. Default value: 220 000 milliseconds |
||||||
|
[checkintv= |
Linux only Interval in seconds between two null requests. Default value: 120 seconds |
||||||
|
nfsbox_options="cross"|"nocross" |
Windows only It specifies the policy to apply when a reparse point of type MOUNT_POINT is present in the replicated directory tree. This policy applies to all replicated directories. MOUNT_POINT reparse points in NTFS can represent two types of objects: an NTFS mount point (for example the D:\ directory) or an NTFS "directory junction" (a form of "symbolic link" to another part of the file system namespace). · nfsbox_options="cross" The MOUNT_POINT reparse point object itself is not replicated/reintegrated. It is evaluated, and the reintegration/replication process the target content as it would do for the content of a standard directory. This is useful for instance when a replicated directory is a mount point (e.g., replicating a "drive letter" root). This is the default configuration value. · nfsbox_options="nocross" The MOUNT_POINT reparse point object itself is replicated/reintegrated, but not evaluated. Reintegration does not descend into the target of the reparse point. This is useful for instance when a replicated directory tree contains NTFS "junctions" that point to another part of the replicated tree (e.g., when replicating a PostgreSQL database, as PostgreSQL is known to need such objects). Default value: cross |
||||||
|
[scripts= |
scripts="on" activates _rfs_* script callbacks used to implement specific data replication management Default value: off |
||||||
|
[reiallowedbw="20000"] |
When defined, this attribute specifies the maximum bandwidth that the reintegration phase may use (for instance 20000 KB/s), in kilo bytes per second (KB/s). Due to implementation trade-off, a +/-10% fluctuation of the effectively used bandwidth is to be expected.
By default, the attribute is not defined, and the bandwidth used by the reintegration is not limited |
||||||
|
[syncdelta="nb minutes"] |
· syncdelta <=1 The attribute is ignored and the default failover and start policy is applied: only an up-to-date server can start as primary or run a failover. · syncdelta >1 It changes the default failover and start policy. The not up-to-date server can become primary but only if the elapsed time, in minutes, since the last synchronization is lower than the syncdelta value (see section 13.6.4.4). Default value: 0 minutes |
||||||
|
[syncat="synchronization scheduling"] |
Default: real-time replication and automatic synchronization (no scheduling) Use syncat for scheduling the synchronization of replicated directories on the secondary node (see section 13.6.4.10). The module must be started for enabling this feature. Once synchronized, the module blocks in the WAIT (NotReady) state until the next synchronization. The scheduling is based on native job scheduler: · On Unix, the job is defined in the safekit user’s crontab · On Windows, the job is defined as a system task You must configure syncat with the syntax of the native job scheduler. For instance, for synchronizing daily, after midnight: · in Windows syncat="/SC DAILY /ST 00:01:00" · in Unix syncat="01 0 * * *"
|
||||||
|
[<flow name ="network">
|
Legacy configuration preserved for backwards compatibility. When this section is not defined, the replication flow uses the same network as the heartbeat with ident="flow" if there is one, if not it uses the first heartbeat (see section 13.3). If you define this section, be coherent with heartbeat ident="flow", if there is one, because default failover rules apply to this heartbeat.
The name attribute of <flow> define the network used for replication flow. It must present in global cluster configuration (see section 12). The <server> tag is a legacy syntax used in previous SafeKit version (before 7.2). It’s supported for compatibility reason but must not be used for new modules.
|
||||||
|
<replicated |
Begin the
definition of replicated directories. |
||||||
|
dir="abs_path" |
Absolute path of a directory to replicate. |
||||||
|
[mode= |
Read-only access rights on the secondary machine for replicated directories to avoid corruption |
||||||
|
<notreplicated |
Relative path of a file or sub-directory in a replicated directory. The file (or sub-directory) is not replicated. Set as many lines as there are non-replicated files or sub-directories. |
||||||
|
<notreplicated |
Regular expression on the name of entries under the replicated directory : · Replicate all except entries matching the regular expression. For example, to avoid replicating entries with the extension .tmp or .bak in the /safedir directory or its sub-directories: <replicated dir="/safedir"> <notreplicated regexpath=".*\.tmp$" /> <notreplicated regexpath=".*\.bak$" /> </replicated> Note that /safedir/conf/config.tmp.swap is replicated. · Replicate only those entries in the directory that match the regular expression after the ! For example, to replicate only entries with the extension .mdf or .ldf in the /safedir directory or its sub-directories: <replicated dir="/safedir"> <notreplicated regexpath="!.*\.mdf$" /> <notreplicated regexpath="!.*\.ldf$" /> </replicated>
The regex engine is POSIX Extended regex (see POSIX documentation): · in Windows, case insensitive mode · in Linux, case sensitive mode
|
||||||
|
<tocheck |
Relative path of a file or sub-directory in a replicated directory. Checks the presence of the file or sub-directory before starting the replication mechanism. Avoids errors such as starting replication on an empty file system. Set as many lines as there are files or sub-directories to check. |
13.6.4 <rfs> description
13.6.4.1 <rfs> prerequisites
See file replication prerequisites described in section 2.2.4.
13.6.4.2 <rfs> Linux
On Linux, interception of data is based on a local NFS mount. And the replication flow between servers is based on NFS v3 / TCP protocol.
The NFS mount of replicated directories from remote Unix clients is not supported. The NFS mount of other directories can be made with standard commands.
Procedure for replicating a mount point
When replicating a mount point in Linux, the module configuration fails with the error:
Error: Device or resource busy
In the following, we take the example of PostgreSQL module that set as replicated directories /var/lib/pgsql/var and /var/lib/pgsql/data. The userconfig.xml of the module contains:
<rfs … >
<replicated dir="/var/lib/pgsql/var" mode="read_only" />
<replicated dir="/var/lib/pgsql/data" mode="read_only" />
</rfs>
These directories are mount points as shown by the result of the command df -H. It returns for instance:
/dev/mapper/vg01-lv_pgs_var … /var/lib/pgsql/var
/dev/mapper/vg02-lv_pgs_data … /var/lib/pgsql/data
You must apply the following procedure for configuring the module to replicate these directories.
1. umount the file systems by running the commands:
umount /var/lib/pgsql/var
umount /var/lib/pgsql/data
2. configure the module by running the command:
/opt/safekit/safekit config -m postgresql
The configuration should succeed (no errors)
3. check the symbolic links created by running the command ls -l /var/lib. It returns:
lrwxrwxrwx 1 root var -> var_For_SafeKit_Replication
lrwxrwxrwx 1 root data -> data_For_SafeKit_Replication
4. edit /etc/fstab and change the two lines:
/dev/mapper/vg01-lv_pgs_var /var/lib/pgsql/var ext4…
/dev/mapper/vg02-lv_pgs_data /var/lib/pgsql/data ext4…
With
/dev/mapper/vg01-lv_pgs_var /var/lib/pgsql/var_For_SafeKit_Replication ext4…
/dev/mapper/vg02-lv_pgs_data /var/lib/pgsql/data_For_SafeKit_Replication ext4..
5. mount the file systems by running the commands:
mount /var/lib/pgsql/var_For_SafeKit_Replication
mount /var/lib/pgsql/data_For_SafeKit_Replication
|
|
· Apply this procedure on both nodes if replicated directories are mount point on both nodes. Once applied, you can use the module as usual: i.e., safekit start stop etc … · It is the same procedure for all mounts points that must be replicated |
|
|
To protect the start of the module on a non-mounted and empty directory, you can insert in userconfig.xml the checking of a file inside the replicated directory. Example for /var/lib/pgsql/var (do the same for /var/lib/pgsql/data with a file inside this directory which is always present): <replicated dir="/var/lib/pgsql/var" mode="read_only"> <tocheck path="postgresql.conf" /> </replicated>. |
If you want to unconfigure the module (or uninstall whole SafeKit package), you must reverse this procedure by:
1. umount the file systems with:
umount /var/lib/pgsql/var_For_SafeKit_Replication
umount /var/lib/pgsql/data_For_SafeKit_Replication
2. de-configure the module with
/opt/safekit/safekit deconfig -m postgresql
3. edit /etc/fstab to undo previous editing
4. mount the file systems with:
mount /var/lib/pgsql/var
mount /var/lib/pgsql/data
13.6.4.3 <rfs> Windows
On Windows, interception of data is based on a file system filter. And the replication flow between servers is based on NFS v3 / TCP protocol.
The rfs filter may not work correctly with some anti-viruses.
On Windows, you can mount remotely a replicated directory from a workstation. If you want to mount with the virtual name instead of the digital virtual IP address, you must set the two following registry keys on the server side:
[HKEY_LOCAL_MACHINE\SYSTEM\CurrentControlSet\Control\Lsa] "DisableLoopbackCheck"=dword:00000001
[HKEY_LOCAL_MACHINE\SYSTEM\CurrentControlSet\Services\lanmanserver\parameters] "DisableStrictNameChecking"=dword:00000001
In Windows, to enable zone reintegration after server reboot, when the module has been successfully stopped, the <rfs> component uses the NTFS USN log to verify that the information recorded on the zones is still valid after the reboot. When the control succeeds, the zone reintegration can be applied to the file; otherwise, the file must be fully copied.
By default, only the system drive has a USN log active. If the replicated directories are located on a different drive than the system drive, you must create the log (with fsutil usn command).
|
|
See SK-0066 for an example. |
13.6.4.4 <rfs> replication and failover
With its file-replication function, mirror architecture is particularly suitable for providing high availability for back-end applications with critical data to protect against failure. The reason is that the secondary server data is strongly synchronized with the primary server data. A synchronized server is considered as up-to-date and only an up-to-date server can start as primary or run a failover.
If the application availability is more critical than the application data, this default policy can be relaxed by allowing a server to become primary if the time elapsed since the last synchronization is below a configurable delay. This is configured by setting the syncdelta attribute of the <rfs> tag:
· syncdelta <= 1
The attribute is ignored and the default failover and start policy is applied. The default value is 0.
· syncdelta > 1
When the last up-to-date server is not responding, the not up-to-date server can become primary but only if the elapsed time since the last synchronization is lower than the syncdelta value (in minutes).
This feature is implemented with:
· rfs.synced resource
When syncdelta is > 1, the rfs.synced resource is managed. This resource is UP if the replicated data are consistent and if the elapsed time, in minute since the last synchronization is lower than the syncdelta value.
· syncedcheck checker
When syncdelta is > 1, this checker is running. It sets the value for the rfs.synced resource.
· rfs_forceuptodate failover rule
When syncdelta is > 1, the following failover rule is valid:
rfs_forceuptodate: if (heartbeat.* == down && cluster() == down && rfs.synced == up && rfs.uptodate == down) then rfs.uptodate=up;
This rule leads to the primary start of the server when the up-to-date server is not responding and if the server is isolated and can be considered as synchronized according to syncdelta value.
13.6.4.5 <rfs> replication verification
You can check for the module, named AM, that files are identical on the primary and the secondary, by running the following command on the SECOND server: safekit rfsverify -m AM. Run safekit rfsverify -m AM > log to redirect the command output into the file named log.
This output of the command is a log like that of the reintegration in which the files to be copied (therefore different) are indicated. When on the primary, there is activity on the replicated directories, an anomaly may be detected while there is no difference between the files in the following cases:
· on Windows because modifications are made on disk before being replicated
· with async="second" (default) because reads can bypass the asynchronous writes.
To check if there is really an inconsistency, you must re-run the command on the secondary server making sure that there is no more activity on the primary.
On Windows, some files are systematically seen as erroneous by the verifier while there is no difference. This occurs when files are modified with SetvalidData: files are extended without resetting the new extension and the reads return random data from the disk.
|
|
It is strongly recommended to run this command only when there are no accesses to the replicated directories on the primary. |
13.6.4.6 <rfs> file changes since the last synchronization
Before starting a secondary server, it may be useful to evaluate the number of files and data that have been changed on the primary server since the secondary server has stopped. This feature is provided by running the following command on the ALONE server: safekit rfsdiff -m AM. Run safekit rfsdiff -m AM > log to redirect the command output into the file named log.
This command runs on-line checks of regular files content of the module AM. It scans the entire replicated tree and displays the number of files that have been modified as well as the size that need to be copied. It also displays estimation for the synchronization duration. This is only estimation since only regular files are scanned and some other modifications may occur until the synchronization is run by the secondary server.
This command must be used with caution on a production server since it leads to an overhead on the server (for reading trees and files with locking). On Windows, rename of files can fail during the evaluation.
|
|
It is strongly recommended to run this command only when there are no accesses to the replicated directories. |
13.6.4.7 <rfs> replication and reintegration bandwidth
The replication component monitors, on the PRIM server, the bandwidth used by replication and reintegration write requests.
Two resources (rfs.rep_bandwidth and rfs.rei_bandwidth) reflect the average bandwidth used by replication and reintegration respectively during the last 3 seconds, expressed in kilo bytes per second (KB/s).
If the replication load is IO intensive, the reintegration phase may saturate the network link and significantly slow down the application. In such a case, the <rfs> reiallowedbw attribute may be used to limit the bandwidth taken by the reintegration phase (see section 13.6.3). Please note that limiting the reintegration bandwidth will make the reintegration phase longer.
There are also 2 resources that reflect the network bandwidth (in in Kbytes/sec) used between nfsbox processes, that run on each node to implement replication and reintegration:
· rfs.netout_bandwidth is the network output bandwidth
· rfs.netin_bandwidth is the network input bandwidth
You can observe the value of rfs.netout_bandwidth on the primary or rfs.netin_bandwidth on the secondary to know the modification rate at the time of observation (write, create, delete, …). The history of the resource values gives an overview of its evolution over time.
The value of the bandwidth depends on the application, system, and network activity. Its measurement is available for information purposes only.
13.6.4.8 <rfs> synchronization by date
SafeKit 7.2 offers a new command safekit secondforce -d date -m AM that forces the module AM to start as secondary after copying only files modified after the specified date.
|
|
This command must be used with cautions since the synchronization will not copy files modified before the specified date. It is the administrator’s responsibility to ensure that these files are consistent and up-to-date. |
The date is in the format of YYYY-MM-DD[Z] or "YYYY-MM-DD hh:mm:ss[Z]" or YYYY-MM-DDThh:mm:ss[Z], where:
- YYYY-MM-DD indicates the year, month, and day
- hh:mm:ss indicates the hours, minutes, and seconds
- Z indicates that the time is in UTC time zone; when not set the time is in local time zone
· For instance:
- safekit secondforce -d 2016-03-01 -m AM for copying only files modified after the 1st of March 2016
- safekit secondforce -d "2016-03-01 12:00:00" -m AM for copying only files modified after the 1st of March 2016 at 12h, local time zone
- safekit secondforce -d 2016-03-01T12:00:00Z -m AM for copying only files modified after the 1st of March 2016 at 12h, UTC time zone
This command may be useful in the following case:
· the module is stopped on the primary server and a backup of the replicated data is done (on a removable drive for instance)
· the module is stopped on the secondary server and the replicated data is restored from the backup. It may be the first start-up or the repair of the secondary server.
· the module is started on the primary server that becomes ALONE
· the module is started on the secondary with the command safekit secondforce -d date -m AM where the date is the backup date
In this case, only the files modified since the backup date will be copied (full copy), instead of the full copy of all files.
|
|
In Windows, the file modification date on the secondary server is changed when the file is copied by the synchronization process. Therefore, safekit secondforce -d date -m AM, where date is prior to the last reintegration on this server, has no interest. |
13.6.4.9 <rfs> external synchronization
On the first synchronization, all replicated files are fully copied from the primary node to the secondary node. During the following synchronizations, necessary when the secondary node comes back, only zones modified, during the secondary downtime, of files that have been modified on the primary node during the secondary node downtime. When the replicated directories are voluminous, the first synchronization can take a lot of time especially if the network is slow. For this reason, since SafeKit> 7.3.0.11, SafeKit provides a new feature to synchronize a large amount of data that must be used in conjunction with a backup tool.
On the primary node, simply back up the replicated directories and pass the synchronization policy to the external mode. The backup is transported (using an external drive for instance) and restored to the secondary node, which is also configured to perform external synchronization. When the module is started on the secondary node, it copies only the file areas that were modified on the primary node since the backup
The external synchronization relies on a new SafeKit command safekit rfssync that must be applied on both nodes to set the synchronization policy to external. This command requires as arguments:
· the role of the node (prim | second)
· a unique identifier (uid)
External synchronization procedure
The external synchronization procedure,
described below, is the procedure to be followed in the case of a cold backup
of the replicated directories. In this case, the application must be stopped,
and any modification of the replicated directories is prohibited until the
module and the application are started, in ![]() ALONE(Ready). The order of
operations must be strictly adhered to.
ALONE(Ready). The order of
operations must be strictly adhered to.
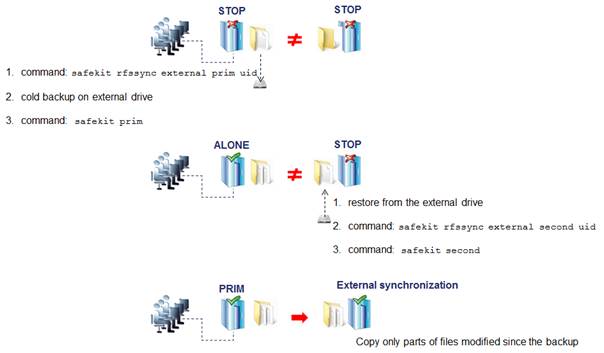
The external synchronization procedure,
described below, is the procedure to be followed in the case of a hot backup of
replicated directories. In this case, the module is
![]() ALONE(Ready); the
application is started and changes to the contents of the replicated
directories are allowed. The order of operations must be strictly adhered to.
ALONE(Ready); the
application is started and changes to the contents of the replicated
directories are allowed. The order of operations must be strictly adhered to.
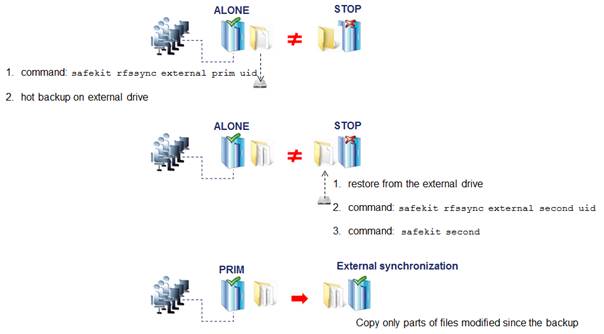
safekit rfssync command
|
safekit rfssync external prim uid [-m AM] |
Set the synchronization policy to external. It is identified by the value of uid (at max 24 char). The node is the primary one, the source for synchronizing data. |
||
|
safekit rfssync external second uid [-m AM] |
Set the synchronization policy to external. It is identified by the value of uid (at max 24 char). The node is the secondary one, the destination for synchronizing data |
||
|
safekit rfssync -d prim uid [-m AM] safekit rfssync -d second uid [-m AM] |
Disable the replicated directories change detection between the cold backup/restore and the start of the module.
|
||
|
safekit rfssync full [-m AM] |
Set the synchronization policy to full. This will copy all files in their entirety on the next synchronization. |
||
|
safekit rfssync |
Display the current synchronization policy |
Internals
The synchronization policy is represented by module’s resources: usersetting.rfssyncmode, usersetting.rfssyncrole, usersetting.rfssyncuid and rfs.rfssync:
· usersetting.rfssyncmode="default" (usersetting.rfssyncrole="default", usersetting.rfssyncuid="default")
These values are associated with the standard synchronization policy, which is applied by default. It consists of copying only the modified areas of the files. When this policy cannot be applied, the modified files are copied in their entirety.
· usersetting.rfssyncmode="full" (usersetting.rfssyncrole="default", usersetting.rfssyncuid="default")
These values are associated with the full synchronization policy. It is applied:
· the first time the module is started after its first configuration
· on safekit commands (safekit second fullsync ; safekit rfssync full ; safekit primforce ; safekit config ; safekit deconfig)
· on change of pairing for the module
The full synchronization policy will copy all files in their entirety on the next synchronization.
· usersetting.rfssyncmode="external", usersetting.rfssyncrole="prim | second" and usersetting.rfssyncuid="uid"
These values are associated with the external synchronization policy assigned with the commands safekit rfssync external prim uid and safekit rfssync external second uid. The next synchronization will apply the external synchronization policy.
· rfs.rfssync="up | down"
This resource is only up when the synchronization policy, defined by the previous resources, can be applied.
When the synchronization policy is not the default policy, the synchronization policy automatically returns to the default mode after successful synchronization.
In some cases, external synchronization cannot be applied, and the secondary node stops with an error specified in the module log. In this situation, you must either:
· complete the external synchronization procedure if this has not been done in its entirety on the 2 nodes
· fully reapply the external synchronization procedure on the 2 nodes
· revert to the full synchronization policy (safekit rfssync full command)
· apply the synchronization by date, using the date of the backup (see section 13.6.4.8). Unlike external synchronization, synchronization by date will copy the files, modified on the primary node, in their entirety (instead of just modified parts).
13.6.4.10 <rfs> scheduled synchronization
By default, SafeKit provides real-time file replication and automatic synchronization. On heavy loaded server or high latency network, you may want to let the secondary node weakly synchronized. For this, you can use the syncat attribute for scheduling replicated directories synchronization on the secondary node. The module must be started for enabling this feature. Once synchronized, the module blocks in the WAIT (NotReady) state until the next synchronization schedule. It is implemented with:
· the resource rfs.syncat that is set to up on the scheduled dates and set to down after the data synchronization
· the failover rule rfs_syncat_wait that blocks the module into the state WAIT (NotReady) until the rfs.syncat resource is up
If you want to manually force the synchronization, you can run the command: safekit set -r rfs.syncat -v up -m AM while the module is in the WAIT (NotReady) state.
With syncat, you just have to configure the scheduled time for the synchronization with the syntax of the native job scheduler: crontab in Linux and schtasks.exe in Windows (see section 13.6.3).
13.7 Enable module scripts - <user>, <var>
This section describes only the configuration options available for <user> tag. Refer to section 14 for a full description of module scripts.
When this tag is not set, the module scripts are not executed.
13.7.1 <user> example
<user logging="userlog" >
<var name="name1" value="value1" />
</user>
|
|
For as example of <var> usage, refer to section 15.3. See also the full example of a mirror module at section 15.1 or a farm module at section 15.2. It presents the configuration via the web console along with the corresponding userconfig.xml. |
13.7.2 <user> syntax
<user
[nicestoptimeout="300"]
[forcestoptimeout="300"]
[logging="userlog"|"none"]
[userlogsize="2048"]
>
<var name="name1" value="value1" />
…
</user>
|
|
The <user> tag and full subtree can be changed with a dynamic configuration. |
13.7.3 <user>, <var> attributes
|
<user |
|
|
[nicestoptimeout= |
Timeout delay in seconds to execute the stop_xx script. Default value: 300 seconds |
|
[forcestoptimeout= |
Timeout delay in seconds to execute the stop_xx -force script. Default value: 300 seconds |
|
[logging="userlog"|"none"] |
stdout and stderr messages of the application started in scripts. · logging="userlog" Messages are redirected into the log SAFEVAR/modules/AM/userlog_<year>_<month>_<day>T<time>_<script name>.ulog where AM is the module name (SAFEVAR=C:\safekit\var on Windows and SAFEVAR=/var/safekit on LINUX). · logging="none", messages are not logged. Default value: userlog |
|
[userlogsize="2048"] |
Limit in KB of the size of the userlog On module start, the file is truncated to 0 if the size has reached this limit. Default value: 2048 KB |
|
[<var |
Optional environment variable and its value are exported before the execution of module scripts. Define as many var sections as there are environment variables to export. |
13.8 Virtual hostname - <vhost>, <virtualhostname>
13.8.1 <vhost> example
<vhost>
<virtualhostname name="vhostname" envfile="vhostenv"/>
</vhost>
|
|
See also the example in section 15.13. It presents the configuration via the web console along with the corresponding userconfig.xml. |
13.8.2 <vhost> syntax
<vhost>
<virtualhostname
name="virtual_hostname"
envfile="path_of_a_file"
[when="prim"|"second"|"both"]
/>
</vhost>
|
|
The <vhost> tag and subtree cannot be changed with a dynamic configuration. |
13.8.3 <vhost>, <virtualhostname> attributes
|
<vhost> |
|
|
<virtualhostname |
|
|
name="virtual_hostname" |
Definition of the virtual hostname. |
|
envfile="path_of_envfile" |
Path of the environment file automatically generated by SafeKit during configuration command If the path of the file is relative, the file will be generated in the runtime environment of the application module i.e.: SAFEUSERBIN This generated environment file is used in module scripts to set the virtual hostname before starting and stopping the application. See the module template vhost.safe delivered with Linux and Windows package. |
|
[when="prim"|"second"| |
Define when the virtual hostname must be returned to the application instead of the physical one. Default value: prim means when the server is primary (PRIM or ALONE). |
|
/> |
|
|
</vhost> |
|
13.8.4 <vhost> description
Some applications need to see the same hostname on all SafeKit servers (typically, because it is stored in a replicated file). With the virtual hostname, these applications see the virtual name whereas other applications see the physical name.
· On Linux
Implementation is based on the LD_PRELOAD environment variable: gethostname and uname functions are overloaded.
· On Windows
Implementation is based on the CLUSTER_NETWORK_NAME_ environment variable: the query API (GetComputerName, GetComputerNameEx, gethostname) functions take this variable into account. To use vhost for a service, use the command vhostservice <service> [<file>] before/after the service start/stop.
13.9 Process or service monitoring - <errd>, <proc>
|
|
<errd> section requires <user/> section. |
13.9.1 <errd> example
|
|
See also a full example in section 15.4. It presents the configuration via the web console along with the corresponding userconfig.xml. |
13.9.1.1 Process monitoring
· Linux and Windows
myproc is the command name of the process to monitor:
<errd>
<proc name="myproc" atleast="1" action="restart" class="prim"/>
</errd>
· Linux only (since SafeKit > 7.2.0.29)
oracle_.* is a regular expression on the command name of the process to monitor:
<errd>
<proc name="oracle" nameregex="oracle_.*" atleast="1" action="restart" class="prim"/>
</errd>
13.9.1.2 Service monitoring
myservice is the name of a service to monitor. In Windows, it is the name of a Windows service (since safekit > 7.3). In Linux, it is the name of a systemd service (since safekit > 7.4.0.19).
<errd>
<proc name="myservice" service="yes" atleast="1" action="restart" class="prim" />
</errd>
13.9.2 <errd> syntax
<errd
[polltimer="10"]
>
<proc name="command name and/or resource name for the monitored process (or service in Windows)"
[service="no|yes"]
[nameregex=="regular expression on the command name"]
[argregex="regular expression on process arguments, including command name"]
atleast="1"
action="stopstart"|"restart"|"stop"|"executable_name"
class="prim"|"both|"pre"|"second"|"sec"|"othername"]
[start_after="nb polling cycles"]
[atmax="-1"]
/>
…
</errd>
|
|
The <errd> tag and full subtree can be changed with a dynamic configuration. |
13.9.3 <errd>, <proc> attributes
|
<errd |
|
||
|
polltimer="30" |
Time delay, in seconds, between two polls of the list of processes. Default value: 30 seconds |
||
|
<proc |
Definition of a process to monitor. Set as many proc sections as there are processes. A resource is associated with each <proc>, it is named proc.<value of the attribute name> (e. g proc.process_name). The resource is up when the monitoring condition is true; else down if false. |
||
|
name="command_name"
|
command_name is the command name of the process to monitor. It is also the name of the resource associated with the monitored process. At max 15 characters in Linux (the command name can be truncated); 63 in Windows. For example: · name="vi" on Linux · name="notepad.exe" on Windows
See section 13.9.4 for help on retrieving the process command name. |
||
|
Or name="service_name" service="yes"
|
service_name is the name of the service to monitor. It is also the name of the resource associated with the monitored service. At max 63 characters. For example: · name="W32Time" service="yes" for monitoring the Windows Time service · name="ntpd" service="yes" for monitoring the Linux Time service (systemd ntpd.service) The service attribute is optional. Default value: no |
||
|
Or name="command_name" nameregex="regular expression on the command name" |
Linux only nameregex is a regular expression applied on the command name for selecting the process to monitor. name is name of the resource associated with the monitored process.
For example: · nameregex="oracle _. *" name="oracle" for monitoring oracle process that match the regular expression. The associated resource is proc.oracle The nameregex attribute is optional. |
||
|
class= "prim"| "both"| "pre"| "sec"| "othername" |
The process belongs to a class. The monitoring of a class is enabled/disabled with the command safekit errd enable|disable "classname" -m AM. · class="prim"|"both"|"pre"|"second"|"sec" Activation/deactivation of these classes are automatically done in the <user/> component with start_prim/stop_prim, start_both/stop_both, start_second/stop_second, start_sec/stop_sec. For scripts details, see section 14. · class="othername" For nonstandard classes, you must explicitly enable/disable process monitoring after/before the start/stop of the process. |
||
|
[argregex="regular expression on process arguments"] |
Regular expression matching the list of arguments of the process to monitor, including the executable name. Optional parameter. The regex engine is POSIX Extended regex (see POSIX documentation): · in Windows, case insensitive mode · in Linux, case sensitive mode
See section 13.9.4 for help on retrieving the list of arguments of a process. · Linux examples with vi editor on myfile <proc name="vi" argregex=".*myfile.*" … <proc name="vi" argregex="/myrep/myfile.*" … <proc name="vi" argregex="/myrep/myfile" … · Windows examples with notepad editor on myfile <proc name="notepad.exe" argregex=".*myfile.*" … <proc name="notepad.exe" argregex="c:\\myrep\\myfile.*" … <proc name="notepad.exe" argregex="c:\\myrep\\myfile" … |
||
|
atleast="1" |
Minimum number of processes that must be running. If this minimum is not reached, then SafeKit triggers an action · name="oracle" argregex=".*db1.*" atleast="1" means that an action will be triggered if less than one oracle instance is running on db1. · atleast="-1" this criterion is meaningless Default value: 1 |
||
|
action=
|
Action (or handler) to execute on the module · action="restart" triggers a local restart · action="stopstart" triggers a stopstart and may lead to a failover · action="stop" triggers a stop and may lead to a failover To avoid a loop on reproducible fault, a maxloop counter is incremented at each restart/stopstart command. For the maxloop definition, see section 13.2. · action="noaction" means logging a message · action="executable_name" To define a special handler, either set an absolute path or a path relative to the "bin" directory of the module: SAFE/modules/AM/bin/. We recommend a relative path and a handler defined inside the module. When defining a special handler, a new class name must be associated with the monitored process. For a special handler on Linux, on success, end with exit 0. For a special handler on Windows, on success, end with %SAFEBIN%\exitcode 0. With a different value, SafeKit performs a stopstart command. When running special handlers, the maxloop counter is not incremented. To increment it, use: safekit incloop -m AM -i <handler name> This command increments the counter and returns 1 when the limit has been reached. Default value: stopstart |
||
|
[start_after="nb polling cycles"] |
Without the start_after attribute the monitoring of processes is immediately effective. Otherwise, it is delayed for (n-1)*polltimer (in seconds) where: · n is the value given in start_after parameter · polltimer is the value set on the errd flag (30 seconds by default) For example, if start_after="3", the server is delayed for 60 seconds ((3-1)*30). The start_after parameter is useful if the process takes a certain time to start. Default value: 0 |
||
|
Advanced parameters |
|
||
|
atmax="-1" |
Maximum number of processes that can run. If this maximum is reached, then SafeKit triggers an action. · atmax="-1" means that this criterion is meaningless. · atmax="0", an action is triggered each time the process is started. Default value: -1 this criterion is meaningless |
||
|
</errd> |
|
13.9.4 <errd> commands
|
|
If the command is used inside a module script, then the SAFEMODULE environment variable is set and the -m AM parameter is not necessary. |
|
This command prints into the file SAFEVAR/errdpoll_reserrd (SAFEVAR=/var/safekit on Linux and SAFEVAR=c:\safekit\var on Windows if c: is the installation drive), one line for each running process with following fields: <pid> <command name> <command full name and arguments list> (parent=<parent pid>) In Windows, the command name is displayed in lower case. Useful to find the process name and its arguments for an <errd> configuration |
|||
|
safekit errd disable "classname" -m AM |
Suspends the monitoring of the processes included in the class classname (for the application module AM). Must be explicitly done in stop_... scripts before stopping the application, for processes in class different from prim, both, second, sec. |
||
|
safekit errd enable "classname" -m AM |
Resumes the monitoring of the processes defined with the class classname (for the application module AM). Must be explicitly done in start_... scripts after starting the application, for processes in class different from prim, both, second, sec. |
||
|
safekit
errd off |
Suspends the monitoring of all processes except SafeKit processes (for the application module AM). Useful when stopping manually the application without triggering error detection.
|
||
|
safekit
errd on
|
Resumes the monitoring of processes suspended with safekit errd suspend (for the application module AM).
|
||
|
safekit
errd list |
Lists all processes monitored by SafeKit (including SafeKit processes) and defined in the application module AM. The list displayed may be truncated due to internal limits. The full list can be found in the file SAFEVAR/modules/AM/errdlist. SAFEVAR=/var/safekit on Linux and SAFEVAR=c:\safekit\var on Windows if c: is the installation drive. |
||
|
safekit
kill |
<errd> component must run. · level="test": only display the process list · level="terminate": kill processes · level="9": send SIGKILL signal to processes (Linux only) · level="15": send SIGTERM signal to processes (Linux only)
· Windows examples ("class CatlRegExp" for more information) safekit kill -name="notepad.exe" safekit kill -name="notepad.exe" · Linux examples ("man regex" for more information) safekit kill -name="vi" safekit kill -name="vi" |
13.10 Checkers - <check>
SafeKit provides checkers that test a critical element and affect the state of a module resource based on the test result. Upon error detection by a checker, the failover machine performs an action on the module according to the failover rule associated with the checker. For a complete description, see section 13.10.3.
The checkers provided by SafeKit are:
![]() section 13.11 “TCP checker - <tcp>”
section 13.11 “TCP checker - <tcp>”
![]() section 13.12 “Ping checker - <ping>”
section 13.12 “Ping checker - <ping>”
![]() section 13.13 “Interface checker - <intf>”
section 13.13 “Interface checker - <intf>”
![]() section 13.14 “IP checker - <ip>”
section 13.14 “IP checker - <ip>”
![]() section 13.15 “Custom checker - <custom>”
section 13.15 “Custom checker - <custom>”
![]() section 13.16 “Module checker - <module>”
section 13.16 “Module checker - <module>”
![]() section 13.17 “Splitbrain checker - <splitbrain>”
section 13.17 “Splitbrain checker - <splitbrain>”
13.10.1 <check> example
All built-in checkers are configured under a single <check> section:
<check>
<!-- Insert below <tcp> <ping> <intf> <ip> <custom> <module> <splitbrain> tags -->
</check>
13.10.2 <check> syntax
<check>
<tcp …>
<to …/>
</tcp>
…
<ping …>
<to …/>
</ping>
…
<intf …>
<to …/>
</intf>
…
<ip …>
<to …/>
</ip>
…
<custom …/>
…
<module …>
[<to …/>]
</module>
…
<splitbrain …/>
</check>
|
|
The <check> tag and full subtree can be changed with a dynamic configuration. |
13.10.3 <checker> description
A checker tests a critical element (by default every 10 seconds) and affects the state of the associated resource, setting it to up or down based on the test result. The failover machine evaluates the failover rules and executes the action associated with the checker when the resource changes state.
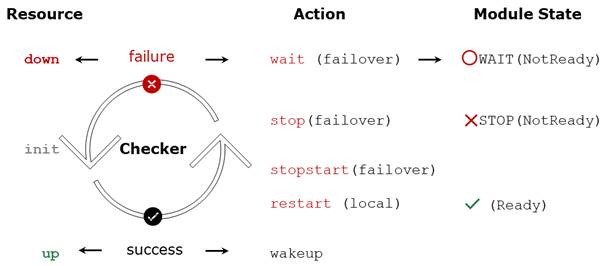
·
The initial state of the resource is init. The
failover machine keeps the module in the ![]() WAIT (Transient) state as long as at least one resource used by a rule with a wait
action is in the init state.
WAIT (Transient) state as long as at least one resource used by a rule with a wait
action is in the init state.
· If the test fails, the associated resource is set to down. The failover rule associated with the checker determines which action to take in this case. Possible actions on the module are restart, stop, stopstart, or wait.
o The restart action triggers a local restart of the application without changing the module's state.
o The actions stop, stopstart, and wait involve stopping the module, and consequently the application,
followed by an automatic restart in the cases of stopstart and wait.
Stopping the module may trigger a failover to the other node if it is ![]() (Ready).
(Ready).
o When the action is wait, the module remains stuck in the ![]() WAIT (NotReady) state as long as the resource is down.
WAIT (NotReady) state as long as the resource is down.
The actions restart, stopstart, and wait increment the error detection counter. When this counter exceeds the maxloop limit within the time interval loop_interval (by default, on the 4th error detection within 24 hours; see section 13.2.3), the module is stopped.
·
If the test succeeds, the associated resource is
set to up. This triggers the implicit wakeup action if the
associated action is wait. The module exits the ![]() WAIT (NotReady) state and continues its normal startup process.
WAIT (NotReady) state and continues its normal startup process.
The configuration of the checker determines:
· The name of the associated resource
· Optionally, the name of the associated failover rule and the action
13.10.3.1 Module resource associated with a checker
· The initial state of the resource is init
· If the test fails, the associated resource is set to down
· If the test succeeds, the associated resource is set to up
For a description of the resources, see section 13.18.4.1.
The name of the resource associated with the checker is determined from its configuration:
· The resource class is the value of the XML tag of the checker: tcp, ping, intf, ip, custom, module or splitbrain
· The resource id is the value of the ident attribute.
For example, for the following configuration of a ping checker:
<check>
<ping ident="testR2" action="wait">
<to addr="R2"/>
</ping>
</check>
The associated resource is named ping.testR2.
The current value of the resource is visible:
· via the web console as described in section 3.4.4.2
· with the command safekit state -v -m AM (where AM is the name of the module)
…
ping.testR2 down yyyy-mm-dd
State changes of the resource are visible in the module log:
· via the web console as described in section 3.4.4.1
· with the command safekit logview -A -m AM (where AM is the name of the module)
I | Resource ping.testR2 set to up by pingcheck
…
C | Resource ping.testR2 set to down by pingcheck
13.10.3.2 Failover rule associated with checker
The failover rule associated with the checker defines which action to take when its resource goes down. For a description of the failover rules, see section 13.18.4.2.
The possible actions for the module are restart, stop, stopstart or wait.
The failover rule associated with the checker is determined based on its configuration:
· The checkers intf, ip, module, and splitbrain have a predefined default rule that applies to all resources of that type:
/* rule for module checkers */
module_failure: if (module.? == down) then wait();
/* rule for interface checkers */
interface_failure: if (intf.? == down) then wait();
/* rule for ip checkers */
ip_failure: if (ip.? == down) then stopstart();
/* rules for splitbrain */
splitbrain_failure: if (splitbrain.uptodate == down) then wait();
· The checkers tcp, ping, and custom have a rule generated with the value of the action attribute if it is set to stop, stopstart, restart or wait.
For example, for the following configuration of a ping checker:
<check>
<ping ident="testR2" action="wait">
<to addr="R2"/>
</ping>
</check>
The generated rule is named :
p_testR2 : if (ping.testR2 == down) then wait();
The name of the rule has as a prefix the first letter of the checker name (t, p or c), followed by _, then the value of the attribute ident.
· The tcp, ping, and custom checkers do not have a failover rule if the value of the action attribute in their configuration is set to noaction. In this case, the user must explicitly add the associated failover rule in the module configuration. For example, for the following configuration of a custom checker, the failover rule is added explicitly :
<check>
<custom ident="checkfile"
exec="checker.ps1"
arg="c:\safekit\checkfile" when="prim" action="noaction"/>
</check>
<failover>
<![CDATA[
checkfile_failure: if( custom.checkfile == down ) then restart();
]]>
</failover>
When the failover rule is activated, it is visible:
· Through the web console in the detailed status of the module described in section 3.4.2.2
· By a message in the module log like the following:
C | Action wait according to the failover rule p_testR2
The module log can be viewed:
o Through the web console as described in section 3.4.4.1
o Using the command safekit logview -A -m AM (where AM is the name of the module)
13.11 TCP checker - <tcp>
By default, there is a restart action on the module when the tcp checker detects a connection failure to the TCP service.
Since SafeKit 8.2.3, the action can be configured using the action attribute of the <tcp> tag.
|
|
Insert the <tcp> tag into the <check> section if this one is already defined. |
13.11.1 <tcp> example
<check>
<tcp ident="R1test" when="prim" action="restart" >
<to addr="R1" port="80"/>
</tcp>
</check>
· The resource associated with the checker is named tcp.R1test (with the prefix tcp.)
· The generated failover rule, which performs a restart when the resource goes down, is named t_R1test (with the prefix t_) and is equivalent to:
t_R1test: if (tcp.R1test == down) then restart();
For a description of checkers, refer to section 13.10.3.
|
|
See also example in section 15.5. It presents the configuration via the web console along with the corresponding userconfig.xml. |
13.11.2 <tcp> syntax
<tcp
ident="tcp_checker_name"
when="prim|second|both|pre"
[action=" stop|stopstart|restart|wait|noaction"]
>
<to
addr="IP address or name to check"
port="TCP port to check"
[interval="10"]
[timeout="5"]
/>
</tcp>
|
|
Since SafeKit 8.2.3, use the action attribute to define the action to be taken when an error is detected by the tcp checker. Before SafeKit 8.2.3, the action was static and defined by the default failover rule that applies to all tcp class resources: tcp_failure: if (tcp.? == down) then restart(); |
13.11.3 <tcp> attributes
|
<tcp |
Set as many <tcp> sections as there are TCP checkers. |
|
ident="tcp_checker_name" |
TCP checker name. It defines the resource associated with the checker: tcp.tcp_checker_name (with the prefix tcp.) |
|
when="prim|second|both" [action="stop|stopstart|restart|noaction"] |
Use this value to test an internal TCP service of the application once it has started: · when="prim" for a mirror module The checker is started after/stopped before the execution of the start_prim/stop_prim scripts. · when="both" for a farm module The checker is started after/stopped before the execution of the start_both/stop_both scripts. · when="second" for a mirror module The checker is started after/stopped before the execution of the start_second/stop_second scripts. Since SafeKit 8.2.3, you can configure the action to take when an error is detected with: · action="stop|stopstart|restart" stop, stopstart or restart the module. The name of the associated failover rule is t_tcp_checker_name (with the prefix t_) · action="noaction" No action is generated automatically. The action must be explicitly written in the <failover> tag (see section 13.18). Default value: action="restart" |
|
when="pre" action="wait|noaction" |
Use this value to test an external TCP service before the application starts: ·
when="pre" Since SafeKit 8.2.3, you can configure the action to be taken in case of error detection with: ·
action="wait" ·
action="noaction" |
|
<to |
|
|
addr="IP address or name" |
IP address or name to check (ex.: 127.0.0.1 for a local service). IPv4 or IPv6 address. |
|
port="value" |
TCP port to check. |
|
[interval="10"] |
Interval in seconds between two connections trials. Default value: 10 seconds |
|
[timeout="5"] |
Connection establishment timeout in seconds. Default value: 5 seconds |
|
</tcp> |
|
13.12 Ping checker - <ping>
By default, there is a wait action on the module when the ping checker detects a ping failure on a device.
Since SafeKit 8.2.3, the action can be configured using the action attribute of the <ping> tag.
|
|
Insert the <ping> tag into the <check> section if this one is already defined. |
13.12.1 <ping> example
<check>
<ping ident="testR2" action="wait">
<to addr="R2"/>
</ping>
</check>
· The resource associated with the checker is named ping.testR2 (with the prefix ping.)
· The generated failover rule, which performs a wait when the resource goes down, is named p_testR2 (with the prefix p_) and is equivalent to:
p_testR2: if (ping.testR2== down) then wait();
For a description of checkers, refer to section 13.10.3.
|
|
See also the example in section 15.6. It presents the configuration via the web console along with the corresponding userconfig.xml. |
13.12.2 <ping> syntax
<ping
ident="ping_checker_name"
[when="pre|prim|second|both"]
[action="wait|stop|stopstart|restart|noaction"]
>
<to
addr="IP address or name to check"
[interval="10"]
[timeout="5"]
/>
</ping>
13.12.3 <ping> attributes
|
<ping |
Set as many ping sections as there are ping checkers. |
|
ident="ping_checker_name" |
Ping checker name. It defines the resource associated with the checker: ping.ping_checker_name (with the prefix ping.) |
|
when="pre" action="wait|noaction" |
Use this value to test an external device before the application starts. ·
when="pre" Since SafeKit 8.2.3, you can configure the action to be taken in case of error detection with: ·
action="wait" ·
action="noaction" Default value : when="pre" action="wait" |
|
when="prim|second|both" action="stop|stopstart|restart|noaction" |
Use this value to test a device after the application has started: · when="prim" for a mirror module The checker is started after/stopped before the execution of the start_prim/stop_prim scripts. · when="both" for a farm module The checker is started after/stopped before the execution of the start_both/stop_both scripts. · when="second" for a mirror module The checker is started after/stopped before the execution of the start_second/stop_second scripts. Since SafeKit 8.2.3, you can configure the action to take when an error is detected with: · action="stop|stopstart|restart" stop, stopstart or restart the module. The name of the associated failover rule is p_ping_checker_name (with the prefix p_) · action="noaction" No action is generated automatically. The action must be explicitly written in the <failover> tag (see section 13.18). |
|
|
|
|
<to |
|
|
addr="IP address or name" |
External IP address or name to check. IPv4 or IPv6 address. |
|
[interval="10"] |
Interval in seconds between two ping requests. Default value: 10 seconds |
|
[timeout="5"] |
Reply timeout in seconds to the ping. Default value: 5 seconds |
|
</ping> |
|
13.13 Interface checker - <intf>
By default, there is a wait action on the module when the intf checker detects a failure on the interface.
|
|
Insert the <intf> tag into the <check> section if this one is already defined. |
13.13.1 <intf> example
<check>
<intf ident="test_eth0">
<to local_addr="192.168.1.10"/>
</intf>
</check>
· The resource associated with the checker is named intf.test_eth0 (with the prefix intf.)
· The failover rule, which performs a wait when an intf class resource goes down, is static and defined by the default failover rule:
interface_failure: if (intf.? == down) then wait();
For a description of checkers, refer to section 13.10.3.
|
|
See also the example in section 15.10. It presents the configuration via the web console along with the corresponding userconfig.xml. |
13.13.2 <intf> syntax
<intf
ident="intf_checker_name"
[when="pre"]
>
<to
local_addr="interface_physical_IP_address"/>
</intf>
13.13.3 <intf> attributes
|
<intf |
|
||
|
ident="intf_checker_name" |
Interface checker name. It defines the resource associated with the checker: intf.intf_checker_name (with the prefix intf.) |
||
|
[when="pre"] |
Fixed value. ·
when="pre" In case of error detection, the action is wait. The name of the failover rule, interface_failure, is static and predefined. |
||
|
<to local_addr="IP addess" /> |
Physical IP address configured on the network interface to check. IPv4 or IPv6 address. |
||
|
</intf> |
|
13.14 IP checker - <ip>
By default, there is a stopstart of the module when the IP checker detects that the IP address is not configured locally. On Windows, it also detects conflicts with that address.
|
|
Insert the <ip> tag into the <check> section if this one is already defined. |
13.14.1 <ip> example
<check>
<ip ident="ip_check" >
<to addr="192.168.1.10" />
</ip>
</check>
· The resource associated with the checker is named ip.ip_check (with the prefix ip.)
· The failover rule, which performs a stopstart when an ip class resource goes down, is static and defined by the default failover rule:
ip_failure: if (ip.? == down) then stopstart();
For a description of checkers, refer to section 13.10.3.
|
|
See also the example in section 15.11. It presents the configuration via the web console along with the corresponding userconfig.xml. |
13.14.2 <ip> syntax
<ip
ident="ip_checker_name"
[when="prim"|"both"]
>
<to
addr="IP address or name to check"
[interval="10"]
/>
</ip>
13.14.3 <ip> attributes
|
<ip |
|
||
|
ident="ip_checker_name" |
Interface checker name. It defines the resource associated with the checker: ip.ip_checker_name (with the prefix ip.) |
||
|
[when="prim"|"both"] |
Default if not set. ·
when="prim" for a mirror module ·
when="both" for a farm module In case of error detection, the action is stopstart. The name of the failover rule, ip_failure, is static and predefined. |
||
|
<to |
|
||
|
addr="IP address or name" |
Local IP address or name to check. IPv4 or IPv6 address. |
||
|
[interval="10"] |
Interval in seconds between two checks. Default value: 10 seconds |
||
|
</ip> |
|
13.15 Custom checker - <custom>
A custom checker is an executable (script or binary) that you develop to test a resource or application. It consists of a loop that performs a test at appropriate intervals. Its role is to set the associated resource's status to up or down. Then, a failover rule decides the action to be taken on the module when the resource is down.
Since SafeKit 8, the action can be configured using the action attribute of the <custom> tag.
|
|
Insert the <custom> tag into the <check> section if this one is already defined. |
13.15.1 <custom> example
· Example with action!="noaction"
<check>
<custom ident="AppChecker" when="prim" exec="mychecker" action="stopstart"/> </check>
o The resource associated with the checker is named custom.AppChecker (with the prefix custom.)
o The generated failover rule, which performs a stopstart when the resource goes down, is named c_AppChecker (with the prefix c_) and is equivalent to:
c_AppChecker: if (custom.AppChecker == down) then stopstart();
· Example with action="noaction"
<check>
<custom ident="AppChecker" when="prim" exec="mychecker" action="noaction"/> </check>
No failover rule is generated. The user has the option to define one explicitly in the <failover> tag. For example:
…
<failover>
<![CDATA[
custom_failure: if (custom.AppChecker == down) then stopstart();
]]>
</failover>
|
|
In SafeKit < 8, the action attribute did not exist, and the action was configured by defining a failover rule in the <failover> tag, as shown in the example above. Therefore, the default value of the action attribute is equivalent to noaction to maintain backward compatibility with older configurations. |
|
|
See also the example in section 15.7. It presents the configuration via the web console along with the corresponding userconfig.xml. |
13.15.2 <custom> syntax
<custom
ident="custom_checker_name"
when="pre|prim|second|both"
exec="executable_path"
arg="executable_arguments"
action="wait|stop|stopstart|restart|noaction"
/>
13.15.3 <custom> attributes
|
<custom |
Set as many custom sections as there are custom checkers. |
||
|
ident="custom_checker_name" |
Custom checker name. It defines the resource associated with the checker: custom.custom_checker_name (with the prefix custom.) A custom checker must set its associated resource state itself, using the command safekit set -r custom.custom_checker_name -v up|down
|
||
|
action="wait"|"noaction" |
Use this value to test an external component before the application starts: ·
when="pre" Since SafeKit 8, you can configure the action to be taken in case of error detection with: ·
action="wait" ·
action="noaction" |
||
|
when="prim"|"second"|"both" action="stop"|"stopstart"|"restart"|"noaction" |
Use this value to test a component after the application starts: · when="prim" for a mirror module The checker is started after/stopped before the execution of the start_prim/stop_prim scripts. · when="both" for a farm module The checker is started after/stopped before the execution of the start_both/stop_both scripts. · when="second" for a mirror module The checker is started after/stopped before the execution of the start_second/stop_second scripts. Since SafeKit 8, you can configure the action to take when an error is detected with: · action="stop|stopstart|restart" stop, stopstart or restart the module. The name of the associated failover rule is c_custom_checker_name (with the prefix c_) · action="noaction" No failover rule generated. The action must be explicitly written in the <failover> tag (see section 13.18). |
||
|
exec="executable_path" |
Defines the executable path of the custom checker. Can be a binary executable or a script file. When the path of executable_path is relative, it is relative to SAFEUSERBIN. In this case, put your executable file in SAFE/modules/AM/bin/ of your application module and use a relative path. See section 10.1 for more information on path values. We recommend a relative path and an executable inside the module. · In Windows, the executable can be a binary or a ps1, vbs or cmd script · In Linux, the executable can be a binary or a shell script |
||
|
arg="executable_arguments" |
Defines the executable arguments when the custom checker is started. |
13.16 Module checker - <module>
By default, there is a wait of the module when the module checker detects the unavailability of another SafeKit module. The module checker also performs a stopstart action when it detects that the external module has been restarted (whether by a restart, a stopstart, or because of a failover). The module checker retrieves the status of the module by connecting to the SafeKit web service running on the server where the module is activated (see section 10.7 for details on the web service).
|
|
Insert the <module> tag into the <check> section if this one is already defined. |
13.16.1 <module> example
· Example using the default configuration of the SafeKit web service (protocol : HTTP, port : 9010) :
<check>
<module name="mysql">
<to addr="172.24.190.21" port="9010"/>
</module>
</check>
mysql is the name of the external module and 172.24.190.21 is its virtual IP address.
o The resource associated with the checker is named module.mysql_172.24.190.21 (with the prefix module.)
o The failover rule, which performs a wait when a module class resource goes down, is static and defined by the default failover rule:
module_failure: if (module.? == down) then wait();
· The same example using the secured configuration of the SafeKit web service (protocol : HTTPS, port : 9453) :
<check>
<module name="mysql">
<to addr="172.24.190.21" port="9453" secure="on"/>
</module>
</check>
For a description of checkers, refer to section 13.10.3.
|
|
See also examples in section 15.9. It presents the configuration via the web console along with the corresponding userconfig.xml. |
13.16.2 <module> syntax
<module
[ident="module_checker_name"]
name="external_module_name">
[<to
addr="IP addres or name the Safekit server running the external module"
port="port of the SafeKit web server"
[interval="10"]
[timeout="5"]
[secure="on"|"off"]
/>]
</module>
13.16.3 <module> attributes
|
<module |
Set as many <module> sections as there are module checkers. |
|
name="external_module_name"] |
Name of the module checker. |
|
[ident="module_checker_name"] |
Name of the external SafeKit module to check. It defines the resource associated with the checker: module.module_checker_name (with the prefix module.) If this attribute is not provided, the resource name is constructed from the name and addr attributes : module.external_module_name_address_or_name |
|
[<to |
Definition of the server(s) running the external module to check. Default is the local server. |
|
addr="address_or_name" |
IP address or name of the external module. IPv4 or IPv6 address. |
|
port="port of the SafeKit web service" |
Port of the SafeKit web service. 9010 for HTTP ; 9453 for HTTPS |
|
[interval="10"] |
Interval in seconds between two checks. Default value: 10 seconds. |
|
[timeout="5"] |
Check reply timeout in seconds. Default value: 5 seconds |
|
[secure="on"|"off"] |
Use HTTP protocol (secure="off") or HTTPS (secure="on") Default value: off |
|
/>] |
|
|
</module> |
|
13.17 Splitbrain checker - <splitbrain>
SafeKit provides a split-brain checker that is suits mirror architectures. Split-brain is a situation where, due to temporary failure of all network links between SafeKit nodes, and possibly due to software or human error, both nodes switched to the primary role while isolated. This is a potentially harmful state, as it implies that the application is running on both nodes. Moreover, when file replication is enabled, modifications to the data are made on the two nodes.
The split-brain checker detects the loss of all connectivity between nodes and selects only one node to become the primary. The other node is not up-to-date anymore and goes into the WAIT state until:
· the heartbeat becomes available again
or
· the administrator runs safekit commands to force the start as primary (safekit stop then safekit prim).
The primary node election is based on the ping of an IP address, called the witness. The network topology must be designed so that only one node can ping the witness in case of split-brain. If this is not the case, both nodes will go primary.
|
|
· Ping between nodes and witness must be enabled · Since SafeKit 8.2.1, multiple witnesses can be defined. This makes it possible to tolerate the failure of one witness, at least one of which must be accessible. |
|
|
Insert the <splitbrain> tag into the <check> section if this one is already defined. |
13.17.1 <splitbrain> example
<check>
<splitbrain ident="witness" exec="ping" arg="192.168.1.100 192.168.2.120"/>
</check>
· The resource associated with the checker is named splitbrain.witness (with the prefix splitbrain.)
· In case of network isolation between nodes, the split-brain checker assigns the splitbrain.uptodate resource as up or down according to access to the witness.
· The failover rule, which performs a wait when the splitbrain.uptodate resource goes down, is static and defined by the default failover rule:
splitbrain_failure: if (splitbrain.uptodate == down) then wait();
For a description of checkers, refer to section 13.10.3.
|
|
See also example in section 15.8. It presents the configuration via the web console along with the corresponding userconfig.xml. |
13.17.2 <splitbrain> syntax
<splitbrain
ident="witness"
exec="ping"
arg="witness1_IP_name witness2_IP_name"
/>
13.17.3 <splitbrain> attributes
|
<splitbrain |
Set only one split-brain checker. |
||
|
ident="witness_name" |
Custom checker name. It defines the resource associated with the checker: splitbrain.witness_name (with the prefix custom.) The resource is assigned to : · up, if at least one witness responds · down, if not all witnesses respond |
||
|
[when="pre"] |
Fixed value. ·
when="pre" On split-brain detection: · The node that has access to the witness (splitbrain.witness_name="up") sets the resource splitbrain.uptodate to up and becomes primary · The other server that does not have access to the witness (splitbrain.witness_name="down") sets the resource splitbrain.uptodate to down. This triggers the wait action of the static and predefined failover rule, named splitbrain_failure. |
||
|
exec="ping" |
Fixed value. Use a pinger to ping the witness and set splitbrain.witness_name state. |
||
|
arg=" witness1_IP_name witness2_IP_name" |
List of IP addresses or witness names to ping. IPv4 or IPv6 address.
|
||
|
</splitbrain> |
|
13.18 Failover machine - <failover>
SafeKit provides checkers that test a critical element and affect the state of the associated resource based on the test result. Upon error detection by a checker, the failover machine executes an action on the module according to the failover rule associated with the checker. For a complete description, see section 13.10.
Some SafeKit components (<heart>, <rfs>, <vipd>, <errd>) manage their own resources and provide their own failover rules. These rules should not be modified or deleted, as doing so may lead to abnormal behavior of SafeKit.
The failover machine regularly evaluates (by default, every 5 seconds) the overall state of all resources and applies an action based on the true failover rules.
In farm architecture, the failover machine can work only on the states of local resources whereas in mirror architecture, the failover machine can work on the states of local and remote resources.
As the states of resources are exchanged on heartbeat channels, it is better to have several heartbeat channels (see section 13.3 for heartbeats definition).
Failover rules can be written in a simple language specific to SafeKit or in Lua using SafeKit function calls
13.18.1 <failover> example
The examples of rules written in this section are added to the default rules or those generated based on the configuration of the checkers.
· Example of adding a rule written in the failover machine language
<failover>
<![CDATA[
custom_failure: if (custom.AppChecker == down) then stopstart();
]]>
</failover>
· Example of adding a rule using the Lua language and the if_then function call
The prefix "--Lua Rules" indicates that the following section should be interpreted using the Lua interpreter.
<failover>
<![CDATA[
--Lua Rules
Rules = Rules +
{ custom_failure=if_then("custom.AppChecker","down",Action.stopstart),_group="checker"}
]]>
</failover>
· Example of a rule to disable the default rule named ip_failure and add the rule allip_failure
<failover>
<![CDATA[
--Lua Rules
Rules.disable("ip_failure")
-- Add here any Lua rules intended to replace the mentioned rules, or write the legacy rules in another CDATA section
]]>
<![CDATA[
allip_failure: if (ip.* == down) then stopstart();
]]>
</failover>
|
|
Use a separate <![CDATA[ … ]]> section for each language. |
13.18.2 <failover> syntax
<failover [extends="yes"] [period="5000"] [handle_time="15000"]>
<![CDATA[
label: if (expression) then action;
…
]]>
</failover>
|
|
The <failover> tag and subtree cannot be changed with a dynamic configuration. |
13.18.3 <failover> attributes
|
<failover |
|
|
[extends="yes"|"no"] |
· extends="yes" The new failover rules extend the default failover rules (see section 13.18.4 for its definition). · extends="no" The new failover rules overwrite the default one (avoid this configuration). Default value: yes. |
|
[period="5000"] |
Period in milliseconds between two evaluations of failover rules. Default value: 5000 milliseconds (5 seconds) |
|
[handle_time="15000"] |
A failover action must be stable (the same) at least during the time handle_time (in milliseconds) before being applied by the failover machine. Default value: 15000 milliseconds (15 seconds). handle_time must be a multiple of the period value. |
13.18.4 <failover> description
13.18.4.1 Module resources
The syntax to design the resources is as follows:
resource ::= [local. | remote.] 0/1resource_class.resource_id (default: local)
resource_class ::= ping | intf | tcp | custom | module | heartbeat | rfs
resource_id ::= * | ? | name
resource_state ::= init | down | up | unknown
|
init |
Special initialization state of a resource when the checker is not started. If a resource in the init state is used in a failover rule, SafeKit does evaluate the rule. |
|
up |
Resource OK |
|
down |
Resource KO |
|
unknown |
Special state of a remote resource; the remote state is unknown at the test time (ex.: when the remote module is stopped). |
13.18.4.2 Failover rules
SafeKit provides default failover rules and generated failover rules from the module checkers’ configuration. Users can also write their own failover rules.
Default failover rules
The default failover rules for the checkers (module, intf, ip, splitbrain) are:
<failover>
<![CDATA[
/* rule for module checkers */
module_failure: if (module.? == down) then wait();
/* rule for interface checkers */
interface_failure: if (intf.? == down) then wait();
/* rule for ip checkers */
ip_failure: if (ip.? == down) then stopstart();
/* rules for splitbrain */
splitbrain_failure: if (splitbrain.uptodate == down) then wait();
]]>
</failover>
There are also:
· failover rules dedicated to file replication management, heartbeats…
· the Implicit_wakeup rule that is applied when no wait rule applies. It runs the wakeup action.
|
|
Since SafeKit 7.5, default failover rules are using a new syntax based on the Lua language. |
Generated failover rules
The checkers tcp, ping, and custom have a rule generated when the value of the action attribute if it is set to stop, stopstart, restart or wait.
The name of the rule has as a prefix the first letter of the checker’s name (t, p or c), followed by _, then the value of the attribute ident (e.g. p_router, t_service, c_app).
Configured failover rules
The user can also define his own rules into the section <failover><![CDATA[ … ]]></failover>. By default, these are added to the default and generated rules.
|
|
See examples in section 13.18.1. |
Failover rules can be written using one of the following syntaxes:
· Failover machine language
label: if ( expression ) then action;
label ::= string
action ::= stop() | stopstart() | wait() | restart() | swap()
expression ::= ( expression )
| ! expression
| expression && expression
| expression || expression
| expression == expression
| expression != expression
| resource ::= [local. | remote.] 0/1resource_class.resource_id
| resource_state
· Lua language
o if_then function call to define a rule
--Lua Rules
Rules = Rules +
{ label=if_then("resource","resource_state",action),_group="checker" }
label ::= string
action ::= Action.stop | Action.stopstart | Action.wait | Action.restart | Action.swap
| resource ::= resource_class.resource_id
| resource_state
o Rules.disable function call to disable a rule based on its label
Rules.disable("failover_rule_label")
|
|
Use a separate <![CDATA[ … ]]> section for each language. |
13.18.4.3 Actions
The actions (restart(), stopstart(), stop(), swap()) of the failover machine are equivalent to control commands (with the -i identity parameter) described in section 9.3.
|
|
maxloop / loop_interval / automatic_reboot are applied if -i identity is passed to commands. This is the case when called from the failover machine or checkers. |
14. Scripts for a module configuration
![]() Section 14.1 “List of scripts”
Section 14.1 “List of scripts”
![]() Section 14.2 “Variables and arguments passed to scripts”
Section 14.2 “Variables and arguments passed to scripts”
![]() Section 14.3 “Scripts output”
Section 14.3 “Scripts output”
![]() Section 14.4 “Scripts execution automaton”
Section 14.4 “Scripts execution automaton”
![]() Section 14.5 “SafeKit special commands for scripts”
Section 14.5 “SafeKit special commands for scripts”
|
|
Examples of scripts are given in section 15. |
To enable scripts call, <user> tag must be defined in userconfig.xml as described in section 13.7.
Scripts must executables:
· in Windows, an executable with the extension and type: .cmd, .vbs, .ps1,.bat or .exe
· in Linux, any type of executable
Each time you update scripts, you must apply the module configuration onto the servers (with the SafeKit console or command).
|
|
During the configuration phase, scripts are copied from SAFE/modules/AM/bin in the execution environment directory SAFE/private/modules/AM/bin (=SAFEUSERBIN, do not touch scripts at this place) where AM is the module name. |
14.1 List of scripts
Below the list of scripts that can be defined by the user. The essential scripts start/stop are those that start and stop the application within the module.
14.1.1 Start/stop scripts
|
start_prim |
Scripts for a mirror module. To start & stop application on the ALONE or PRIM server |
|
start_both |
Scripts for a farm module. To start & stop application on all UP servers in a farm cluster In the special case they are defined in a mirror module, they are also executed on both servers (PRIM, SECOND or ALONE) |
|
start_second |
Special scripts for a mirror module To start & stop application on the "SECOND" server When the secondary server becomes the primary one, stop_second followed by start_prim is executed |
|
start_sec |
Special scripts for a mirror module |
|
stop_[both, |
Scripts for all modules The stop scripts are called twice: once for a graceful shutdown of the application (without force as first argument), a second time with a force parameter for a rapid shutdown (with force as first argument). |
|
prestart |
Scripts for all modules Executed at the very beginning of the module start and at its end. By default, prestart contains stop_sec, stop_second, stop_prim, stop_both to stop application before starting the module under the control of SafeKit. |
|
transition |
Script for all modules This script is executed on state transitions described in section 14.4 |
14.1.2 Other scripts
|
config |
config is called when executing the safekit config -m AM command on the application module. You can make a special application configuration in this script. |
|
deconfig |
deconfig is called when executing the safekit deconfig -m AM command, which is itself called at the application module uninstallation. You can remove a special application configuration made previously in the config script. |
|
confcheck |
confcheck is called when executing the safekit confcheck -m AM command on the application module. You can add in this script some tests for checking changes on the application configuration files. |
|
state |
state is called when executing the safekit state -v -m AM command on the application module. You can display a special state of the application. |
|
level |
level is called when executing the safekit level -m AM command on the application module. You can display the application version. |
14.2 Variables and arguments passed to scripts
All scripts are called with 3 parameters:
· the current state (STOP,WAIT,ALONE,PRIM,SECOND,UP),
· the next state (STOP,WAIT,ALONE,PRIM,SECOND,UP)
· the action (start, stop, stopstart or stopwait).
|
|
The stopwait argument is passed during the execution of the wait action triggered by a checker. |
The stop scripts are called twice:
· a first time for a graceful shutdown of the application
· a second time with a force parameter for a forced shutdown (with force as first argument)
The environment variables that can be used inside scripts are:
· SAFE, SAFEMODULE, SAFEBIN, SAFEUSERBIN, SAFEVAR, SAFEUSERVAR (for details, see section 10.1)
|
|
The definition of SAFEMODULE, which contains the name of the module, allows omitting the -m AM option with the safekit command if it is to apply to the SAFEMODULE. |
· all variables defined in <user> tag of userconfig.xml (see section 13.7).
|
|
For an example with environment variables, refer to section 15.3. |
14.3 Scripts output
14.3.1 Output into script log
By default (logging="userlog" in <user> tag of userconfig.xml), the stdout and stderr of the script are redirected into the file SAFEVAR/modules/AM/userlog_<year>_<month>_<day>T<time>_<script name>.ulog where:
· SAFEVAR=C:\safekit\var in Windows and /var/safekit in Linux
· AM is the module name
· <year>_<month>_<day>T<time> are date and time of execution of the script
· <script name> is the script name
To insert a message into the script log, add the following command into the script:
14.3.2 Output into module log
To insert messages with level E or I into the AM module log, add the following command into the script:
· in Windows
"%SAFE%/safekit" printe "message"
"%SAFE%/safekit" printi "message"
· in Linux
"$SAFE/safekit" printe "message"
"$SAFE/safekit" printi "message"
Level E messages are visible in the non-verbose log; level I messages are found in the verbose log
|
|
In the execution environment of the AM script, the -m AM option is unnecessary for the safekit command. |
14.4 Scripts execution automaton
Most of the time, stop scripts are called twice (without the force parameter and then with the force parameter). In that case the script name is written in italic.
|
|
For instance, first transition from STOP to WAIT calls the script transition STOP WAIT start is called. |
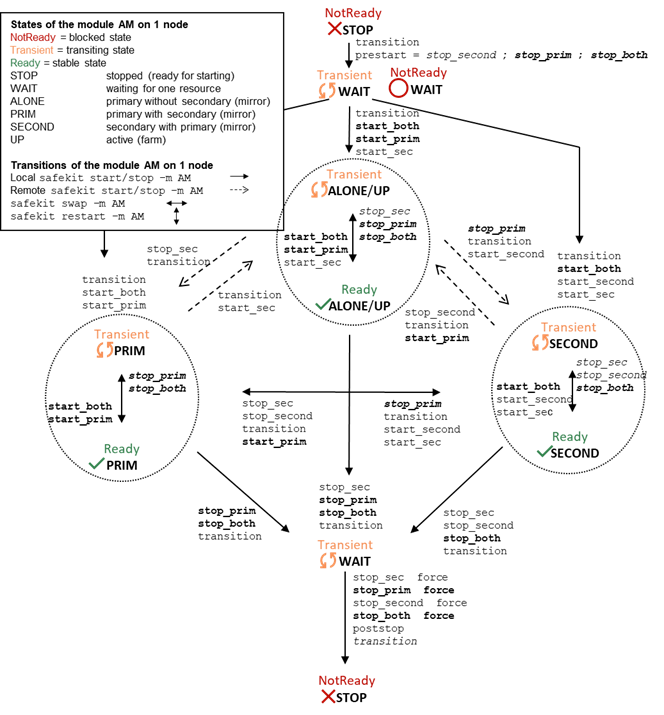
14.5 SafeKit special commands for scripts
Special commands are installed under SAFE/private/bin. Special commands can be called directly in module scripts with %SAFEBIN%\specialcommand or $SAFEBIN/specialcommand. Outside module scripts, use safekit -r command.
|
safekit
-r |
<special command> <args> executed within the SafeKit environment. When the command name is not an absolute path, the command is searched in SAFEBIN=SAFE/private/bin directory. |
14.5.1 Commands for Windows
14.5.1.1 sleep, exitcode, sync commands
On Windows, you can use the following basic commands:
· %SAFEBIN%\sleep.exe <timeout value in seconds>
To be used inside stop scripts because net stop service is not synchronous
· %SAFEBIN%\exitcode.exe <exit value>
To return an error value when the script exits
· %SAFEBIN%\sync.exe \\.\<drive letter:>
To sync file system cache of a disk
14.5.1.2 namealias command
%SAFEBIN%/namealias [-n | -s ] <alias name>
-n to add a new NetBIOS name (se
t into start_prim) or -s to suppress the NetBIOS name (set into stop_prim)
You can also use the SafeKit command netnames (or the windows command nbtstat) to list NetBIOS information.
14.5.2 Commands for Linux
14.5.2.1 Managing the crontab
|
$SAFEBIN/gencron [del | add] <user name> [all |<command name>] -c "<comment>" |
· del to disable the entries in stop_prim (by inserting comments) · add to enable the entries in start_prim (by removing comments) · <user name> user name in the crontab · all to apply on all entries · <command name> to apply on the name of the command · <comment> header of the comment that will be inserted |
The following example applies to the crontab entry:
5 0 * * * $HOME/bin/daily.job >> $HOME/tmp/out 2>&1
For a mirror module, to manage this entry on the primary, insert :
· Its activation into start_prim
$SAFEBIN/gencron add admin daily.job -c "SafeKit configuration for $SAFEMODULE"
· Its deactivation into stop_prim
$SAFEBIN/gencron del admin daily.job -c "SafeKit configuration for $SAFEMODULE"
14.5.2.2 Bounding command
|
$SAFEBIN/boundcmd <timeout value> <command path> [<args>]
|
· <timeout value> maximum time allocated to execute the command · <command path> path to the command to execute · <args> optional arguments to the command |
boundcmd returns the exit code of the command when the command terminates before the timeout; otherwise, it exits with the value 2.
For example, to flush data on disk with a timeout of 30 seconds, run:
$SAFEBIN/boundcmd 30 /bin/sync 1>/dev/null 2>&1
14.5.3 Commands for Windows and Linux
|
List running processes as a tree (except for all) and optional kill · safekit -r processtree list all List all running processes. · safekit -r processtree list <process command name> List all running processes with the specified command name. · safekit -r processtree kill <process command name> List and kill all running processes with the specified command name. · safekit -r processtree list | kill <process command name>| all <regular expression on the full command - path and arguments> List (and kill) all running process with the specified command name and arguments.
· Windows examples safekit -r processtree kill notepad.exe ".*myfile.*"
safekit -r processtree list all "mirror" · Linux examples safekit -r processtree kill vi ".*myfile.*"
safekit -r processtree list all "mirror" |
|||
|
safekit incloop -m AM -i <handler name> |
The module has a maxloop counter, the number of restart, stopstart and wait of the module on error detection. The module is stopped when this counter reaches the maxloop value over the loop_interval period. When running special handlers, the maxloop counter is not incremented. To increment it, use the command: safekit incloop -m AM -i <handler name> It increments the maxloop counter for the module AM and returns 1 when the limit has been reached.
|
||
|
safekit resetloop -m AM [-i <handler name>] |
Reset the maxloop counter to the value 0 |
||
|
safekit checkloop -m AM |
For checking the maxloop counter for the module AM, use the command: safekit checkloop -m AM • It returns 0 when the maxloop counter is not reached or the last increment occurred outside loop_interval • It returns 1 when the maxloop counter is reached and the last increment occurred during loop_interval |
15. Examples of module configurations
![]() Section 15.1 “Mirror module example with mirror.safe”
Section 15.1 “Mirror module example with mirror.safe”
![]() Section 15.2 “Farm module example with farm.safe”
Section 15.2 “Farm module example with farm.safe”
![]() Section 15.3 “Macro and script variables example with hyperv.safe”
Section 15.3 “Macro and script variables example with hyperv.safe”
![]() Section 15.4 “Process monitoring example with softerrd.safe”
Section 15.4 “Process monitoring example with softerrd.safe”
![]() Section 15.5 “TCP checker example”
Section 15.5 “TCP checker example”
![]() Section 15.6 “Ping checker example”
Section 15.6 “Ping checker example”
![]() Section 15.7 “Custom checker example with customchecker.safe”
Section 15.7 “Custom checker example with customchecker.safe”
![]() Section 15.8 “Split-brain checker example”
Section 15.8 “Split-brain checker example”
![]() Section 15.9 “Module checker example”
Section 15.9 “Module checker example”
![]() Section 15.10 “Interface checker example”
Section 15.10 “Interface checker example”
![]() Section 15.11 “IP checker example”
Section 15.11 “IP checker example”
![]() Section 15.12 “Mail notification example with notification.safe”
Section 15.12 “Mail notification example with notification.safe”
![]() Section 15.13 “Virtual hostname example with vhost.safe”
Section 15.13 “Virtual hostname example with vhost.safe”
Some examples are taken from the modules delivered with the SafeKit package, under SAFE/Application_Modules. Many real integration examples are also described in SafeKit Quick Installation Guides.
|
|
The .safe are platform dependent and therefore different in Windows and Linux, mainly for module scripts. |
The module configuration can be modified in two ways:
· either through the module configuration wizard in the SafeKit web console (see section 3.3)
· or by directly editing the files SAFE/module/AM/conf/userconfig.xml or the scripts under SAFE/module/AM/bin (where AM is the name of the installed module)
To take effect, at the next module startup, the new configuration must be applied:
· either at the last step of the module configuration wizard
· or with the command safekit config -H "node1,node2" -E AM executed on the node where the files have been modified
|
|
Before applying the configuration, close all editors, file explorers, shells, or command prompts that may access a file under SAFE/modules/AM on the nodes. |
15.1 Mirror module example with mirror.safe
Below is the configuration of the mirror module, mirror.safe.
To test a mirror module, refer to section 4.2.
|
|
The following description is for Windows. For Linux, please refer to mirror.safe delivered with the Linux package that includes Linux configuration and scripts. |
15.1.1 Cluster configuration with two networks
The cluster configuration includes two networks, such as default and private. The second network is designed to illustrate the configuration of a dedicated network for replication traffic within the module configuration. Most configurations typically include only one network.
|
To start the cluster configuration wizard, refer to section 3.2. Switch to “Advanced configuration” to edit the XML if needed. |
<cluster> <lans> <lan name="default"> <node name="node1" addr="10.0.0.107"/> <node name="node2" addr="10.0.0.108"/> </lan> <lan name="private"> <node name="node1" addr="10.1.0.107"/> <node name="node2" addr="10.1.0.108"/> </lan> </lans> </cluster> For detail on XML configuration refer to section 12.1. |
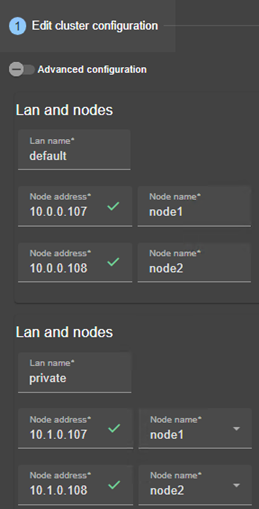
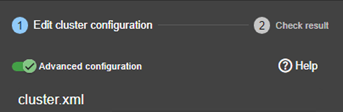
15.1.2 Mirror module configurations
Below is mirror module configurations, with a virtual IP address, real-time replication, and failover.
15.1.2.1 Configuration with a virtual IP address, real-time replication, and failover
The following configuration use only one network for the heartbeats and replication flow.
|
To start the module configuration wizard, refer to section 3.3. Switch to “Advanced configuration” to edit the XML if needed. |
<!DOCTYPE safe> <safe> <service mode="mirror" boot="on"> <heart> <heartbeat name="default"> </heartbeat> </heart> <vip> <interface_list> <interface check="on"> <real_interface> <virtual_addr addr="10.1.0.126" where="one_side_alias" check="on"/> </real_interface> </interface> </interface_list> </vip> <rfs> <replicated dir="e:\repdir"/> </rfs> <user></user> </service> </safe> For detail on XML configuration of: · <service> refer to section 13.2 · <heart> refer to section 13.3 · <vip> refer to section 13.5 · <rfs> refer to section 13.6 · <user> refer to section 13.7 |
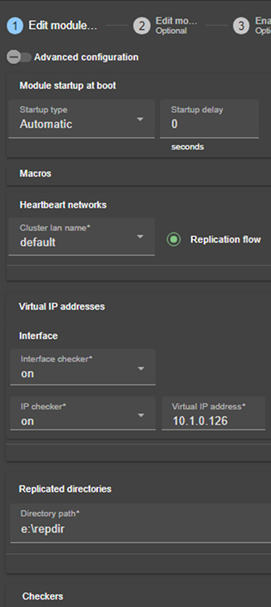

15.1.2.2 Configuration of a dedicated replication network
The module is configured to use both cluster networks as defined in section 15.1.1. The one named private is selected as the “Replication flow” for replication traffic.
|
To start the module configuration wizard, refer to section 3.3. |
<!DOCTYPE safe> <safe> <service mode="mirror"
boot="on"> <heart> <heartbeat name="default"/> <heartbeat name="private" ident="flow"/> </heart> <vip> <interface_list> <interface check="on"> <real_interface> <virtual_addr addr="10.1.0.126" where="one_side_alias" check="on"/> </real_interface> </interface> </interface_list> </vip> <rfs> <replicated dir="e:\repdir"/> </rfs> <user></user> </service> </safe> For detail on XML configuration see section 13. |
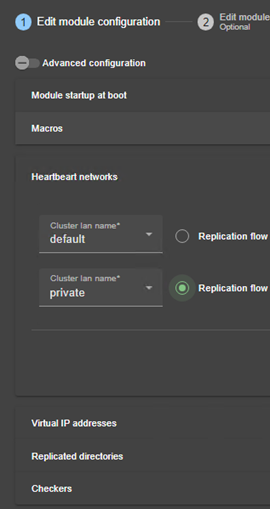

15.1.3 Mirror Module scripts
Below are Windows scripts in CMD for a mirror module to start/stop services on the primary node. For Linux, please refer to the mirror.safe delivered with the Linux package that includes Linux scripts.
For detail on module scripts, refer to section 14.
For details on script logging (with echo and safekit printe commands), refer to section 14.3.
15.1.3.1 start_prim script
start_prim script is called when the mirror module is starting as primary (manual or automatic start after stopstart or wait exit) or restarting on a primary node (restart). It must contain the start of the application integrated into the module. The application runs on only on the primary node.
|
|
@echo off echo "Running start_prim %*" set res=0
rem net start "myservice"
set res=%errorlevel% if %res% == 0 goto end
:stop "%SAFE%\safekit" printe "start_prim failed"
rem uncomment to stop the module when critical rem "%SAFE%\safekit" stop -i "start_prim"
:end For safekit command description, refer to section 9. |

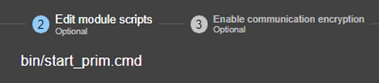
15.1.3.2 stop_prim script
stop_prim script is called when the module is stopping (stop, stopstart or wait) or restarting on a primary node (restart). It must contain the stop of the application integrated into the module.
|
|
@echo off echo "Running stop_prim %*" set res=0
rem default: no action on forcestop if "%1" == "force" goto end
rem net stop "myservice" /Y set res=%errorlevel%
rem If necessary, wait for the stop of the services rem "%SAFEBIN%\sleep" 10
if %res% == 0 goto end
"%SAFE%\safekit" printe "stop_prim failed"
:end For safekit command description, refer to section 9. |

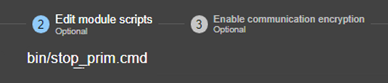
15.2 Farm module example with farm.safe
Below is the configuration of the farm module, farm.safe.
To test a mirror module, refer to section 4.3.
|
|
The following description is for Windows. For Linux, please refer to farm.safe delivered with the Linux package that includes Linux configuration and scripts. |
15.2.1 Cluster configuration with three nodes
The cluster configuration includes a single network, named default, and three nodes to demonstrate advanced load balancing configuration. Most cluster configurations typically include only two nodes.
|
|
Only a farm module with load balancing and no replication can be configured on more than 2 nodes. A mirror module with replication can be configured only on two nodes. |
|
To start the cluster configuration wizard, refer to section 3.2. Switch to “Advanced configuration” to edit the XML if needed. |
<cluster> <lans> <lan name="default"> <node name="node1" addr="10.0.0.107"/> <node name="node2" addr="10.0.0.108"/> <node name="node3" addr="10.0.0.106"/> </lan>
</lans> </cluster> For detail on XML configuration refer to section 12.1. |
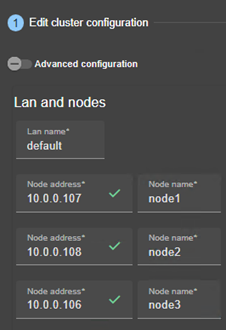

15.2.2 Farm module configurations
Below is farm module configuration with a virtual IP address, load-balancing rules, and failover.
15.2.2.1 Configuration with a virtual IP address, load-balancing rule, and failover
The defined load-balancing rule allows you to view the load distribution among the nodes by accessing the SafeKit web page http://host:9010/safekit/mosaic.html.
|
To start the module configuration wizard, refer to section 3.3. Switch to “Advanced configuration” to edit the XML if needed. |
<!DOCTYPE safe> <safe> <service mode="farm" boot="on"> <farm> <lan name="default"></lan> </farm> <vip> <interface_list> <interface check="on"> <virtual_interface type="vmac_directed"> <virtual_addr addr="10.1.0.127" where="alias" check="on"/> </virtual_interface> </interface> </interface_list>
<loadbalancing_list> <group name="FarmProto"> <rule port="9010" proto="tcp" filter="on_port"/> </group> </loadbalancing_list> </vip>
</service> </safe> For detail on XML configuration of: · <service> refer to section 13.2 · <farm> refer to section 13.4 · <vip> refer to section 13.5 · <user> refer to section 13.7 |
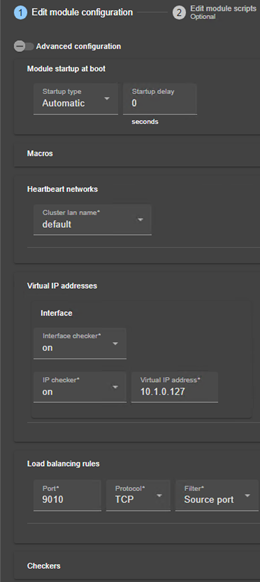

Other examples of load balancing rules configuration are described in the following.
15.2.2.2 Configuration of TCP load-balancing rules
Below is the load balancing configuration for accessing the virtual IP using the TCP protocol on the specified ports:
· 80 (HTTP), 443 (HTTPS), 8080 (HTTP proxy)
With HTTP and HTTPS, network load balancing is set on the client IP source address and not on the client TCP source port, to ensure that the same client is always connected to the same web server over several TCP connections (stateful versus stateless servers: see section 1.3.3).
· 389 (LDAP) et 23 (Telnet)
|
To start the module configuration wizard, refer to section 3.3. Switch to “Advanced configuration” to edit the XML if needed. |
<!DOCTYPE safe> <safe> <service mode="farm" boot="on"> <farm> <lan name="default"></lan> </farm> <vip> <interface_list> <interface check="on"> <virtual_interface type="vmac_directed"> <virtual_addr addr="10.1.0.127" where="alias" check="on"/> </virtual_interface> </interface> </interface_list> <loadbalancing_list> <group name="FarmProto"> <rule port="23" proto="tcp" filter="on_port"/> <rule port="80" proto="tcp" filter="on_addr"/> <rule port="443" proto="tcp" filter="on_addr"/> <rule port="8080" proto="tcp" filter="on_addr"/> <rule port="389" proto="tcp" filter="on_port"/> </group> </loadbalancing_list> </vip> </service> </safe> For details on <loadbalancing_list> configuration, refer to section 13.5.6. |
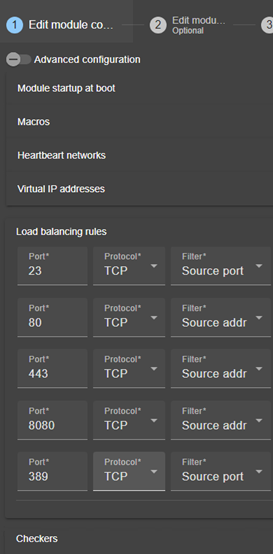

15.2.2.3 Configuration of UDP load-balancing rules
Below is the load balancing configuration for accessing the virtual IP using the UDP protocol on the specified ports:
· 1645 (RADIUS)
With "on_ipid", the load balancing is made on the IP identifier field in the packet IP header. The load balancing works even if the client always presents the same client IP address and client port at input.
|
To start the module configuration wizard, refer to section 3.3. The wizard do not present on_ipid filter. Switch to “Advanced configuration” to edit it. |
<!DOCTYPE safe> <safe> <service mode="farm" boot="on"> <farm> <lan name="default"></lan> </farm> <vip> <interface_list> <interface check="on"> <virtual_interface type="vmac_directed"> <virtual_addr addr="10.1.0.127" where="alias" check="on"/> </virtual_interface> </interface> </interface_list> <loadbalancing_list> <group name="FarmProto"> <rule port="53" proto="udp" filter="on_ipid" /> <rule port="1645" proto="udp" filter="on_ipid" /> </group> </loadbalancing_list> </vip> </service> </safe> For details on <loadbalancing_list> configuration, refer to section 13.5.6. |
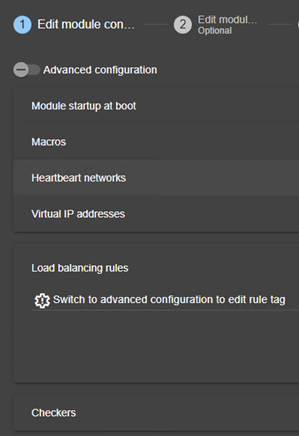

15.2.2.4 Configuration of advanced load-balancing rules
With the following configuration example, you are defining a farm of 3 nodes with a priority for HTTP traffic on the 1st node, HTTPS on the 2nd node and proxy HTTP on the 3rd node.
|
To start the module configuration wizard, refer to section 3.3. The wizard do not present details on the load-balancing groups. Switch to “Advanced configuration” to edit them. |
<!DOCTYPE safe> <safe> <service mode="farm" boot="on"> <farm> <lan name="default"></lan> </farm> <vip> <interface_list> <interface check="on"> <virtual_interface type="vmac_directed"> <virtual_addr addr="10.1.0.127" where="alias" check="on"/> </virtual_interface> </interface> </interface_list> <loadbalancing_list> <group name="http_service"> <cluster> <host name="node1" power="3"/> <host name="node2" power="1"/> <host name="node3" power="1"/> </cluster> <rule port="80" proto="tcp" filter="on_addr"/> </group> <group name="https_service"> <cluster> <host name="node1" power="1"/> <host name="node2" power="3"/> <host name="node3" power="1"/> </cluster> <rule port="443" proto="tcp" filter="on_addr"/> </group> <group name="httpproxy_service"> <cluster> <host name="node1" power="1"/> <host name="node2" power="1"/> <host name="node3" power="3"/> </cluster> <rule port="8080" proto="tcp" filter="on_addr"/> </group> </loadbalancing_list> </vip> </service> </safe> For details on <loadbalancing_list> configuration, refer to section 13.5.6. |
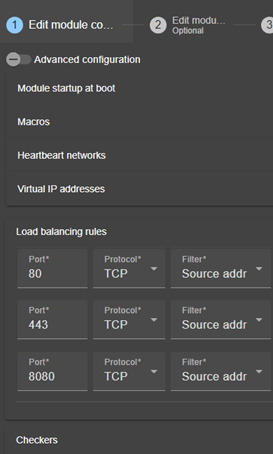

15.2.3 Farm module scripts
Below are Windows scripts in CMD for a farm module to start/stop services on all nodes. For Linux, please refer to the farm.safe delivered with the Linux package that includes Linux scripts.
For detail on module scripts, refer to section 14.
For details on script logging (with echo and safekit printe commands), refer to section 14.3.
15.2.3.1 start_both script
start_both script is called when the farm module is starting (manual or automatic start after stopstart or wait) and restarting (restart). It must contain the start of the application integrated into the module. The application runs on all nodes.
|
|
@echo off echo "Running start_both %*" set res=0
rem net start "myservice"
set res=%errorlevel% if %res% == 0 goto end
:stop "%SAFE%\safekit" printe "start_both failed"
rem uncomment to stop the module when critical rem "%SAFE%\safekit" stop -i "start_both"
:end For details on script logging (with echo and safekit printe commands), refer to section 14.3. For safekit command description, refer to section 9. |
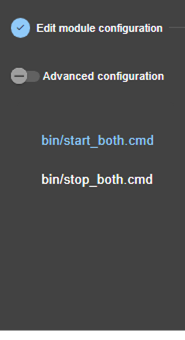
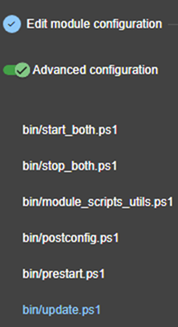
15.2.3.2 stop_both script
stop_both script is called when the farm module is stopping (stop, stopstart or wait exit) or restarting (restart). It must contain the stop of the application integrated into the module.
|
|
@echo off echo "Running stop_both %*" set res=0
rem default: no action on forcestop if "%1" == "force" goto end
rem net stop "myservice" /Y set res=%errorlevel%
rem If necessary, wait for the stop of the services rem "%SAFEBIN%\sleep" 10
if %res% == 0 goto end
"%SAFE%\safekit" printe "stop_both failed"
:end |


15.3 Macro and script variables example with hyperv.safe
The module hyperv.safe brings high availability to Hyper-V between two Windows servers. It is a mirror module configuration, with a virtual IP address, real-time replication, and failover. It is presented to demonstrate the use of macros and module script environment variables.
15.3.1 Module configuration with macros and var
In the following example, four <macro> are configured and their values are used to define the replicated directory path <dir> (i.e. E:\Hyper-V\Ubuntu20-1) and the environment variables <var> for module scripts. Note that in the example, the names of the macros and the variables are identical, which is not a requirement.
|
To start the module configuration wizard, refer to section 3.3. The wizard do not present the user configuration. Switch to “Advanced configuration” to edit it. |
<!DOCTYPE safe> <safe> <macro name="VM_PATH" value="E:\Hyper-V"/> <macro name="VM_NAME" value="Ubuntu20-1"/> <macro name="NORMAL_STOP" value="stop"/> <macro name="FORCE_STOP" value="stop"/> <service mode="mirror"> <heart> <heartbeat name="default" /> </heart> <rfs scripts="on" acl="on" namespacepolicy="0" allocthreshold="10"> <replicated dir="%VM_PATH%\%VM_NAME%"> </replicated> </rfs> <user> <var name="VM_PATH" <var name="VM_NAME" <var name="NORMAL_STOP" <var name="FORCE_STOP" </user> </service> </safe> For detail on XML configuration of: · <macro> refer to section 13.1. · <user>, <var> refer to section 13.7. |
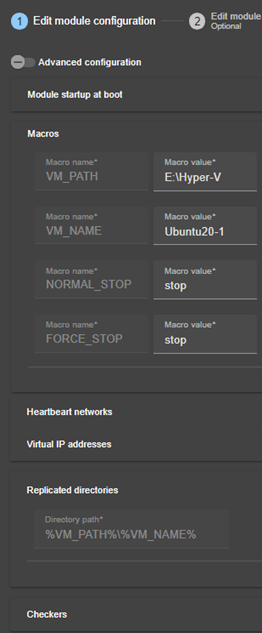

15.3.2 Module scripts with var
Below, the start_prim.ps1 accesses the environment variables defined at the time the script is executed:
· the SafeKit environment variables SAFE and SAFEUSERVAR
· the module environment variables VM_PATH, VM_NAME… defined in the <var> sections of <user>
For details, refer to section 14.2.
|
|
$safe = (Get-Item env:SAFE).Value $suv = (Get-Item env:SAFEUSERVAR).Value $vmname = (Get-Item env:VM_NAME).Value $vmpath = (Get-Item env:VM_PATH).Value
… |
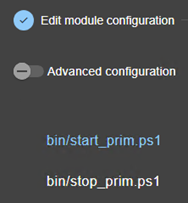
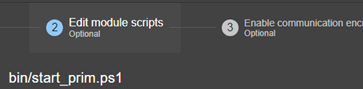
15.4 Process monitoring example with softerrd.safe
The module softerrd.safe is a demonstration mirror module for process monitoring. This feature is also available in a farm module.
The tests consist of terminating the monitored processes (i.e., mybin, myotherbin, or myappli) using the safekit kill command.
To test the process/service monitoring, refer to section 4.4.1.
|
|
The following description is for Windows. For Linux, please refer to softerrd.safe delivered with the Linux package that includes Linux configuration and scripts. |
15.4.1 Module configuration with process monitoring
Detecting the shutdown of:
· mybin.exe causes the module to restart (action="restart"). Its monitoring enabled/disabled after/before the execution of start_prim/stop_prim (class="prim").
· myotherbin.exe causes a stop of the module (action="stop"). Its monitoring enabled/disabled after/before the execution of start_second/stop_second (class="second").
· myappli.exe causes the execution of a special handler restart_myappli.cmd (action="restart_myappli") located into the bin directory of the module. The monitoring of myappli is manually enabled/disabled in the module scripts after/before its launch/stop (e.g. class="myappli"). Refer to scripts detailed in section 15.4.2.
This configuration allows for the individual restart of the myappli process without having to completely restart the application integrated in start_prim/stop_prim.
The actions restart and stopstart automatically increment the maxloop counter to limit the number of automatic actions in the event of persistent errors. By default, the module is stopped on the 4th error detection within 24 hours (see maxloop and loop_interval in section 13.2.3).
If the action involves executing a special script, this script must manually manage the maxloop counter (i.e., restart_myappli.cmd).
|
To start the module configuration wizard, refer to section 3.3. The wizard do not present details on class associated to process. Switch to “Advanced configuration” to edit them. |
<!DOCTYPE safe> <safe> <service mode="mirror"> <heart> <heartbeat name="default"> </heartbeat> </heart> <errd> <proc name="mybin.exe" <proc name="myotherbin.exe" <proc name="myappli.exe" </errd> <user> </user> </service> </safe> For details on XML configuration of <errd>, see section 13.9. |

15.4.2 Advanced configuration of module scripts
The module monitors the presence of the following processes:
· mybin and myappli started/stopped on the primary node with start_prim/stop_prim
· myotherbin started/stopped on the secondary node with start_second/stop_second
|
|
@echo off echo "Running start_prim %*"
%SAFE%\safekit printi "start mybin" start %SAFEUSERBIN%\mybin.exe 10000000
%SAFE%\safekit printi "start myappli" start %SAFEUSERBIN%\myappli.exe 10000000 %SAFE%\safekit errd enable myappli Note the call to safekit errd enable myappli to start monitoring the process with class="myappli" once this process is launched. Refer to section 13.9.4 for the description of this command. |
|
|
@echo off echo "Running stop_prim %*" %SAFE%\safekit printi "stop mybin" %SAFE%\safekit kill -level="terminate" -name="mybin.exe"
%SAFE%\safekit printi "stop myappli" %SAFE%\safekit errd disable myappli %SAFE%\safekit kill -level="terminate" -name="restart_myappli.cmd" %SAFE%\safekit kill -level="terminate" -name="myappli.exe" :end Note the call to safekit errd disable myappli to stop monitoring the process with class="myappli", before terminating this process. |
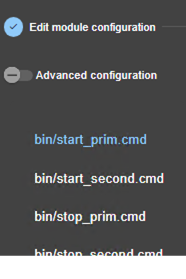

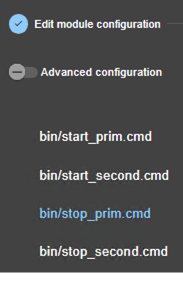
The specific handler restart_myappli.cmd is editable in "Advanced Configuration". This script increments the maxloop counter and restarts the myappli process.
|
Switch to “Advanced configuration” to list and edit all scripts. |
@echo off
%SAFE%\safekit printi "restart_myappli"
rem first disable monitoring of the application %SAFE%\safekit errd disable myappli
rem increment loop counter %SAFE%\safekit incloop -i "restart_myappli" if %errorlevel% == 0 goto next rem max loop reached %SAFE%\safekit stop -i "restart_myappli" %SAFEBIN%\exitcode 0
:next rem max loop not reached : go on restarting the application %SAFE%\safekit printi "Restart myappli" %SAFE%\safekit kill -level="terminate" -name="myappli.exe" start %SAFEUSERBIN%\myappli.exe 10000000
rem finally, enable monitoring of the application %SAFE%\safekit errd enable myappli %SAFEBIN%\exitcode 0 Note the increment of the loop counter with safekit incloop -i "restart_myappli" and the stopping of the module when maxloop is reached. Refer to section 14.5.3 for the description of this command. |
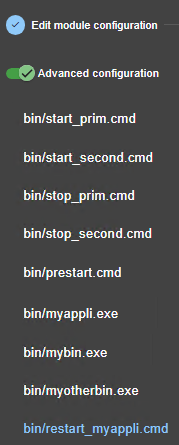

15.5 TCP checker example
Below is an example of the configuration of a TCP checker in a farm module. This checker tests the connection to the local web service on port 80. If the connection fails, the checker sets the resource tcp.Apache_80 to down. The associated failover rule, named t_Apache_80, executes a restart of the module when the resource goes down.
|
|
· The resource name prefix is tcp. · The failover rule name prefix is t_ · The suffix is the value of the attribute ident |
For a description of checkers, refer to section 13.10.3.
To test the TCP checker, refer to section 4.4.2 and section 4.4.3.
|
To start the module configuration wizard, refer to section 3.3. Switch to “Advanced configuration” to edit the XML if needed. |
<!DOCTYPE safe> <safe> <service mode="farm" boot="on"> <lan name="default"></lan> </farm> <interface_list> <interface check="on"> <virtual_interface type="vmac_directed"> <virtual_addr addr="10.1.0.127" where="alias" check="on"/> </virtual_interface> </interface> </interface_list>
<loadbalancing_list> <group name="FarmProto"> <rule port="80" proto="tcp" filter="on_addr"/> </group> </loadbalancing_list> </vip>
<check> <tcp ident="Apache_80" when="both" action="restart"> <to addr="localhost" port="80"/> </tcp> </check> </service> </safe> For details on XML configuration of <tcp>, see section 13.11. |
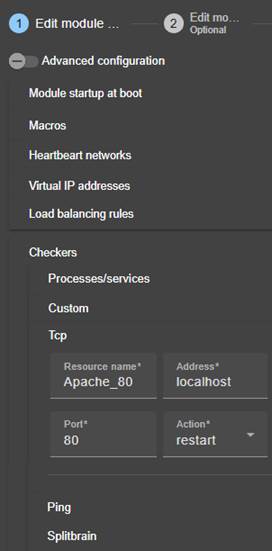

15.6 Ping checker example
Below is an example of the configuration of a ping checker in a mirror module. This checker tests that 192.168.1.1 responds to the ping. If the ping fails, the checker sets the resource ping.router to down. The associated failover rule, named p_router, executes a wait on the module when the resource goes down.
|
|
· The resource name prefix is ping. · The failover rule name prefix is p_ · The suffix is the value of the attribute ident |
For a description of checkers, refer to section 13.10.3.
To test the ping checker, refer to section 4.4.5.
|
To start the module configuration wizard, refer to section 3.3. Switch to “Advanced configuration” to edit the XML if needed. |
<!DOCTYPE safe> <safe> <service mode="mirror" boot="on"> <heart> <heartbeat name="default"> </heartbeat> </heart> <vip> <interface_list> <interface check="on"> <real_interface> <virtual_addr addr="10.1.0.126" where="one_side_alias" check="on"/> </real_interface> </interface> </interface_list> </vip> <rfs> <replicated dir="e:\repdir"/> </rfs> <user></user>
<ping ident="router" when="pre" action="wait"> <to addr="192.168.1.1"/> </ping> </check> </service> </safe> For details on XML configuration of <ping>, see section 13.12. |
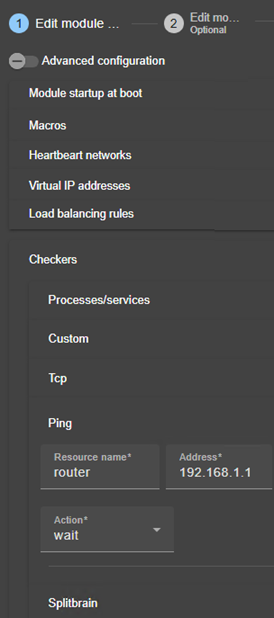

15.7 Custom checker example with customchecker.safe
The customchecker.safe module is a demonstration mirror module including a custom checker that tests the presence of a file on the primary server. This feature is also available in a farm module.
If the file is not present, the checker sets the resource custom.checkfile to down. The associated failover rule, named c_checkfile, executes a restart of the module when the resource goes down.
|
|
· The resource name prefix is custom. · The failover rule name prefix is c_ · The suffix is the value of the attribute ident |
The customchecker.safe is delivered with the SafeKit package and can be used as a basis for writing your own checker.
For a description of checkers, refer to section 13.10.3.
To test the custom checker, refer to section 4.4.7 and section 4.4.8.
|
|
The following description is for Windows. For Linux, please refer to customchecker.safe delivered with the Linux package that includes Linux configuration and scripts. |
15.7.1 Module configuration with custom checker
The following example is the custom checker configuration supported since SafeKit 8 with the attribute action.
|
To start the module configuration wizard, refer to section 3.3. Switch to “Advanced configuration” to edit the XML if needed. |
<!DOCTYPE safe> <safe> <service mode="mirror" boot="on"> <heart> <heartbeat name="default"> </heartbeat> </heart> <vip> <interface_list> <interface check="on"> <real_interface> <virtual_addr addr="10.1.0.126" where="one_side_alias" check="on"/> </real_interface> </interface> </interface_list> </vip> <rfs> <replicated dir="e:\repdir"/> </rfs> <user></user> <custom ident="checkfile" exec="checker.ps1" arg="c:\safekit\checkfile" when="prim" action="restart"/> </check> </service> </safe> For details on XML configuration of <custom>, see section 13.15. |
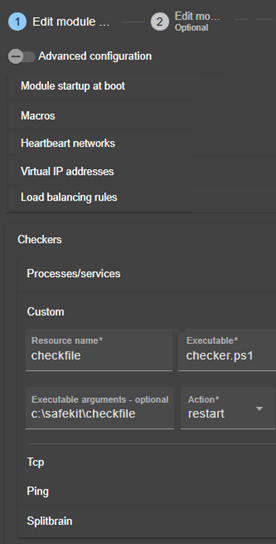

The custom checker configuration for SafeKit < 8 is still supported. In previous releases, the custom checker configuration required to define an explicit failover rule in userconfig.xml as follow:
<custom ident="checkfile" exec="checker.ps1" arg="c:\safekit\checkfile" when="prim"/>
</check>
<failover>
<![CDATA[
c_checkfile: if( custom.checkfile == down ) then restart();
]]>
</failover>
…
Attribute action is not defined and its value, by default, is noaction.
The module configuration wizard do not present the failover section. You must switch to “Advanced configuration” to edit it.
15.7.2 Advanced configuration of module checker script
The custom checker is an infinite loop that performs a test and assigns the associated resource as up or down based on the test result.
The checker is called with at least 2 arguments:
· The 1st argument is the module name
· The 2nd is the name of the resource to be assigned
If the <custom> configuration contains the arg attribute, its value is passed as the next arguments.
In the following example, the checker is written with the following precautions:
· The resource is only assigned if its value has changed
· When the resource is down, the checker consolidates this state (grace times) before assigning it. This can help to avoid false error detections.
|
Switch to “Advanced configuration” to list and edit all scripts. |
# Custom checker template that tests if a file exists
param([Parameter(Mandatory = $true, ValueFromPipeLine = $true, position=1)][String]$ModName, [Parameter(Mandatory = $true, ValueFromPipeLine = $true, position=2)][String]$RName, [Parameter(Mandatory = $true, ValueFromPipeLine = $true, position=3)][String]$Arg1Value, [Parameter(Mandatory = $false, ValueFromPipeLine = $false, position=4)][String]$Grace="2", [Parameter(Mandatory = $false, ValueFromPipeLine = $false, position=5)][String] $Period="5" ) # return up on success | down on failure Function test([String]$Arg1Value) { $res="down" if (Test-Path "$Arg1Value"){ $res="up" } return $res }
$customchecker=$MyInvocation.MyCommand.Name $safekit="$env:SAFE/safekit.exe" $gracecount=0 $prevrstate="unknown" # wait a little Start-Sleep $Period
while ($true){ Start-Sleep $Period $rstate = test($Arg1Value) if($rstate -eq "down"){ $gracecount+=1 }else{ $gracecount = 0 if($prevrstate -ne $rstate){ & $safekit set -r "$RName" -v $rstate -i $customchecker -m $ModName $prevrstate = $rstate } } if($gracecount -ge $Grace){ if($prevrstate -ne $rstate){ & $safekit set -r "$RName" -v $rstate -i $customchecker -m $ModName $prevrstate = $rstate } $gracecount = 0 } } Note the call to safekit set -r custom.checkfile -v up (or down) to assign the resource value. Refer to section 9.3 for the description of this command. |
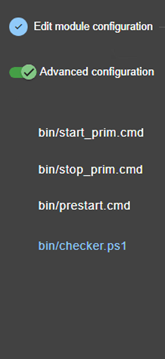

15.8 Split-brain checker example
Below is an example of the split-brain checker configuration in a mirror module. This feature is not also available in a farm module
This checker tests if the address 192.168.1.1 responds to the ping. If the ping fails, the checker sets the splitbrain.witness
resource to down.
In case of network isolation between nodes, the split-brain checker assigns the
splitbrain.uptodate
resource as up or down according to access to the witness. The static and predefined
failover rule, named splitbrain_failure, executes a wait on the module when this resource goes down. This ensures
that only the node with access to the witness becomes ALONE, while the
other is stuck in the WAIT state.
|
|
· The resource name prefix is splitbrain. · The suffix is the value of the attribute ident · The failover rule is static and predefined, and tests the other resource managed by the split-brain checker, splitbrain.uptodate. Its name is splitbrain_failure. |
|
To start the module configuration wizard, refer to section 3.3. Switch to “Advanced configuration” to edit the XML if needed. |
<!DOCTYPE safe> <safe> <service mode="mirror" boot="on"> <heart> <heartbeat name="default"> </heartbeat> </heart> <vip> <interface_list> <interface check="on"> <real_interface> <virtual_addr addr="10.1.0.126" where="one_side_alias" check="on"/> </real_interface> </interface> </interface_list> </vip> <rfs> <replicated dir="e:\repdir"/> </rfs> <user></user>
<check> <splitbrain ident="witness" exec="ping" arg="10.1.0.112"/> </check> </check> </service> </safe> For details on XML configuration of <splitbrain>, see section 13.17. |
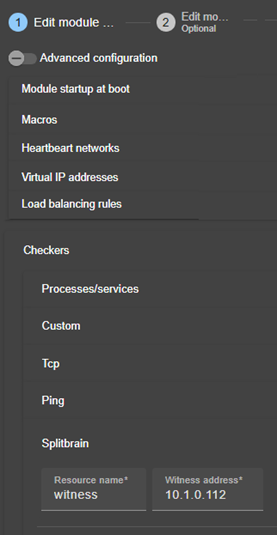
15.9 Module checker examples
15.9.1 Example of a farm module depending on a mirror module
Below is an example of the configuration of a module checker in a farm module. This checker tests that the module name mirror with virtual IP address 10.0.0.129 is ready (ALONE or PRIM). If it is not ready, the checker sets the resource module.mirror_10.0.0.129 to down. The static and predefined failover rule, named module_failure, executes a wait on the farm module when this resource goes down.
|
|
· The resource name prefix is module. · The suffix is the value of the attribute name and addr · The failover rule is static and predefined, and is named module_failure |
For a description of checkers, refer to section 13.10.3.
To test the module checker, refer to section 4.4.6.
|
To start the module configuration wizard, refer to section 3.3. The wizard do not present the module checker. Switch to “Advanced configuration” to configure it. |
<!DOCTYPE safe> <safe> <service mode="farm" boot="on"> <farm> <lan name="default"></lan> </farm> <vip> <interface_list> <interface check="on"> <virtual_interface type="vmac_directed"> <virtual_addr addr="10.1.0.127" where="alias" check="on"/> </virtual_interface> </interface> </interface_list>
<loadbalancing_list> <group name="FarmProto"> <rule port="9010" proto="tcp" filter="on_port"/> </group> </loadbalancing_list> </vip>
<check> <module name="mirror"> <to addr="10.0.0.129" port="9010"/> </module> </check>
</service> </safe> For details on XML configuration of <module>, see section 13.16. |
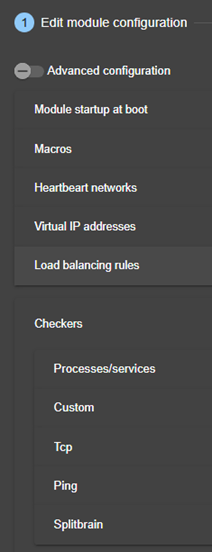

|
|
Note that the module dependency can be used when you deploy farm and mirror modules on the same SafeKit cluster or when you deploy farm and mirror modules on two different clusters. In this case, the password set to initialize the web service must be identical on both SafeKit clusters. |
15.9.2 Example with leader.safe and follower.safe
This example describes the two application modules leader.safe and follower.safe delivered with SafeKit:
· The leader module defines shared SafeKit resources between followers like virtual IP addresses and replicated directories
· The follower modules contain individual start and stop of several applications that are then isolated in different modules. Each follower module can be started and stopped independently without stopping the other modules.
The leader module is configured for a mirror architecture. It also includes the start and stop of the follower modules.
Each follower module is configured for a light architecture with module scripts and error detectors. The follower modules depend on the leader failover with the following module checker.
follower/conf/userconfig.xml - see section 13
<check>
<module name="leader"/>
</check>
This is a shortcut for:
<module name="leader">
<to addr="127.0.0.1" port="9010"/>
</module>
For details on XML configuration of <module>, see section 13.16.
|
|
If you change the listening port for the SafeKit web service (as described in section 10.7), replace the short configuration with the full one and change the port value. |
15.10 Interface checker example
Below is the example of an interface checker configuration automatically generated when <interface check="on"> is set. For details, refer to section 13.5.
In the userconfig.xml of the mirror module for instance, the virtual IP address is defined as follows:
<interface_list>
<interface check="on">
<real_interface>
<virtual_addr addr="10.0.0.129" where="one_side_alias" check="on"/>
</real_interface>
</interface>
</interface_list>
</vip>
When configuring the module, SafeKit generates the corresponding configuration for the interface checker. For the example, the automatically generated configuration is:
<check>
<intf when="pre" ident="10.0.0.0">
<to local_addr="10.0.0.107"/>
</intf>
</check>
Where the value of ident is the network corresponding to the virtual IP address; the value of local_addr is the first IP address of the network corresponding to the virtual address.
The checker checks that the Ethernet cable is connected on this interface. If the cable is disconnected, the checker set the associated resource intf.10.0.0.0 to down. The static and predefined failover rule, named interface_failure, executes a wait on the module when this resource goes down.
|
|
· The resource name prefix is intf. · The suffix is the value of the attribute ident · The failover rule is static and predefined, and is named interface_failure |
For configuration details of interface checker, see section 13.13.
For a description of checkers, refer to section 13.10.3.
To test the interface checker, refer to section 4.4.4.
15.11 IP checker example
Below is the example of an IP checker configuration automatically generated when <virtual_addr … check="on"> is set. For details, refer to section 13.5.
In the userconfig.xml of the mirror module for instance, the virtual IP address is defined as follows:
<interface_list>
<interface check="on">
<real_interface>
<virtual_addr addr="10.0.0.129" where="one_side_alias" check="on"/>
</real_interface>
</interface>
</interface_list>
</vip>
When configuring the module, SafeKit generates the corresponding configuration for the IP checker. For the example, the automatically generated configuration is:
<ip ident="10.0.0.129" when="prim">
<to addr="10.0.0.129"/>
</ip>
</check>
Where the value of ident and addr are the the virtual IP address ; the value of when is prim for a mirror module, and both for a farm module.
The IP checker checks that the IP address is configured locally. If the IP address is not configured, the checker set the associated resource ip.10.0.0.129 to down. The static and predefined failover rule, named ip_failure, executes a stopstart on the module when this resource goes down.
|
|
· The resource name prefix is ip. · The suffix is the value of the attribute ident · The failover rule is static and predefined, and is named ip_failure |
For configuration details of IP checker, see section 13.14.
For a description of checkers, refer to section 13.10.3.
15.12 Mail notification example with notification.safe
The notification.safe
module is a mirror demonstration module for sending notification on main module
state changes. The following example is for sending an e-mail, but you can
replace it by any other notification mechanism. In Windows, it uses the Send-MailMessage from the Microsoft PowerShell Utility. In Linux, it uses the mail command.
|
|
The following description is for Windows. For Linux, please refer to notification.safe delivered with the Linux package that includes Linux configuration and scripts. |
15.12.1 Notification on the start of the module
The prestart script sends an e-mail with the name of the module and server on which the module is started.
|
Switch to “Advanced configuration” to list and edit all scripts. |
# Script called on module start for stopping applications # before setting SafeKit resources echo "Running prestart $args"
try{ $sub = (Get-Item env:SAFEUSERBIN).Value $safebin = (Get-Item env:SAFEBIN).Value $module = (Get-Item env:SAFEMODULE).Value $action = $args[2] $retval = 0 $hostname=(Get-Item env:computername).Value
if ( $action -eq "start" ) { echo "*** Start of module $module on $hostname" # insert here your notification: the module is starting # Send-MailMessage -From 'SafeKit' -To 'admin@mydomain.com' -Subject 'Start of module $module on $hostname' -Body 'Running prestart' }
#graceful stop if (Test-Path -Path "$sub/stop_second.*") { & "$sub/stop_second" } if (Test-Path -Path "$sub/stop_prim.*") { & "$sub/stop_prim" } if (Test-Path -Path "$sub/stop_both.*") { & "$sub/stop_both" }
#force stop if (Test-Path -Path "$sub/stop_second.*") { & "$sub/stop_second" force } if (Test-Path -Path "$sub/stop_prim.*") { & "$sub/stop_prim" force } if (Test-Path -Path "$sub/stop_both.*") { & "$sub/stop_both" force }
}catch{ $retval=-1 }finally{ echo "prestart exit ($retval)" exit $retval } Note that the graceful stop and force stop parts, are the standard content of the prestart script. |
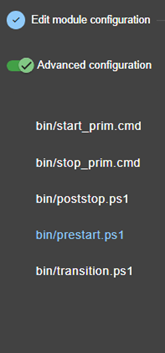

15.12.2 Notification on the stop of the module
When the module stops, it can send a notification via the poststop script. This is not provided by default.
|
Switch to “Advanced configuration” to list and edit all scripts. |
# Script called on module stop # after resetting SafeKit resources echo "Running poststop $args"
try{ $module = (Get-Item env:SAFEMODULE).Value $hostname=(Get-Item env:computername).Value $action = $args[2] $retval = 0 if ( $action -eq "stop" ) { echo "*** Stop of module $module on $hostname" # insert here your notification: the module is stopping # Send-MailMessage -From 'SafeKit' -To 'admin@mydomain.com' -Subject 'Stop of module $module on $hostname' -Body 'Running poststop' }
}catch{ $retval=-1 }finally{ echo "poststop exit ($retval)" exit $retval } |
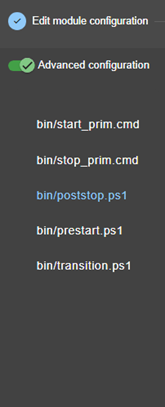

15.12.3 Notification on module state changes
The module script transition can be used to send an e-mail on main local state transitions of the module. For instance, it may be useful to know when the mirror module is going ALONE (on failover for instance). The script transition is not delivered by default and can be created as follow.
|
Switch to “Advanced configuration” to list and edit all scripts. |
# Script called on module state change echo "Running transition $args"
try{ $module = (Get-Item env:SAFEMODULE).Value $hostname=(Get-Item env:computername).Value $from = $args[0] $to = $args[1] $retval = 0
if ( $from -eq "WAIT" -and $to -eq "ALONE" ) { echo "*** Start ALONE of $module on $hostname" # insert here your notification: the module is starting as ALONE # Send-MailMessage -From 'SafeKit' -To 'admin@mydomain.com' -Subject 'Start ALONE of module $module on $hostname' -Body 'Running prestart' } if ( $from -eq "WAIT" -and $to -eq "PRIM" ) { echo "*** Start PRIM of $module on $hostname" # insert here your notification: the module is starting as PRIM # Send-MailMessage -From 'SafeKit' -To 'admin@mydomain.com' -Subject 'Start PRIM of module $module on $hostname' -Body 'Running prestart' } if ( $from -eq "WAIT" -and $to -eq "SECOND" ) { echo "*** Start SECOND of $module on $hostname" # insert here your notification: the module is starting as SECOND # Send-MailMessage -From 'SafeKit' -To 'admin@mydomain.com' -Subject 'Start SECOND of module $module on $hostname' -Body 'Running prestart' } if ( $from -ne "WAIT" -and $to -eq "ALONE" ) { echo "*** Go ALONE of module $module on $hostname" # insert here your notification: the module is going ALONE # Send-MailMessage -From 'SafeKit' -To 'admin@mydomain.com' -Subject 'Go ALONE of module $module on $hostname' -Body 'Running prestart' } if ( $from -ne "WAIT" -and $to -eq "PRIM" ) { echo "*** Go PRIM of module $module on $hostname" # insert here your notification: the module is going PRIM # Send-MailMessage -From 'SafeKit' -To 'admin@mydomain.com' -Subject 'Go PRIM of module $module on $hostname' -Body 'Running prestart' } if ( $from -ne "WAIT" -and $to -eq "SECOND" ) { echo "*** Go SECOND of module $module on $hostname" # insert here your notification: the module is going SECOND # Send-MailMessage -From 'SafeKit' -To 'admin@mydomain.com' -Subject 'Go SECOND of module $module on $hostname' -Body 'Running prestart' } }catch{ $retval=-1 }finally{ echo "transition exit ($retval)" exit $retval } For a farm module, change the state values. |


15.13 Virtual hostname example with vhost.safe
The demonstration module vhost.safe shows how to set a virtual hostname in a mirror module. This feature is also available in a farm module.
|
|
The following description is for Windows. For Linux, please refer to vhost.safe delivered with the Linux package that includes Linux configuration and scripts. |
15.13.1 Module configuration with a virtual hostname
In the following example, one <macro> is configured and its value is used to define the virtual hostname.
|
To start the module configuration wizard, refer to section 3.3. The wizard do not present the vhost. Switch to “Advanced configuration” to edit it. |
<!DOCTYPE safe> <safe> <macro name="virtualname" value="virtualsrv"/>
<service mode="mirror" boot="on"> <heart> <heartbeat name="default"> </heartbeat> </heart> <vip> <interface_list> <interface check="on"> <real_interface> <virtual_addr addr="10.1.0.126" where="one_side_alias" check="on"/> </real_interface> </interface> </interface_list> </vip> <rfs> <replicated dir="e:\repdir"/> </rfs> <user></user> <vhost> <virtualhostname name="%virtualname%" envfile="vhostenv.cmd"/> </vhost> </service> </safe> For details on XML configuration of <vhost>, see section 13.8. |
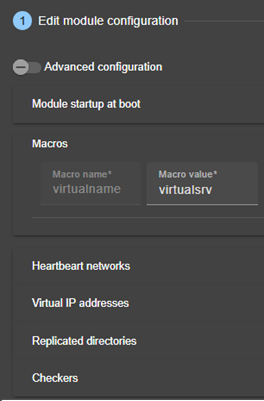

15.13.2 Module scripts with a virtual hostname
In addition to the module configuration, special commands must be executed in the module scripts.
For details on script logging (with echo and safekit printe commands), refer to section 14.3.
15.13.2.1 start_prim script
The script runs commands to set the virtual hostname in the script environment, as well as in the Windows service environment.
|
|
@echo off echo "Running start_prim %*"
rem Set virtual hostname CALL "%SAFEUSERBIN%\vhostenv.cmd"
rem Next commands use the virtual hostname FOR /F %%x IN ('hostname') DO SET servername=%%x echo "hostname is "%servername%
rem WARNING: previous virtual hostname setting is insufficient to change the hostname for services rem If one service needs the virtual hostname, you need also to uncomment the rem following
rem "%SAFE%\private\bin\vhostservice" SERVICE_TO_BE_DEFINED
set res=0
rem net start "myservice"
set res=%errorlevel% if %res% == 0 goto end
:stop "%SAFE%\safekit" printe "start_prim failed"
rem uncomment to stop the module when critical rem "%SAFE%\safekit" stop -i "start_prim"
:end For safekit command description, refer to section 9. |

15.13.2.2 stop_prim script
The script runs commands to reset the virtual hostname in the script environment, as well as in the Windows service environment.
|
|
@echo off echo "Running stop_prim %*"
rem Reset virtual hostname CALL "%SAFEUSERBIN%\vhostenv.cmd"
rem Next commands use the real hostname FOR /F %%x IN ('hostname') DO SET servername=%%x echo "hostname is "%servername%
set res=0
rem default: no action on forcestop if "%1" == "force" goto end
rem net stop "myservice" /Y set res=%errorlevel%
rem If necessary, wait for the stop of the services rem "%SAFEBIN%\sleep" 10
if %res% == 0 goto end
"%SAFE%\safekit" printe "stop_prim failed"
:end rem WARNING: if the virtual hostname was set for services in start_prim.cmd, rem uncomment the following to restore the real hostname in last stop phase :
rem "%SAFE%\private\bin\vhostservice" SERVICE_TO_BE_DEFINED For safekit command description, refer to section 9. |
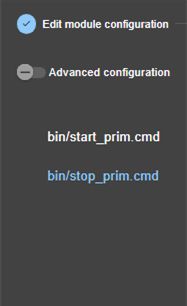
16. SafeKit cluster in the cloud
![]() Section 16.1 “SafeKit cluster in Amazon AWS”
Section 16.1 “SafeKit cluster in Amazon AWS”
![]() Section 16.2 “SafeKit cluster in Microsoft Azure”
Section 16.2 “SafeKit cluster in Microsoft Azure”
![]() Section 16.3 “SafeKit cluster in Google GCP”
Section 16.3 “SafeKit cluster in Google GCP”
You can install, configure, and administer SafeKit modules that run on virtual servers in the cloud instead of on-premises physical servers. This requires a minimum of cloud and/or server settings, especially to implement the virtual IP address.
16.1 SafeKit cluster in Amazon AWS
In the following, we suppose that you are familiar with:
· Amazon Elastic Compute Cloud (Amazon EC2) that offers computing capacity in the Amazon Web Services (AWS) cloud. For more information about the features of Amazon EC2, see the Amazon EC2 product page.
· AWS CloudFormation that helps deploying instances and applications on Amazon EC2. It permits to save a lot of time and effort so that you can spend less time managing EC2 resources and more time focusing on your applications that run in AWS.
Before implementing a SafeKit module, the administrator must :
1. Create instances (2 for a mirror module)
2. Make settings for AWS, instances, and SafeKit.
3. Then, apply specific settings for implementing your SafeKit module.
AWS settings
You must set AWS to:
· associate public addresses to each instance if you want to administer them with the SafeKit web console from the internet
· configure the security groups associated with network(s) to enable the communications of the SafeKit framework and the SafeKit web console. The ports to open are described in section 10.3.3.2
· use a high-bandwidth, low-latency network if real-time replication is used in a mirror module
Virtual machine settings
In each instance, you must also:
· apply the HTTPS configuration to secure the SafeKit web console (described in section 11)
SafeKit settings
Finally, you must enter the SafeKit cluster configuration and apply it to all nodes (for details on cluster configuration, see section 12). For example, the SafeKit cluster configuration file would be:
<cluster>
<lans>
<lan name="default">
<node name="Server1" addr="10.0.11.10"/>
<node name="Server2" addr="10.0.12.10"/>
</lan>
</lans>
</cluster>
The default lan is used for SafeKit framework communications between cluster nodes.
16.1.1 Mirror cluster in AWS
Mirror module features are operational in the AWS cloud (real-time file replication, failover, process death detection, checkers, …), except the virtual IP address failover. Anyway, you can set up a SafeKit mirror module on the cluster and use the Elastic load balancing provided by AWS (see Elastic load balancing products in AWS) in such way that all the traffic is routed only to the primary node. An IP address and/or DNS name is associated with the load balancer that plays the role of the virtual IP.
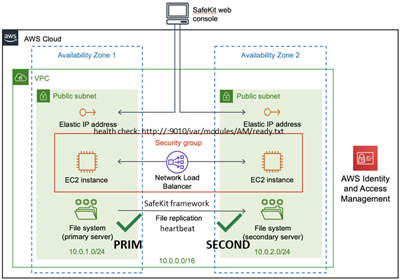
You must configure yourself the AWS load balancer and the security group.
For the load balancer, you must:
· specify the rules for your application
· set the SafeKit cluster nodes in the target group
· configure the health check. It tests whether the instance is in a healthy state or an unhealthy state.
The load-balancer routes the traffic only to healthy instances. It resumes routing requests to the instance when this one has been restored to a healthy state.
SafeKit provides a health checker for SafeKit modules. For this, configure it in the load balancer with:
· HTTP protocol
· port 9010, the SafeKit web service port
· URL /var/modules/AM/ready.txt, where AM is the module name
In a mirror module, the health checker:
·
returns OK, that means that
the instance is healthy, when the module state is
![]() PRIM (Ready) or
PRIM (Ready) or ![]() ALONE (Ready)
ALONE (Ready)
· returns NOT FOUND, that means that the instance is out of service, in all other states
The AWS network security group must be at least configured to enable communications for the following protocols and ports:
· UDP - 4800 for the safeadmin service (between SafeKit cluster nodes)
· UDP - 8888 for the module heartbeat (between SafeKit cluster nodes)
· TCP - 5600 for the module real time file replication (between SafeKit nodes)
· TCP - 9010 for the load-balancer health check and the SafeKit web console in HTTP
· TCP - 9453 for the SafeKit web console in HTTPS
· TCP - 9001 for configuring the SafeKit web console for HTTPS
|
|
The module’s port value depends on the module id (for details, see section 10.3.3.2).The previous values are the one for the first module installed on the node. |
16.1.2 Farm cluster in AWS
Most farm module features are operational in the AWS cloud (process death detection, checkers), except the virtual IP address with load balancing . Anyway, you can set up a SafeKit farm module on the cluster and use the Elastic load balancing provided by AWS (see Elastic load balancing products in AWS). An IP address and/or DNS name is associated with the load balancer that plays the role of the virtual IP.
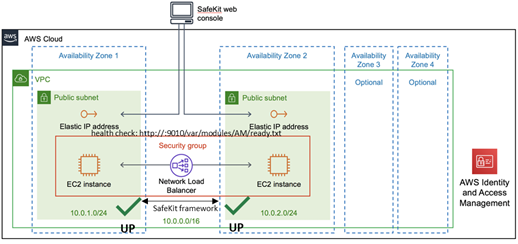
You must configure yourself the AWS load balancer and the security group.
For the load balancer, you must:
· specify the rules for your application
· set the SafeKit cluster nodes in the target group
· configure the health check. These tests whether the instance is in a healthy state or an unhealthy state.
The load-balancer routes the traffic only to healthy instances. It resumes routing requests to the instance when this one has been restored to a healthy state.
SafeKit provides a health check for SafeKit modules. For this, configure it in the load balancer with:
· HTTP protocol
· port 9010, the SafeKit web service port
· URL /var/modules/AM/ready.txt, where AM is the module name
In a farm module, the health check:
·
returns OK, that means that
the instance is healthy, when the module state ![]() UP (Ready)
UP (Ready)
· returns NOT FOUND, that means that the instance is out of service, in all other states
The AWS network security group must be at least configured to enable communications for the following protocols and ports:
· UDP - 4800 for the safeadmin service (between SafeKit cluster nodes)
· TCP - 9010 for the load-balancer health check and the SafeKit web console in HTTP
· TCP - 9453 for the SafeKit web console in HTTPS
· TCP - 9001 for configuring the SafeKit web console for HTTPS
16.2 SafeKit cluster in Microsoft Azure
In the following, we suppose that you are familiar with Microsoft Azure that is a cloud computing service created by Microsoft for building, testing, deploying, and managing applications and services through a global network of Microsoft-managed data centers. For more information about the features and use of Azure, see the Microsoft Azure portal.
Before implementing a SafeKit module, the administrator must :
1. Create virtual machines (2 for a mirror module)
2. Make settings for Azure, virtual machines, and SafeKit.
3. Then, apply specific settings for implementing your SafeKit module.
Azure settings
You must set Azure to:
· associate public IP addresses and DNS name to virtual machines if you want to administer them with the SafeKit web console from the internet
· configure the network security group to enable the communications of the SafeKit framework and the SafeKit web console. The ports to open are described in section 10.3.3.2
· use a high-bandwidth, low-latency network if real-time replication is used in a mirror module
Virtual machine settings
On each virtual machine, you must also:
· install the SafeKit package
· apply the HTTPS configuration to secure the SafeKit web console (described in section 11)
SafeKit settings
Finally, you must enter the SafeKit cluster configuration and apply it to all nodes (for details on cluster configuration, see section 12). For example, the SafeKit cluster configuration file would be:
<lans>
<lan name="default">
<node name="Server1" addr="10.0.0.10"/>
<node name="Server2" addr="10.0.0.11"/>
</lan>
</lans>
</cluster>
The default lan is used for SafeKit framework communications between cluster nodes.
16.2.1 Mirror cluster in Azure
Mirror module features are operational in the Azure cloud (real-time file replication, failover, process death detection, checkers, …) except the virtual IP address failover. Anyway, you can set up a SafeKit mirror module on the cluster and use the load balancing provided by Azure (see Load Balancer in Azure) and route request only to the primary node. An IP is associated with the load balancer that plays the role of the virtual IP.
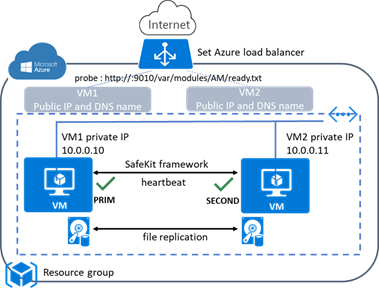
You must configure yourself the Azure load balancer and the network security group.
For the load balancer, you must:
· specify the rules for your application
· set the SafeKit cluster nodes into the backend pool
· configure the probe. It tests whether the instance is in a healthy state or an unhealthy state.
The load balancer routes traffic only to healthy instances. It resumes routing requests to the instance when the instance has been restored to a healthy state.
SafeKit provides a probe for SafeKit modules. For this, configure the probe in the load balancer with:
· HTTP protocol
· port 9010, the SafeKit web service port
· URL /var/modules/AM/ready.txt, where AM is the module name
In a mirror module, the probe:
·
returns OK, that means that
the instance is healthy, when the module state is
![]() PRIM (Ready) or
PRIM (Ready) or ![]() ALONE (Ready)
ALONE (Ready)
· returns NOT FOUND, that means that the instance is out of service, in all other states
The Azure network security group must be at least configured to enable communications for the following protocols and ports:
· UDP - 4800 for the safeadmin service (between SafeKit cluster nodes)
· UDP - 8888 for the module heartbeat (between SafeKit cluster nodes)
· TCP - 5600 for the module real time file replication (between SafeKit nodes)
· TCP - 9010 for the load-balancer health check and the SafeKit web console in HTTP
· TCP - 9453 for the SafeKit web console in HTTPS
· TCP - 9001 for configuring the SafeKit web console for HTTPS
|
|
The module’s port value depends on the module id (for details, see section 10.3.3.2).The previous values are the one for the first module installed on the node. |
16.2.2 Farm cluster in Azure
Most farm module features are operational in the Azure cloud (process death detection, checkers), except the virtual IP address with load balancing . Anyway, you can set up a SafeKit farm module on the cluster and use the load balancing provided by Azure (see Load Balancer in Azure). An IP is associated with the load balancer that plays the role of the virtual IP.
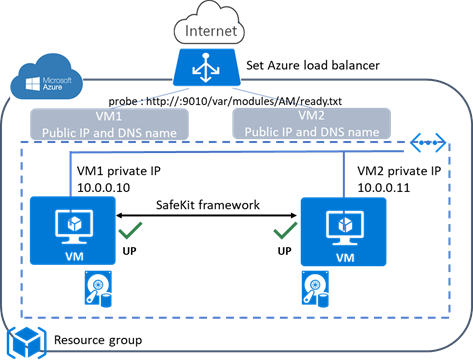
You must configure yourself the Azure load balancer and the network security group.
For the load balancer, you must:
· specify the rules for your application
· set the SafeKit cluster nodes as backend
· configure the probe. It tests whether the instance is in a healthy state or an unhealthy state.
The load balancer routes traffic only to healthy instances. It resumes routing requests to the instance when the instance has been restored to a healthy state.
SafeKit provides a probe for SafeKit modules. For this, configure the probe in the load balancer with:
· HTTP protocol
· port 9010, the SafeKit web service port
· URL /var/modules/AM/ready.txt, where AM is the module name
In a farm module, the probe:
·
returns OK, that means that
the instance is healthy, when the farm module state is ![]() UP (Ready)
UP (Ready)
· returns NOT FOUND, that means that the instance is out of service, in all other states
The Azure network security group must be at least configured to enable communications for the following protocols and ports:
· UDP - 4800 for the safeadmin service (between SafeKit cluster nodes)
· TCP - 9010 for the load-balancer health check and the SafeKit web console in HTTP
· TCP - 9453 for the SafeKit web console in HTTPS
· TCP - 9001 for configuring the SafeKit web console for HTTPS
16.3 SafeKit cluster in Google GCP
In the following, we suppose that you are familiar with Google Cloud Platform (GCP) that delivers virtual machines running in Google's innovative data centers and worldwide fiber network. For more information about the features and use of Google Cloud Platform, see the Google Cloud Computing documentation.
Before implementing a SafeKit module, the administrator must :
1. Create virtual machines (2 for a mirror module)
2. Make settings for Google Compute Engine (GCP), virtual machines, and SafeKit.
3. Then, apply specific settings for implementing your SafeKit module.
GCP settings
You must set GCP to:
· associate an external IP address (and optionally DNS name) to each virtual machine instance if you want to administer them with the SafeKit web console from the internet
· configure the firewall rules for the Virtual Private Cloud (VPC) network to enable the communications of the SafeKit framework and the SafeKit web console. The ports to open are described in section 10.3.3.2
· use a high-bandwidth, low-latency network if real-time replication is used in a mirror module
Virtual machine settings
On each virtual machine, you must also:
· install the SafeKit package
· apply the HTTPS configuration to secure the SafeKit web console (described in section 11)
SafeKit settings
Finally, you must enter the SafeKit cluster configuration and apply it to all nodes (for details on cluster configuration, see section 12. For example, the SafeKit cluster configuration file would be:
<cluster>
<lans>
<lan name="default">
<node name=" Inst1" addr="10.132.0.4"/>
<node name=" Inst2" addr="10.32.0.6"/>
</lan>
</lans>
</cluster>
The default lan is used for SafeKit framework communications between cluster nodes.
16.3.1 Mirror cluster in GCP
Mirror module features are operational in the Google Cloud Platform (real-time file replication, failover, process death detection, checkers, …) except the virtual IP address failover. Anyway, you can set up a SafeKit mirror module on the cluster and use the load balancing provided by GCP (see Load Balancer in GCP) and route request only to the primary node. An IP is associated with the load balancer that plays the role of the virtual IP.

You must configure yourself the Google load balancer and the network firewall.
For the load balancer, you must:
· specify the rules for your application
· set the SafeKit cluster nodes as backend
· configure the health check. It tests whether the instance is in a healthy state or an unhealthy state.
The load balancer routes traffic only to healthy instances. It resumes routing requests to the instance when the instance has been restored to a healthy state.
SafeKit provides a health check for SafeKit modules. For this, configure the health check in the load balancer with:
· HTTP protocol
· port 9010, the SafeKit web service port
· URL /var/modules/AM/ready.txt, where AM is the module name
In a mirror module, the health check:
·
returns OK, that means that
the instance is healthy, when the module state
![]() PRIM (Ready) or
PRIM (Ready) or ![]() ALONE (Ready)
ALONE (Ready)
· returns NOT FOUND, that means that the instance is unhealthy, in all other states
The network firewall must be at least configured to enable communications for the following protocols and ports:
· UDP - 4800 for the safeadmin service (between SafeKit cluster nodes)
· UDP - 8888 for the module heartbeat (between SafeKit cluster nodes)
· TCP - 5600 for the module real time file replication (between SafeKit nodes)
· TCP - 9010 for the load-balancer health check and the SafeKit web console in HTTP
· TCP - 9453 for the SafeKit web console in HTTPS
· TCP - 9001 for configuring the SafeKit web console for HTTPS
|
|
The module’s port value depends on the module id (for details, see section 10.3.3.2).The previous values are the one for the first module installed on the node. |
16.3.2 Farm cluster in GCP
Most farm module features are operational in the Google Cloud Platform (process death detection, checkers), except the virtual IP address with load balancing . Anyway, you can set up a SafeKit farm module on the cluster and use the load balancing provided by GCP (see Load Balancer in GCP). An IP is associated with the load balancer that plays the role of the virtual IP.
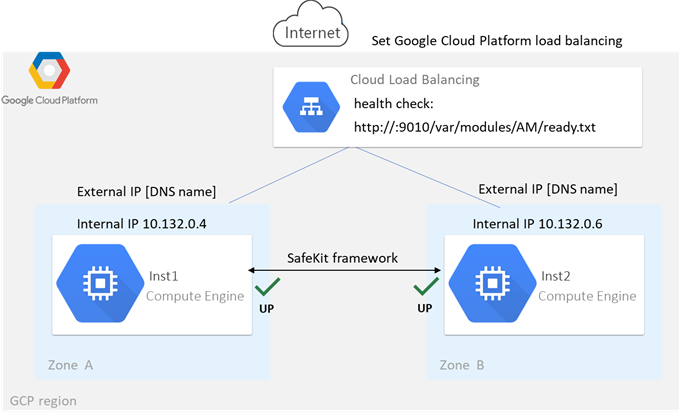
You must configure yourself the Google load balancer and the network firewall.
For the load balancer, you must:
· specify the rules for your application
· set the SafeKit cluster nodes as backend
· configure the health check. It tests whether the instance is in a healthy state or an unhealthy state.
The load balancer routes traffic only to healthy instances. It resumes routing requests to the instance when the instance has been restored to a healthy state.
SafeKit provides a health check for SafeKit modules. For this, configure the health check in the load balancer with:
· HTTP protocol
· port 9010, the SafeKit web service port
· URL /var/modules/AM/ready.txt, where AM is the module name
In a farm module, the health check:
·
returns OK, that means that
the instance is healthy, when the farm module state is ![]() UP (Ready)
UP (Ready)
· returns NOT FOUND, that means that the instance is out of service, in all other states
The network firewall must be at least configured to enable communications for the following protocols and ports:
· UDP - 4800 for the safeadmin service (between SafeKit cluster nodes)
· TCP - 9010 for the load-balancer health check and the SafeKit web console in HTTP
· TCP - 9453 for the SafeKit web console in HTTPS
· TCP - 9001 for configuring the SafeKit web console for HTTPS
17. Third-Party Software
SafeKit comes with the third-party software listed below.
For licenses details, refer to the links or the license files into the SAFE/licenses directory (SAFE=/opt/safekit in Linux and SAFE=C:\safekit in Windows if %SYSTEMDRIVE%=C:).
|
Packet Construction and Injection Libnet license - license Used for arpreroute and ping |
|
|
swagger-ui |
https://github.com/swagger-api/swagger-ui Apache2 License - https://github.com/swagger-api/swagger-ui/blob/master/LICENSE Swagger UI is a collection of HTML, JavaScript, and CSS assets that dynamically generate beautiful documentation from a Swagger-compliant API Used for to visualize the SafeKit API |
|
Sqlite3 |
https://www.sqlite.org/about.html Public Domain License - https://www.sqlite.org/copyright.html SQLite is an in-process library that implements a self-contained, serverless, zero-configuration, transactional SQL database engine Used by SafeKit framework |
And on Windows OS only :
|
libxml |
MIT license - http://www.xmlsoft.org/FAQ.html#License Used by the SafeKit framework |
|
libxslt |
MIT license - https://gitlab.gnome.org/GNOME/libxslt/blob/master/Copyright Used by the SafeKit framework |
|
Net-SNMP |
http://net-snmp.sourceforge.net BSD like and BSD license - http://www.net-snmp.org/about/license.html Used by SafeKit SNMP agent in Windows |
|
HTTP server |
Apache license - https://www.apache.org/licenses/LICENSE-2.0 Used by the SafeKit web service for the web console, the distributed commands, and the module checker |
|
APR |
Apache license - https://www.apache.org/licenses/LICENSE-2.0 Used by the Apache HTTP server |
|
PCRE |
BSD license - https://www.pcre.org/licence.txt Used by the Apache HTTP server |
|
libexpat |
https://github.com/libexpat/libexpat BSD license -https://github.com/libexpat/libexpat/blob/master/expat/COPYING Used by the Apache HTTP server |
|
mod_auth_openidc |
https://github.com/OpenIDC/mod_auth_openidc Apache2 License - https://github.com/OpenIDC/mod_auth_openidc/blob/master/LICENSE.txt mod_auth_openidc is an OpenID Certified™ authentication and authorization module for the Apache 2.x HTTP server that implements the OpenID Connect Relying Party Used by the Apache HTTP server |
|
cURL |
Curl license - https://github.com/curl/curl/blob/master/docs/LICENSE-MIXING.md Used by the distributed commands and the module checker |
|
dual OpenSSL and SSLeay license - https://www.openssl.org/source/license.html Used when securing the web console, the distributed commands, and the module checker |
|
|
MIT license - https://www.lua.org/license.html Used by SafeKit framework and the web service |
|
|
BSD like license - http://infozip.sourceforge.net/license.html Used to pack/unpack a .safe module |
SafeKit uses the following third-party packages for the SafeKit web console:
|
Angular |
MIT License - https://github.com/angular/angular-cli/blob/main/LICENSE Angular is an application-design framework and development platform for creating efficient and sophisticated single-section apps. @angular/animations, @angular/cdk, @angular/common, @angular/core, @angular/forms, @angular/material, @angular/material-moment-adapter, @angular/platform-browser, @angular/router |
|
jszip |
MIT OR GPL-3.0-or-later license - https://github.com/Stuk/jszip/blob/main/LICENSE.markdown A library for creating, reading, and editing .zip files with JavaScript, with a lovely and simple API. |
|
material-icons |
https://github.com/marella/material-icons Apache-2.0 license - https://github.com/marella/material-icons/blob/main/LICENSE |
|
moment |
https://github.com/urish/angular-moment#readme MIT license - https://github.com/urish/angular-moment?tab=MIT-1-ov-file |
|
ngx-logger |
https://github.com/dbfannin/ngx-logger#readme MIT license - https://github.com/dbfannin/ngx-logger?tab=MIT-1-ov-file NGX Logger is a simple logging module for angular |
|
rxjs |
https://github.com/ReactiveX/rxjs Apache2 License - https://github.com/ReactiveX/rxjs/blob/master/LICENSE.txt Reactive Extensions For JavaScript |
|
tslib |
https://www.typescriptlang.org/ 0BSD Copyright (c) Microsoft Corporation Runtime library for typescript |
|
vlq |
https://github.com/Rich-Harris/vlq/blob/master/README.md MIT license - https://github.com/Rich-Harris/vlq/blob/master/LICENSE Convert integers to a Base64-encoded VLQ string, and vice versa |
|
zone.js |
https://github.com/angular/zone.js MIT license - https://angular.io/license Implements Zones for JavaScript |
This list is available in file : safekit/web/htdcos/console//en/3rdpartylicenses.txt .
"Action forcestop called by admin@<IP>/SYSTEM/root", 119, 147
"Action prim called by admin@<IP>/SYSTEM/root",102, 147
"Action primforce called by SYSTEM/root", 109
"Action restart called by admin@<IP>/SYSTEM/root",78, 83, 119, 147
"Action restart|stopstart called by customscript", 95, 121, 147
"Action restart|stopstart called by errd", 89 , 121, 147
"Action restart|stopstart from failover rule tcp_failure", 90, 121, 147
"Action second called by admin@<IP>/SYSTEM/root", 102, 147
"Action shutdown called by SYSTEM", 80, 88, 147
"Action start called at boot time", 80, 80, 88
"Action start called automatically", 90, 95
"Action start called by admin@<IP>/SYSTEM/root", 77, 83, 119, 147
"Action stop called by admin@<IP>/SYSTEM/root", 77, 83, 119, 147
"Action stopstart called by failover-off", 106, 147
"Action stopstart called by modulecheck", 93, 147
"Action stopstart called by admin@<IP>/SYSTEM/root", 119, 147
"Action stopstart from failover rule customid_failure", 95, 121, 147
"Action wait from failover rule customid_failure", 94, 121
"Action wait from failover rule t_id", 90, 121
"Action wait from failover rule degraded_server", 105
"Action wait from failover rule interface_failure", 91, 121
"Action wait from failover rule module_failure", 93, 121
"Action wait from failover rule notuptodate_server", 104, 121
"Action wait from failover rule ping_failure", 92, 121
"Action wait from failover rule splitbrain_failure", 121
"Action alone called by heart : no heartbeat", 80
"Action alone called by heart : remote stop", 77, 80
File replication and reintegration messages
"Copied <reintegration statistics>", 79
"Data may be inconsistent for replicated directories (stopped during reintegration)", 109
"Data may not be uptodate for replicated directories (wait for the start of the remote server)", 102, 104, 121
"If you are sure that this server has valid data, run safekit prim to force start as primary", 102, 104, 121
"If you are sure that this server has valid data, run safekit primforce to force start as primary", 109
"Reintegration ended (synchronize)", 79
"Updating directory tree from /replicated", 79
Load-balancing messages
"farm load: 128/256 (group FarmProto_0)" , 113, 85, 86
"farm membership: node1 (group FarmProto_0)", 85, 86
"farm membership: node1 node2 (group FarmProto_0)" , 113, 85, 86
"farm membership: node2 (group FarmProto_0)", 86
"Local state ALONE Ready", 101, 77, 81
"Local state PRIM Ready", 101,77
"Local state SECOND Ready",101, 77
"Local state UP Ready",112 ,113
"Local state WAIT NotReady", 121, 106
"Remote state ALONE Ready", 101,81
"Remote state PRIM Ready", 101, 77
"Remote state SECOND Ready",101, 77
"Remote state UNKNOWN Unknown", 80, 81
"Resource custom.id set to down by customscript", 94, 121, 121
"Resource custom.id set to up by customscript", 94
"Resource heartbeat.0 set to down by heart", 80, 81
"Resource heartbeat.flow set to down by heart", 80, 81
"Resource intf.ip.0 set to down by intfcheck", 91, 121
"Resource intf.ip.0 set to up by intfcheck", 91
"Resource module.othermodule_ip set to down by modulecheck", 93, 121
"Resource module.othermodule_ip set to up by modulecheck", 93
"Resource ping.id set to down by pingcheck", 92, 121
"Resource ping.id set to up by pingcheck", 92
"Resource rfs.degraded set to up by nfsadmin", 105
"Resource tcp.id set to down by tcpcheck", 90, 90, 121, 121
"Resource tcp.id set to up by tcpcheck", 90
"Script start_prim", 277, 77, 80, 80
"Script stop_prim", 277, 77, 80, 81
"Script start_both", 277, 83, 88
"Transition RESTART|STOPSTART from failover rule customid_failure", 95
"Transition STOPSTART from failover-off", 106
"Transition SWAP from defaultprim", 108
"Transition WAIT_TR from failover rule customid_failure", 94
"Transition WAIT_TR from failover rule interface_failure", 91
"Action wakeup from failover rule Implicit_wakeup", 90, 91, 92, 93, 94
Other messages
"Process appli.exe not running", "Service mySQL not running", 89, 121
"Failover-off configured", 106
"Requested prim start aborted ", 109
"Split brain recovery: exiting alone", 81
"Split brain recovery: staying alone", 81
"Action stop called by maxloop", 122, 89, 90, 91, 92, 93, 94, 95, 121
"Virtual IP <ip 1.10 of mirror> set", 78
"Virtual IP <ip1.20 of farm> set", 83
|
Architectures mirror, farm… - 15 cloud - 321
Installation install, upgrade… - 29
Console configuration, monitoring- 41 securing (https, …) - 177
Advanced Configuration cluster.xml - 203 userconfig.xml - 209 module scripts - 277 examples - 285
Administration mirror - 99 farm - 111 advanced - 157 command line - 143
Support tests - 73 troubleshooting - 115 call desk - 135 log messages - 337
Other table of contents - 5 third-party software - 333 |